> ## Documentation Index
> Fetch the complete documentation index at: https://docs.airmdr.com/llms.txt
> Use this file to discover all available pages before exploring further.
# Amazon Web Services
> AirMDR integrates with Amazon Web Services (AWS) to ingest security data and automate enrichment using AWS services like GuardDuty, CloudTrail, EC2, and IAM. This guide helps you set up the required AWS integration with appropriate access permissions.
## Overview
AirMDR integrates with Amazon Web Services (AWS) to enrich alerts, perform threat detection using GuardDuty, investigate logs, and extract contextual metadata from cloud resources.
To support these capabilities, AirMDR requires **read-only access** to specific AWS services, which can be granted by following these steps:
1. [Enable AWS GuardDuty](https://docs.airmdr.com/Integrations/AWS-Updated#enable-aws-guardduty)
2. [Create IAM policy](https://docs.airmdr.com/Integrations/AWS-Updated#create-iam-policy)
3. Choose one of the three integration methods based on your organization's requirements:
* [**Option 1: IAM User (Access Key Method)**](https://docs.airmdr.com/Integrations/AWS-Updated#option-1%3A-iam-user-access-key-method)
* [**Option 2: IAM Role (Assume Role via STS)**](https://docs.airmdr.com/Integrations/AWS-Updated#option-2%3A-iam-role-assume-role-via-sts)
* [**Option 3: Multi-Account Integration via AWS StackSet Method**](https://docs.airmdr.com/Integrations/AWS-Updated#option-3%3A-multi-account-integration-using-aws-stacklet-method)
4. [Configure AWS in the AirMDR Integrations Dashboard](https://docs.airmdr.com/Integrations/AWS-Updated#configure-aws-in-the-airmdr-integrations-dashboard)
After completing the above steps, click [here](https://docs.airmdr.com/Integrations/AWS-Updated#where-to-find-the-generated-aws-authentication-parameters-in-the-console-ui-steps) to view or access all the generated AWS authentication parameters in the AWS UI Console.
## AWS Setup Prerequisites
| Step | What you need | Why it's needed |
| :--- | :------------------------------------------- | :--------------------------------------------------------------------------------------- |
| 1. | **AWS Account** (free) | The root thing to log into the AWS Console |
| 2. | **Valid Payment Method** (credit/debit card) | Required even if you stay within Free Tier |
| 3. | **Verified Email Address** | AWS will send confirmation and alerts |
| 4. | **Enable MFA (Multi-Factor Authentication)** | Secure your root user (HIGHLY recommended) |
| 5. | **IAM Users and Roles** | Create users instead of using the root account for everything |
| 6. | **Knowledge of Regions** | Decide which AWS region you want to deploy resources in (e.g., `us-east-1`, `eu-west-1`) |
| 7. | **AWS CLI (optional)** | Install locally if you want to manage AWS from terminal |
## AirMDR – AWS Integration Guide
### Enable AWS GuardDuty
> AWS **GuardDuty is mandatory** for integration with AirMDR because it serves as the **primary threat detection engine** in your AWS environment and AirMDR relies on GuardDuty findings to perform its core security use cases.
To Enable AWS GuardDuty, refer to [**Getting started with GuardDuty**](https://docs.aws.amazon.com/guardduty/latest/ug/guardduty_settingup.html#guardduty_enable-gd)**.**
### **Create IAM policy**
To allow AirMDR to fetch telemetry data and perform read-only queries on your AWS environment, create a **custom IAM policy** with the following managed policies:
Creating a **custom IAM policy** in AWS is important when integrating with platforms like **AirMDR** because it allows you to define **precise, least-privilege access**
Expand this sections to explore the complete set of AWS IAM permissions used by AirMDR, along with how they are applied across skills, actions, and playbooks. This information is intended for reference purposes, and helpful when reviewing access scope, customizing IAM policies, or conducting security reviews.
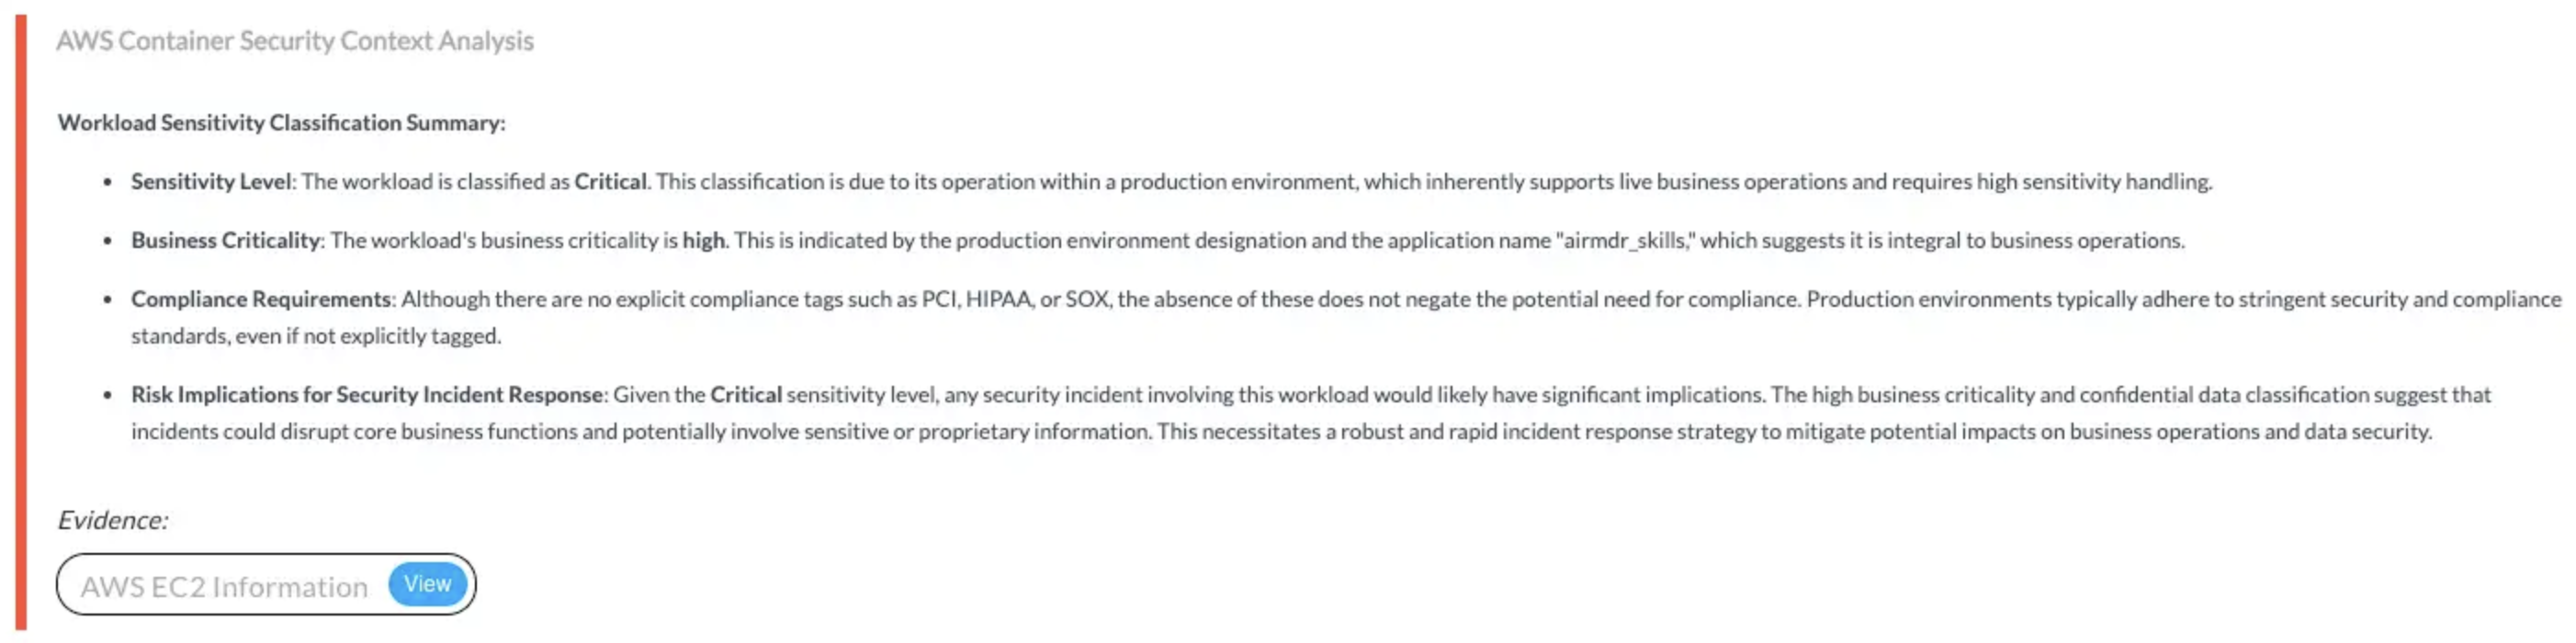
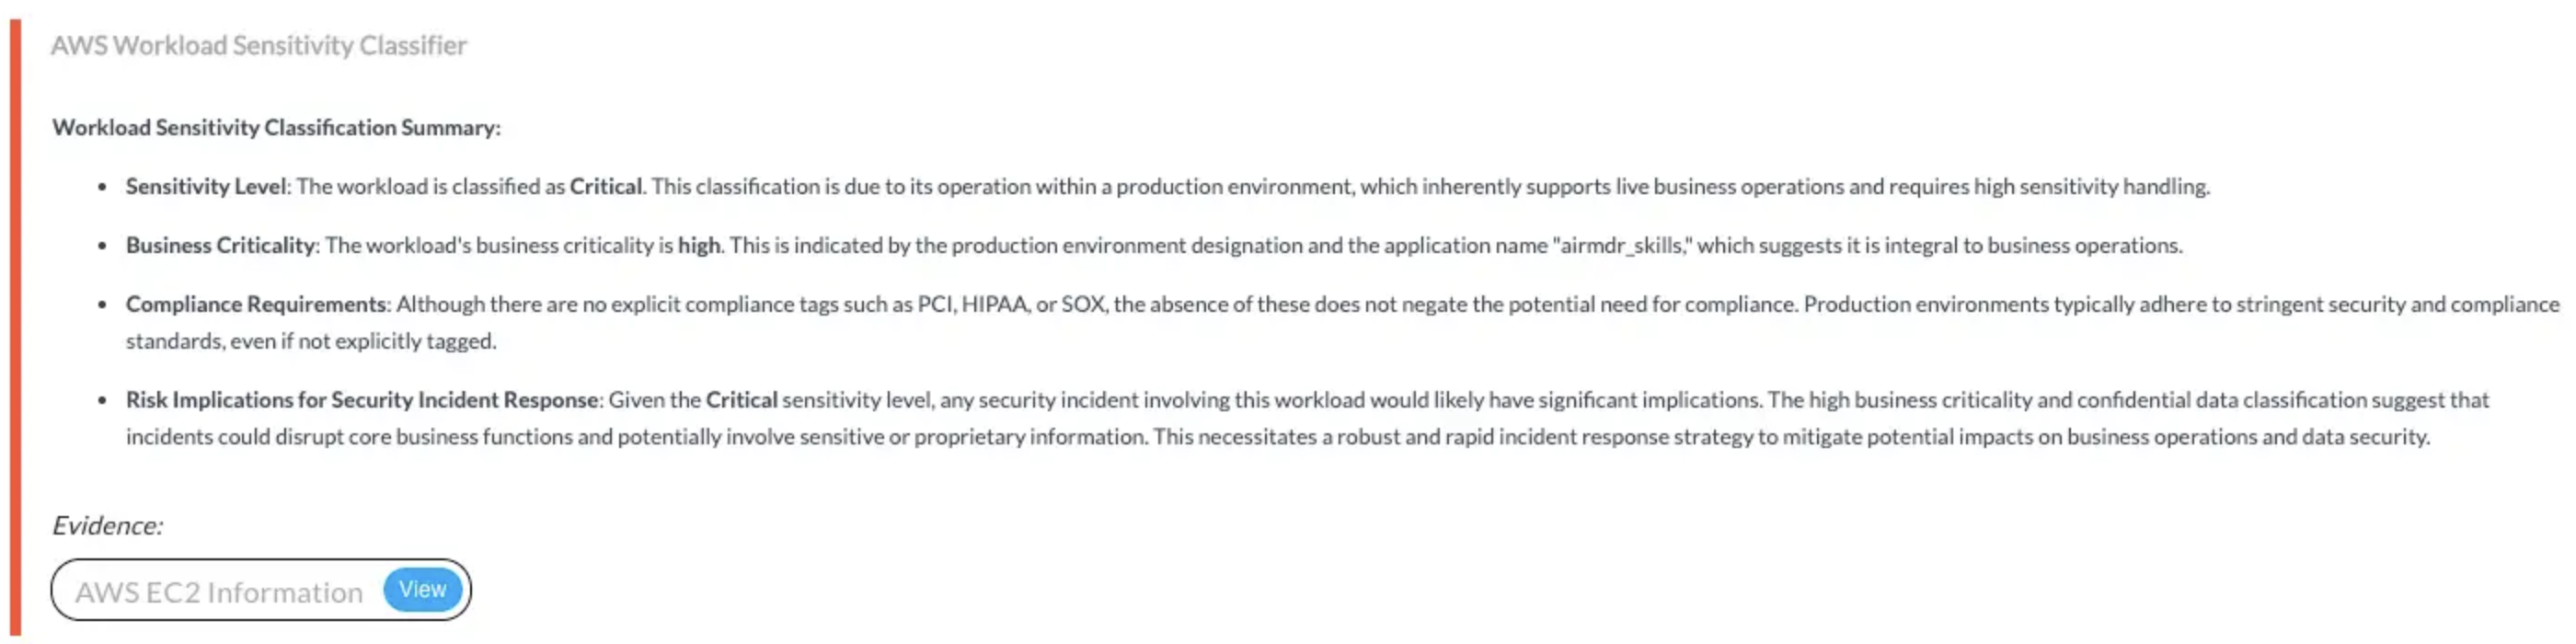
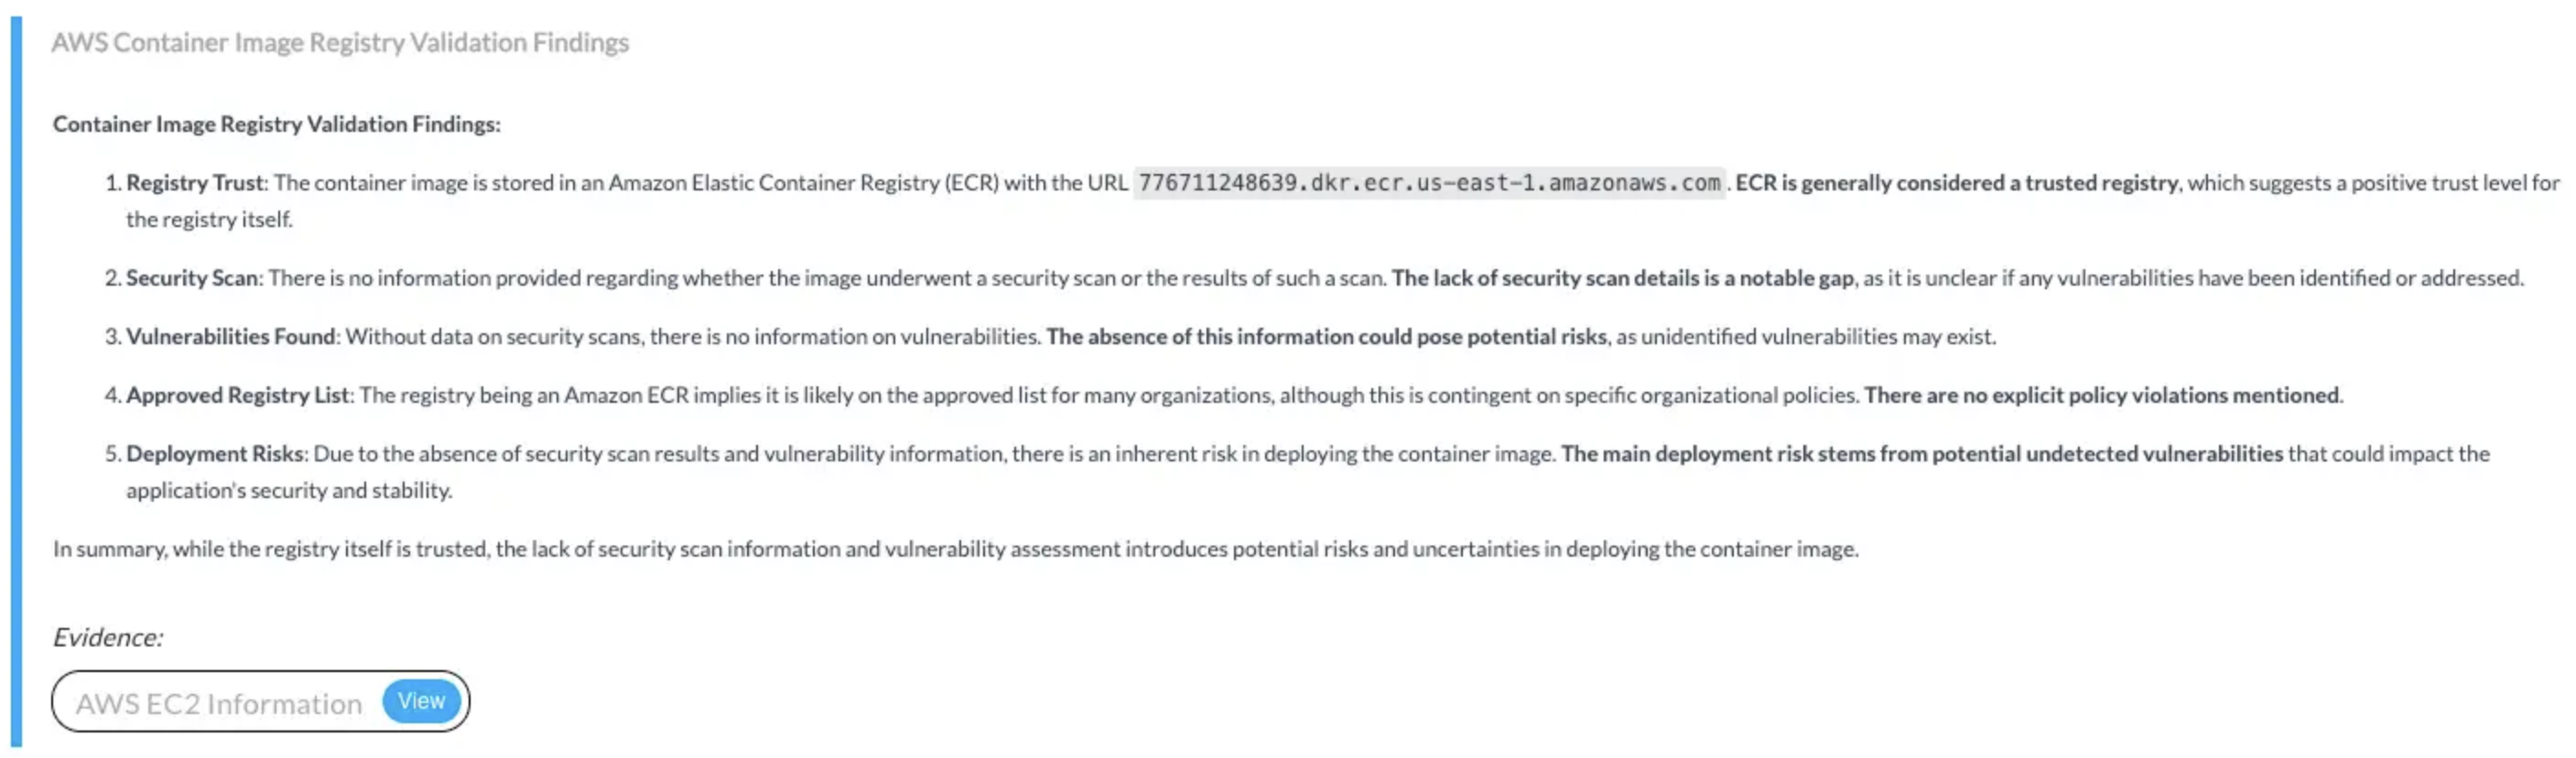
**🔹 Description:**\
Provides read-only access to EC2 and container metadata, enabling AirMDR to enrich alerts, assess security configurations, classify workloads by risk, and validate container deployment standards.
**🔸 Input Params Used:**\
`service_name: ec2`, `method_name: describe_instances`
**🔸 AWS Actions:**\
`ec2:DescribeInstances`
**🔸 Skills Used:**\
`general_aws_query`
**📎 Findings:**

 **🔹 Description:**\
Enables AirMDR to retrieve and analyze GuardDuty findings for suspicious activity related to S3 buckets and remote IPs, supporting threat pattern detection, anomaly analysis, and automated case enrichment.
**🔸 AWS Actions:**\
`guardduty:GetFindings`, `guardduty:ListFindings`, `guardduty:GetDetector`
**🔸 Skills Used:**\
`Get AWS Guardduty Findings`
**🔹 Description:**\
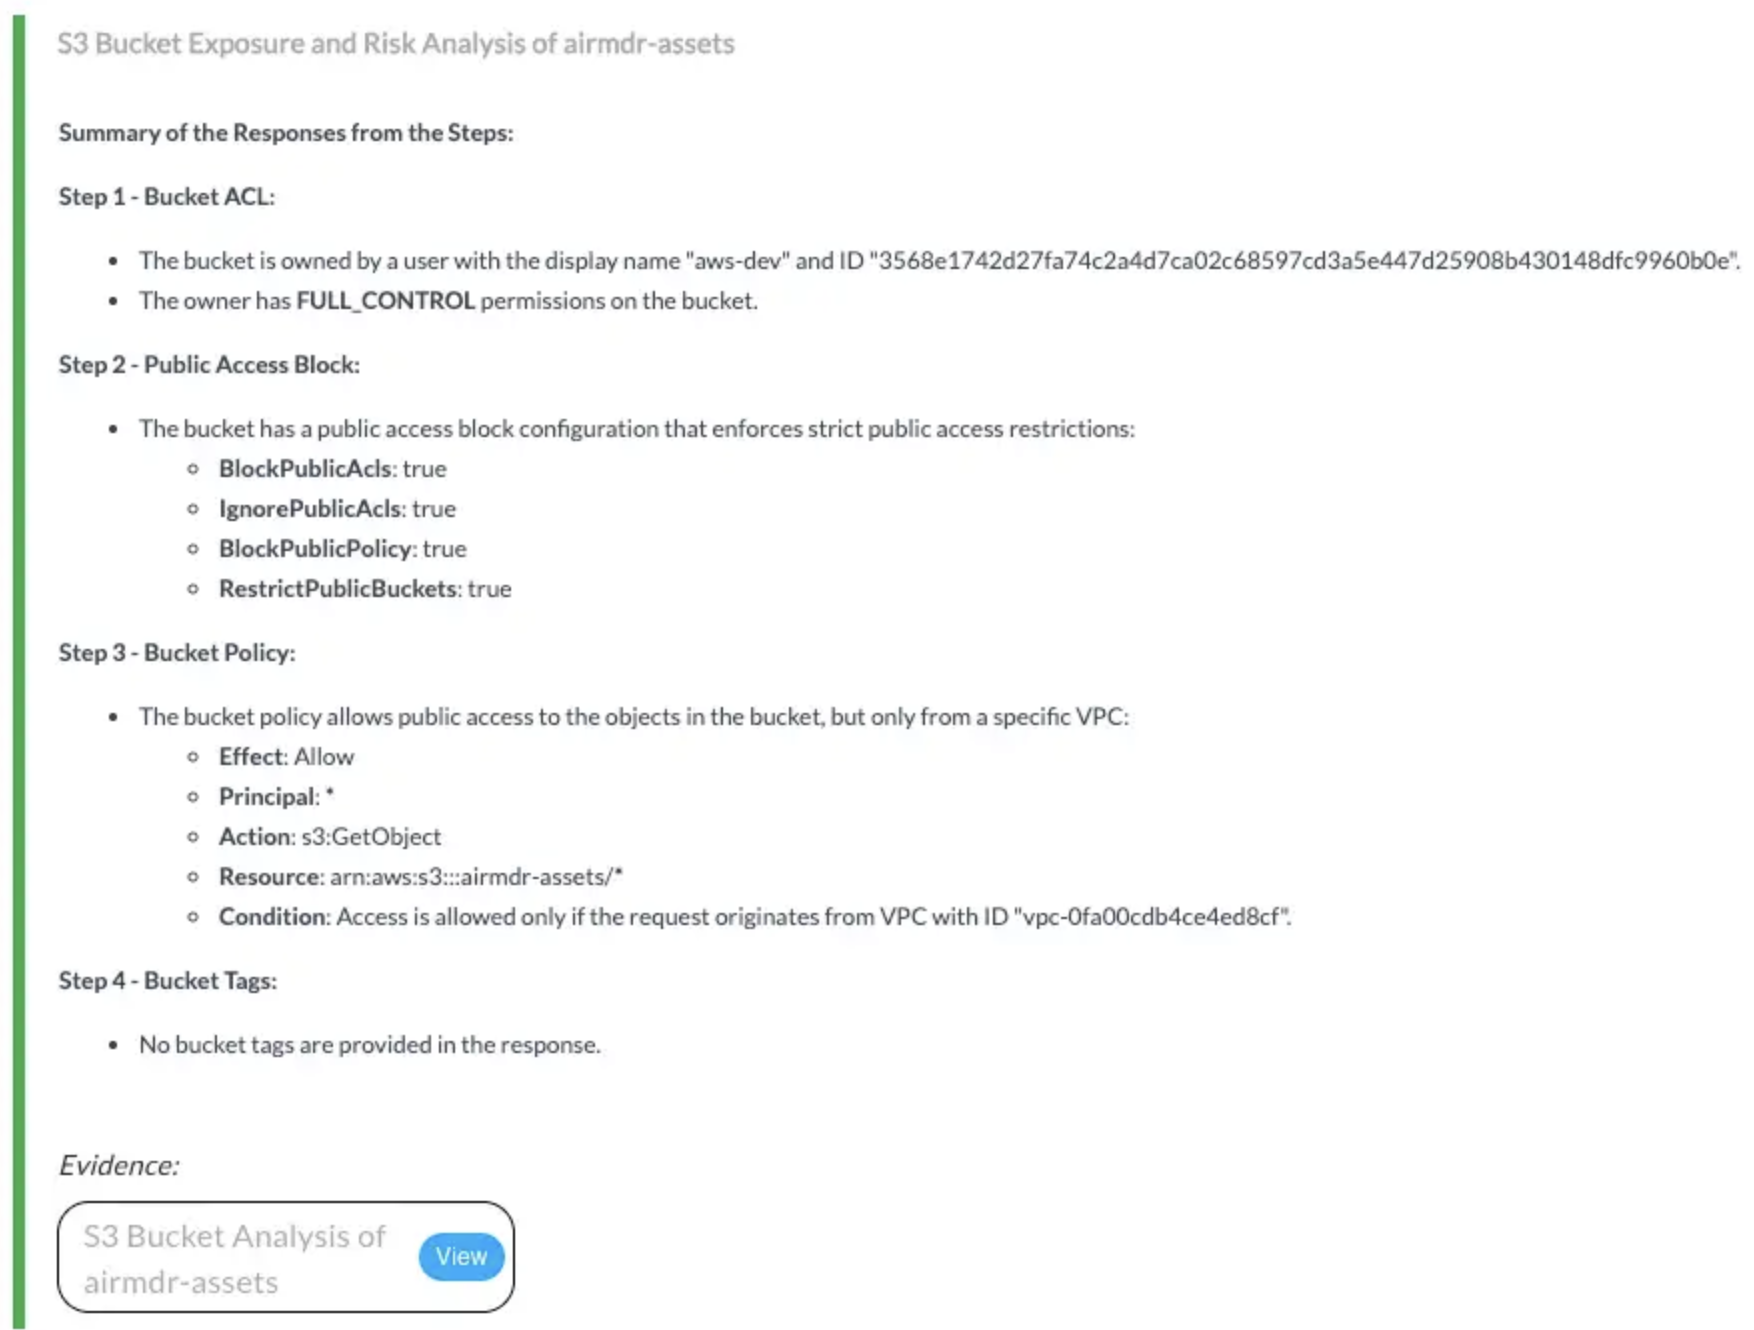
Provides read-only access to evaluate S3 bucket security by checking configurations, classifying data sensitivity, and validating real-world exposure risks.
**🔸 Input Params Used:**\
`service_name: s3`, `method_name: [get_bucket_acl, get_public_access_block, get_bucket_policy, get_bucket_tagging, list_objects_v2]`
**🔸 AWS Actions:**\
`s3:GetBucketAcl`, `s3:GetBucketPublicAccessBlock`, `s3:GetBucketPolicy`, `s3:GetBucketTagging`, `s3:ListBucket`
**🔸 Skills Used:**\
`general_aws_query`
**📎 Findings:**
**🔹 Description:**\
Enables AirMDR to retrieve and analyze GuardDuty findings for suspicious activity related to S3 buckets and remote IPs, supporting threat pattern detection, anomaly analysis, and automated case enrichment.
**🔸 AWS Actions:**\
`guardduty:GetFindings`, `guardduty:ListFindings`, `guardduty:GetDetector`
**🔸 Skills Used:**\
`Get AWS Guardduty Findings`
**🔹 Description:**\
Provides read-only access to evaluate S3 bucket security by checking configurations, classifying data sensitivity, and validating real-world exposure risks.
**🔸 Input Params Used:**\
`service_name: s3`, `method_name: [get_bucket_acl, get_public_access_block, get_bucket_policy, get_bucket_tagging, list_objects_v2]`
**🔸 AWS Actions:**\
`s3:GetBucketAcl`, `s3:GetBucketPublicAccessBlock`, `s3:GetBucketPolicy`, `s3:GetBucketTagging`, `s3:ListBucket`
**🔸 Skills Used:**\
`general_aws_query`
**📎 Findings:**
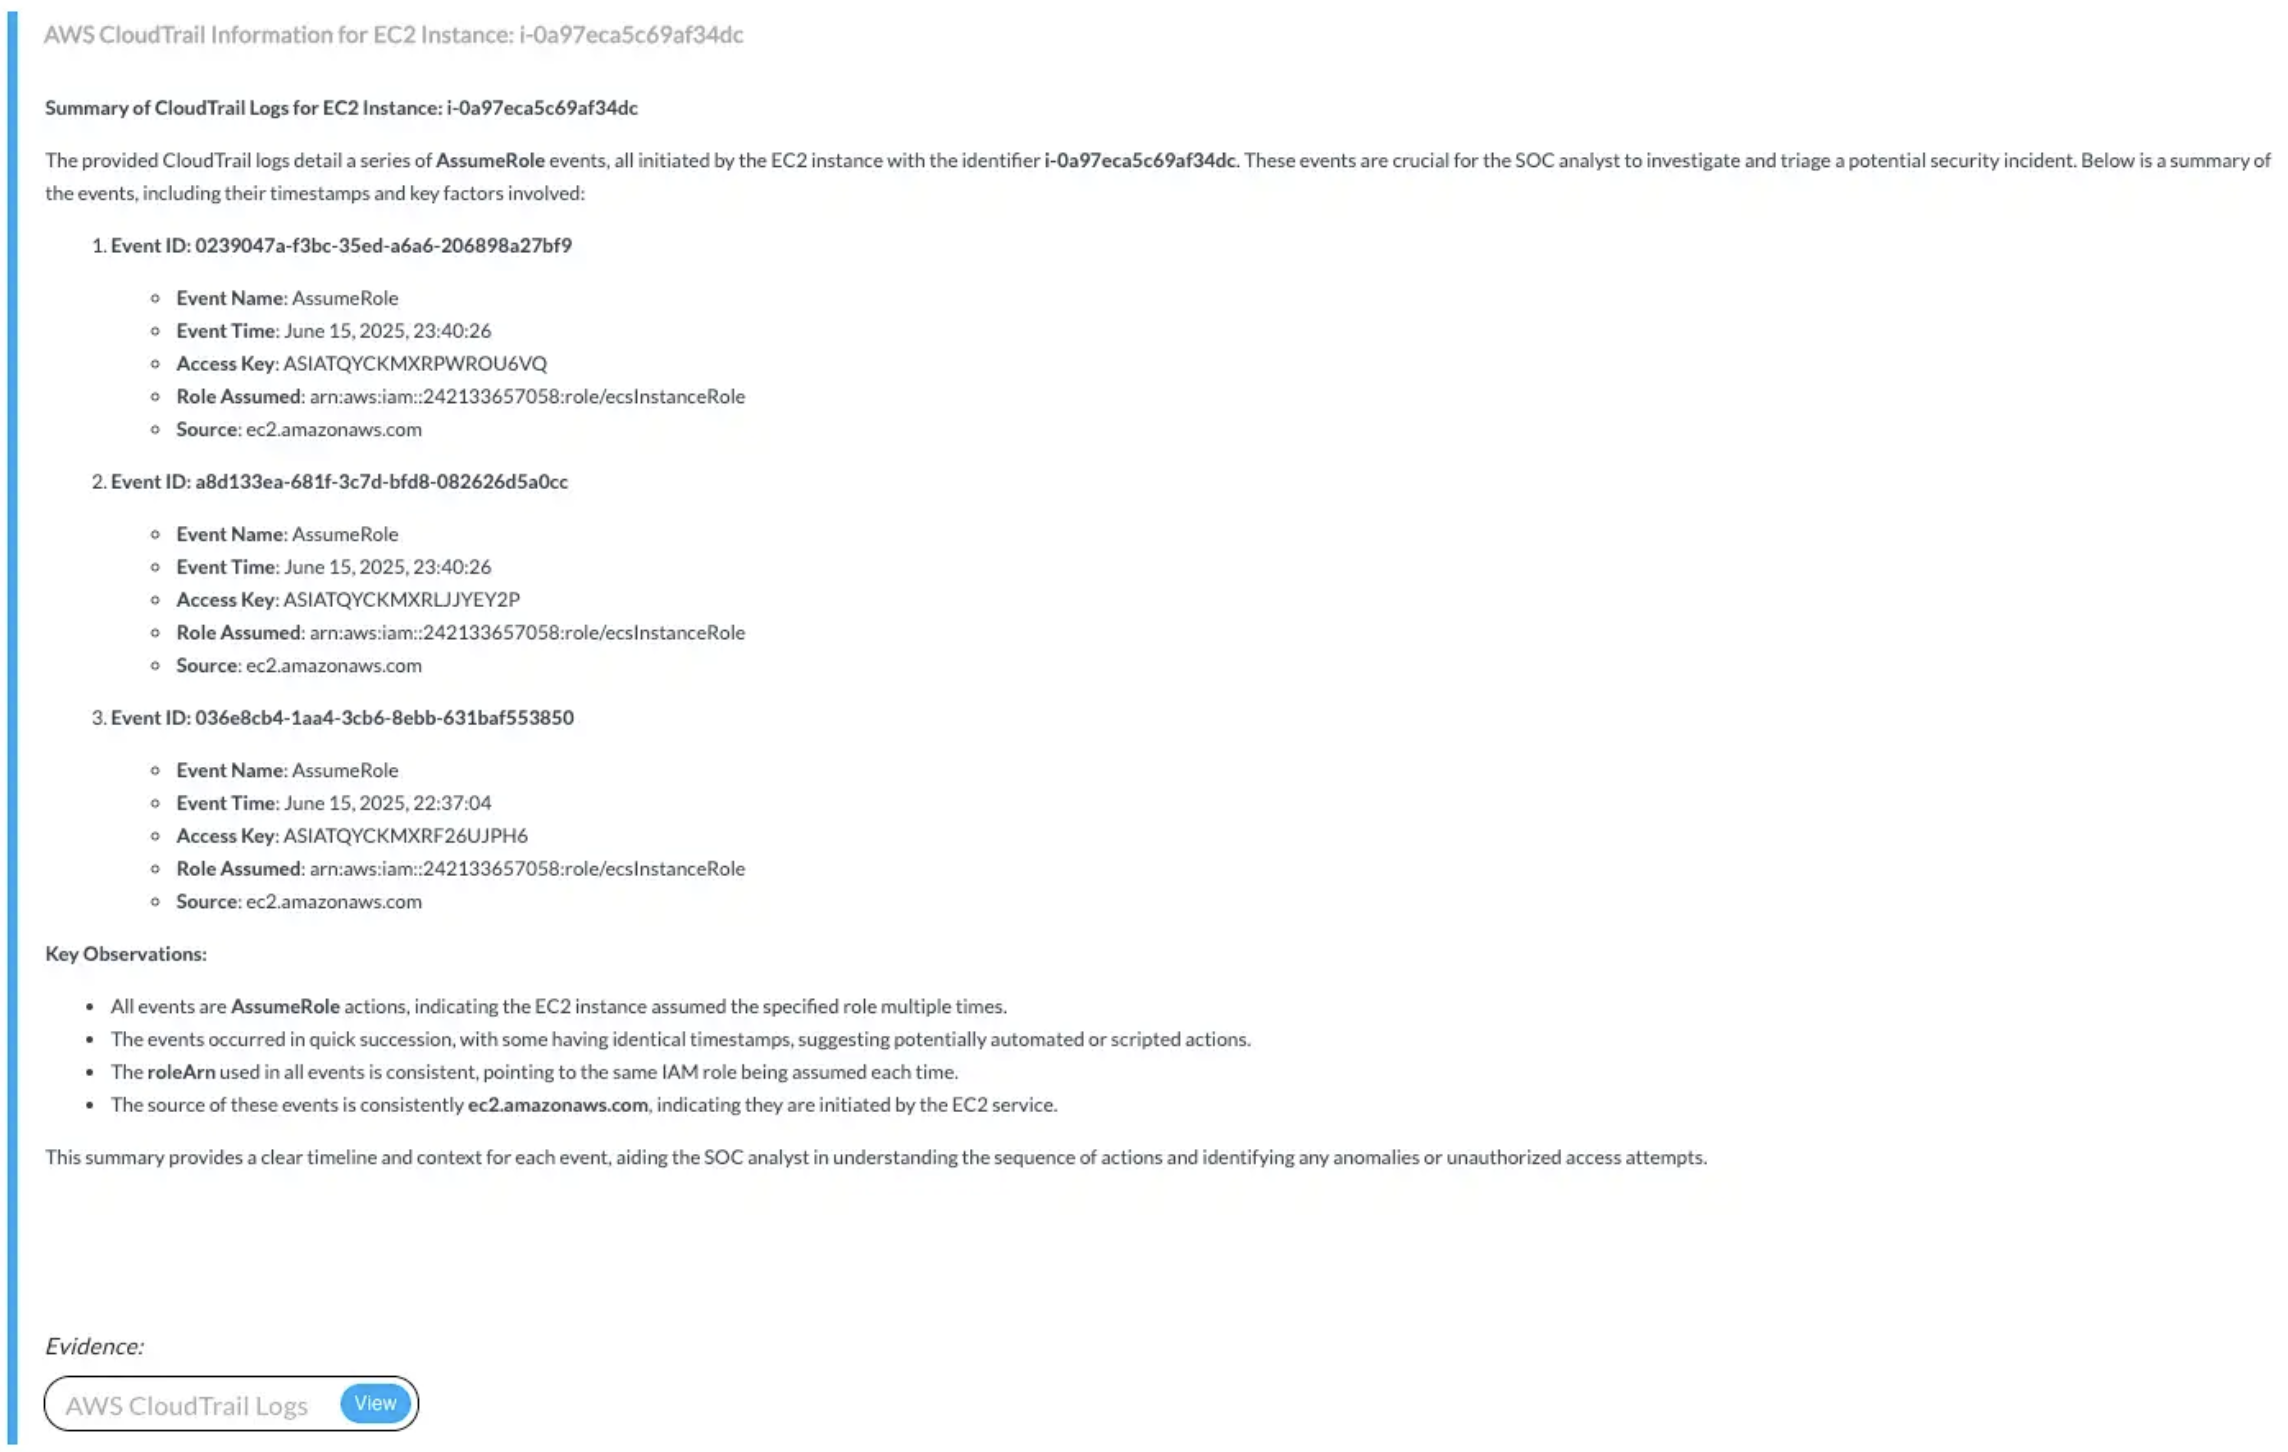
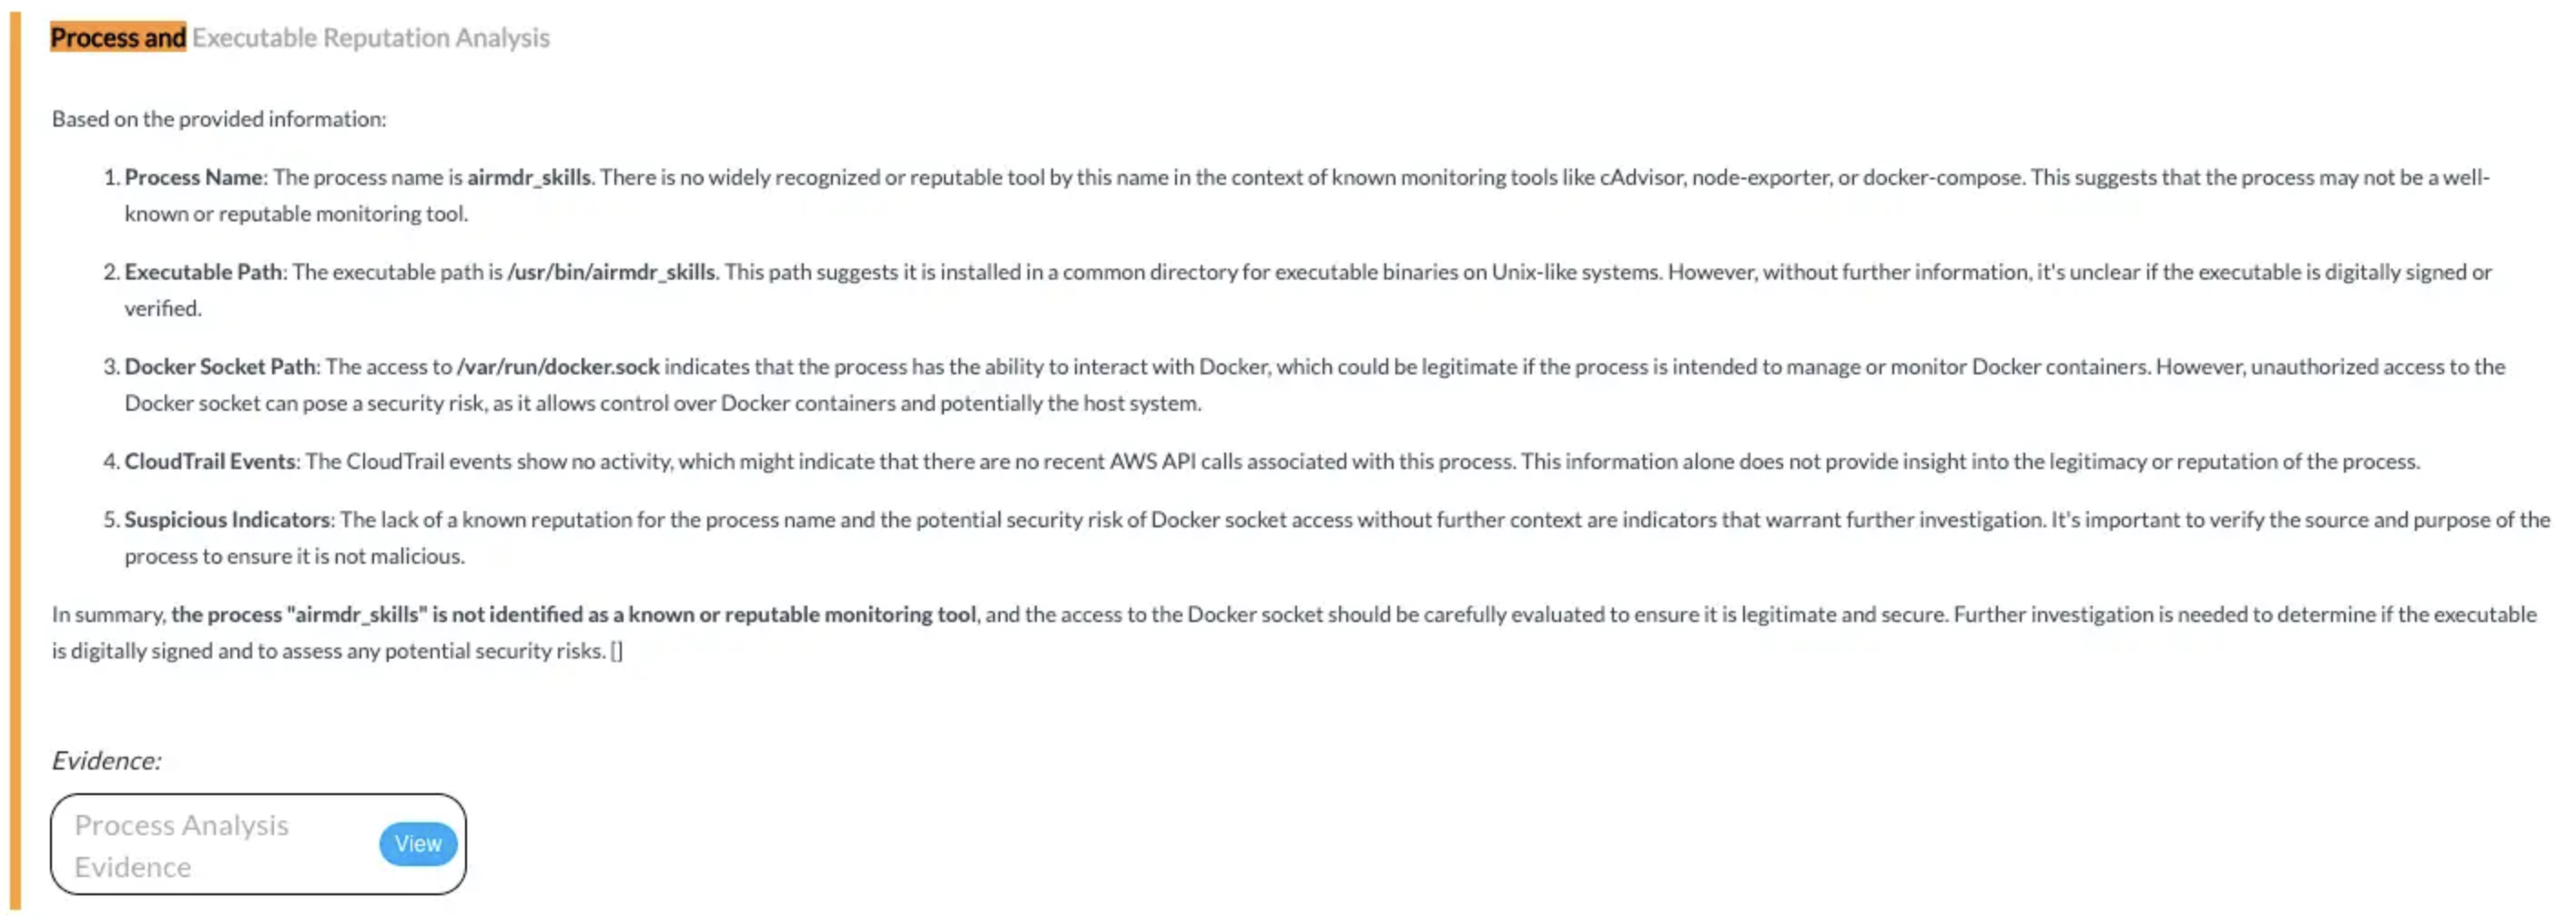
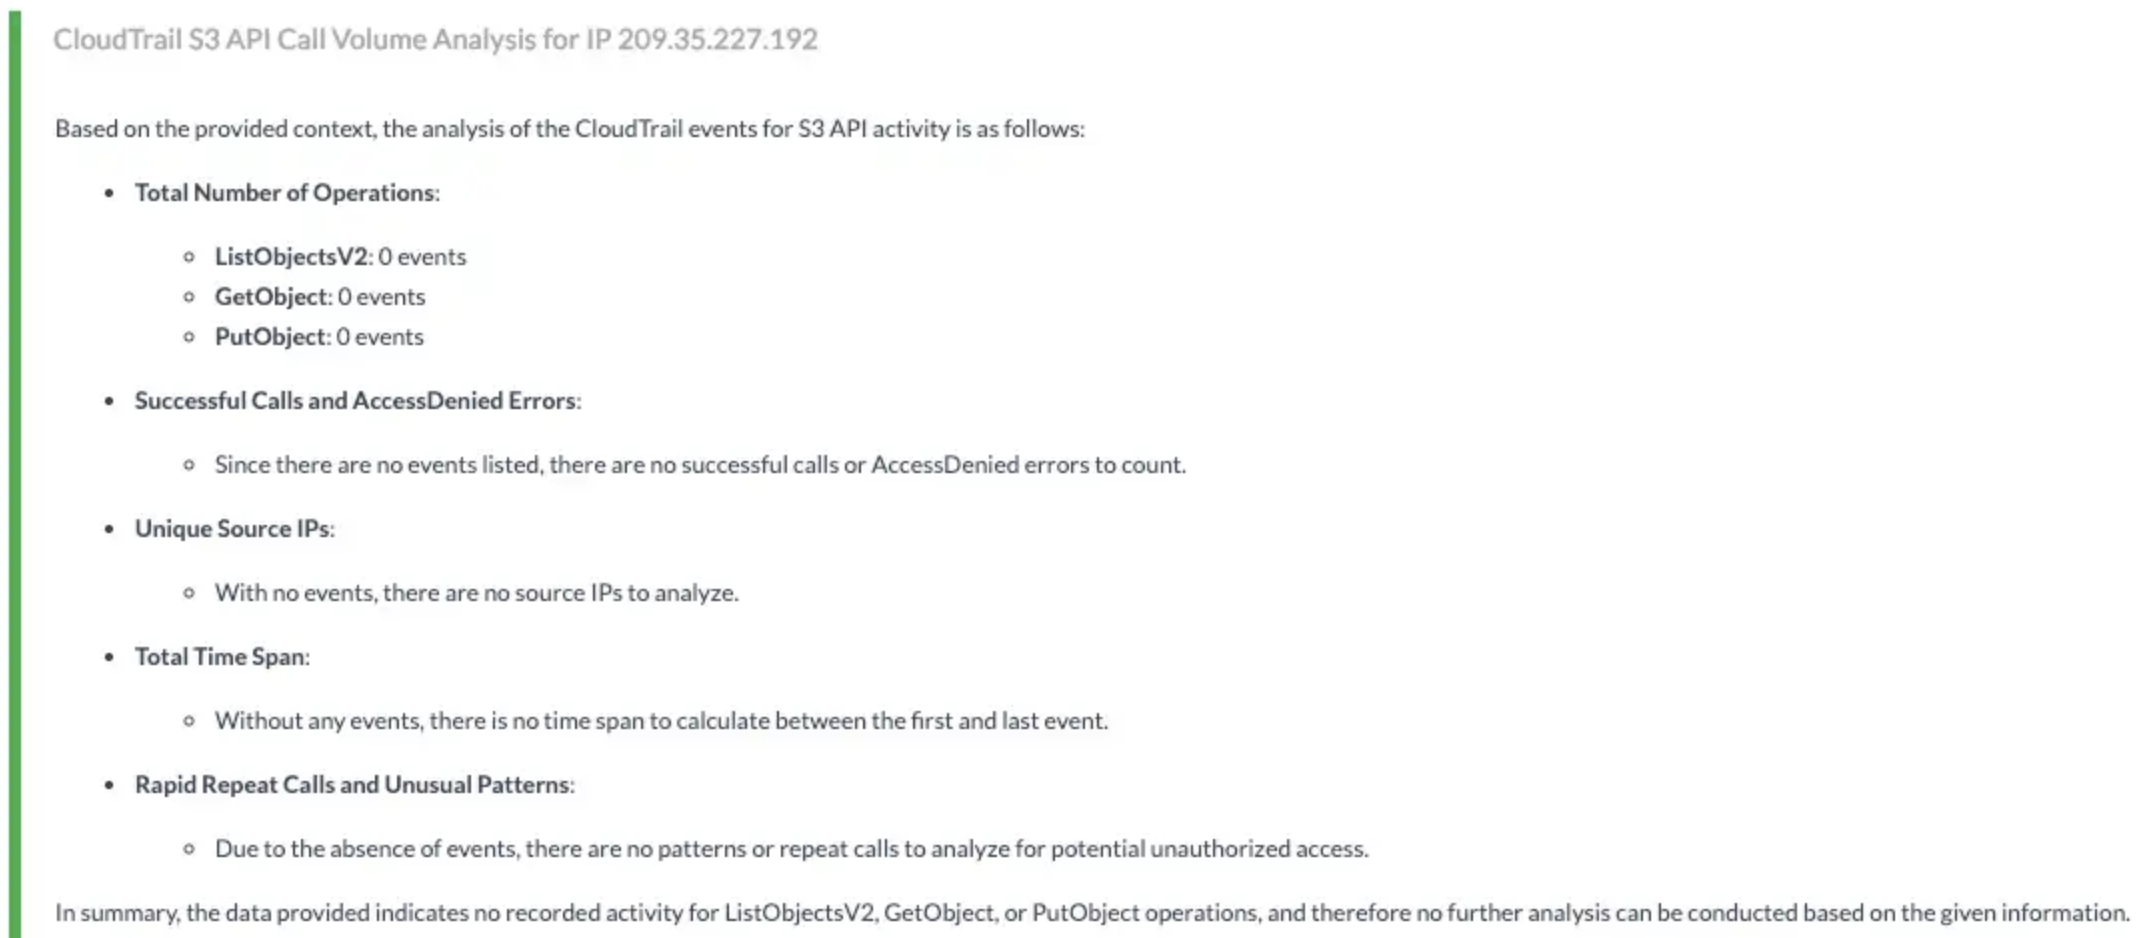
 **🔹 Description:**\
Grants read-only access to CloudTrail logs for reconstructing activity timelines, detecting suspicious patterns, and enriching alerts with user and process-level context.
**🔸 Input Params Used:**\
`Attribute Key: ResourceName`, `Attribute Value: ec2 instance id`, `filter_key: sourceIPAddress`
**🔸 AWS Actions:**\
`cloudtrail:DescribeTrails`, `cloudtrail:GetTrailStatus`, `cloudtrail:LookupEvents`
**🔸 Skills Used:**\
`Lookup AWS Cloudtrail Events`
**📎 Findings:**
**🔹 Description:**\
Grants read-only access to CloudTrail logs for reconstructing activity timelines, detecting suspicious patterns, and enriching alerts with user and process-level context.
**🔸 Input Params Used:**\
`Attribute Key: ResourceName`, `Attribute Value: ec2 instance id`, `filter_key: sourceIPAddress`
**🔸 AWS Actions:**\
`cloudtrail:DescribeTrails`, `cloudtrail:GetTrailStatus`, `cloudtrail:LookupEvents`
**🔸 Skills Used:**\
`Lookup AWS Cloudtrail Events`
**📎 Findings:**

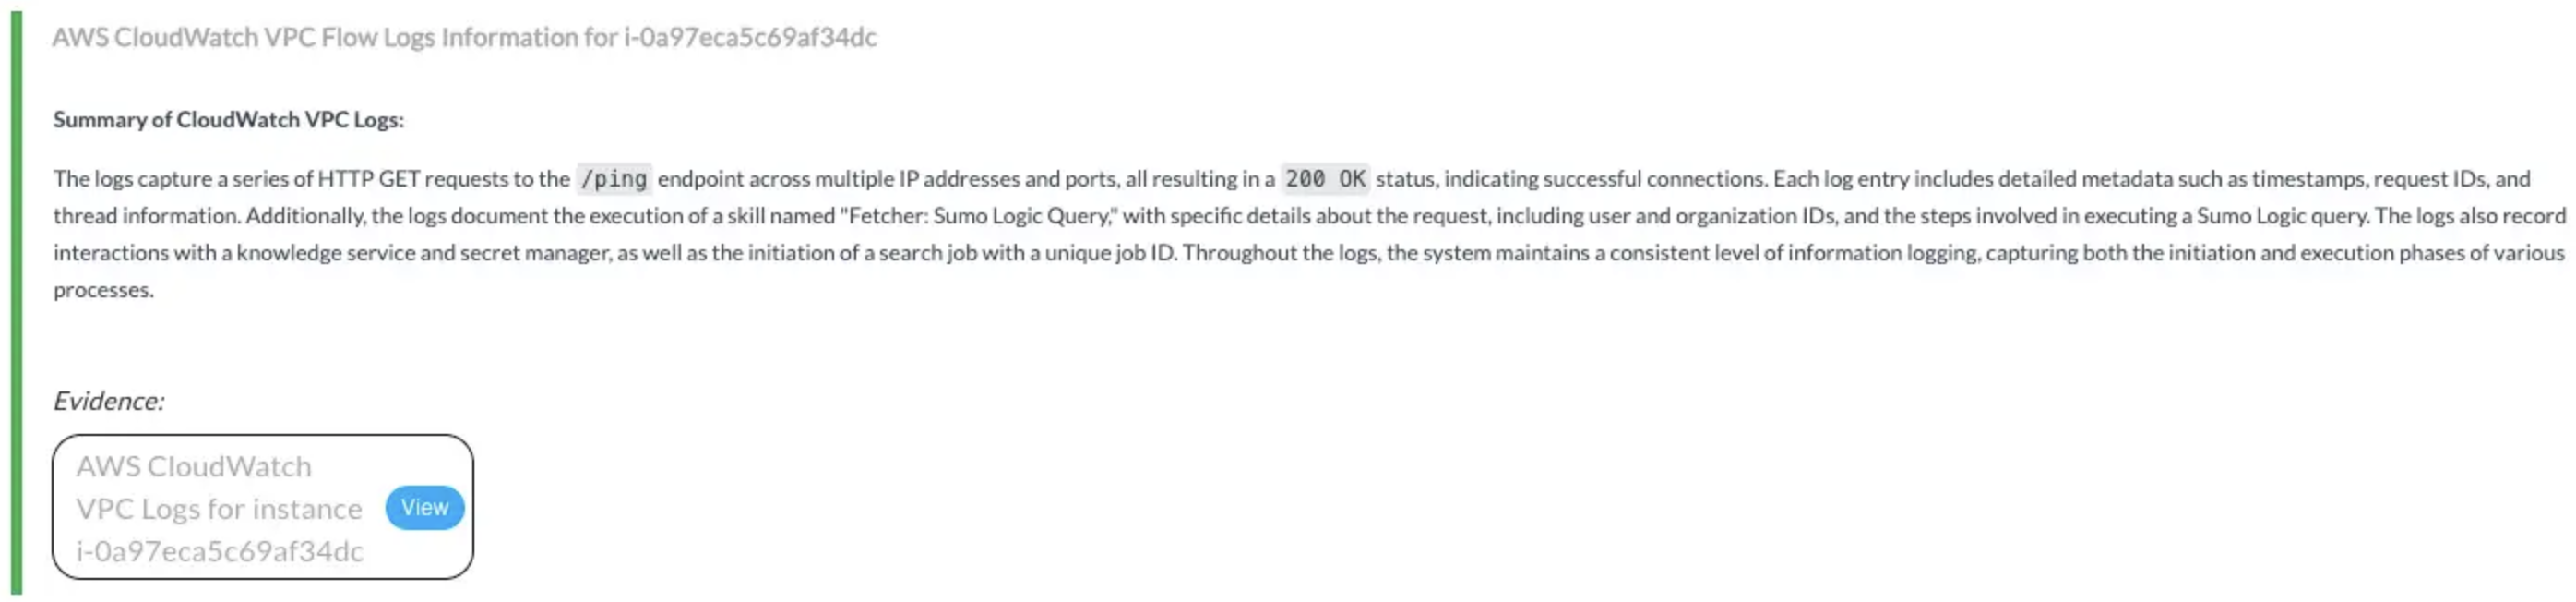
 **🔹 Description:**\
Allows read-only access to CloudWatch logs for analyzing VPC activity, extracting alert context, and enriching investigations with time-bound log insights.
**🔸 Input Params Used:**\
`Log Group Name`, `Log Stream Name Prefix`
**🔸 AWS Actions:**\
`logs:DescribeLogGroups`, `logs:DescribeLogStreams`, `logs:GetLogEvents`, `logs:FilterLogEvents`
**🔸 Skills Used:**\
`Filter AWS CloudWatch Log Events`
**📎 Findings:**
**🔹 Description:**\
Allows read-only access to CloudWatch logs for analyzing VPC activity, extracting alert context, and enriching investigations with time-bound log insights.
**🔸 Input Params Used:**\
`Log Group Name`, `Log Stream Name Prefix`
**🔸 AWS Actions:**\
`logs:DescribeLogGroups`, `logs:DescribeLogStreams`, `logs:GetLogEvents`, `logs:FilterLogEvents`
**🔸 Skills Used:**\
`Filter AWS CloudWatch Log Events`
**📎 Findings:**
 🔹 **Description:**\
Enables validation of IAM permissions and detection of unusual user behavior, such as bulk S3 modifications, to support access risk analysis.
🔸 **Input Params Used:**\
`service_name: iam`, `method_name: [get_user, list_attached_user_policies, simulate_principal_policy]`
🔸 **AWS Actions:**\
`iam:GetUser`, `iam:ListAttachedUserPolicies`, `iam:SimulatePrincipalPolicy`, `cloudtrail:LookupEvents`
🔸 **Skills Used:**\
`Lookup AWS Cloudtrail Events`, `general_aws_query`
**📎 Findings:**
🔹 **Description:**\
Enables validation of IAM permissions and detection of unusual user behavior, such as bulk S3 modifications, to support access risk analysis.
🔸 **Input Params Used:**\
`service_name: iam`, `method_name: [get_user, list_attached_user_policies, simulate_principal_policy]`
🔸 **AWS Actions:**\
`iam:GetUser`, `iam:ListAttachedUserPolicies`, `iam:SimulatePrincipalPolicy`, `cloudtrail:LookupEvents`
🔸 **Skills Used:**\
`Lookup AWS Cloudtrail Events`, `general_aws_query`
**📎 Findings:**
 | **Policy Name** | **Access Type** | **Importance** |
| :------------------------------ | :-------------- | :------------- |
| `AmazonGuardDutyReadOnlyAccess` | Read-Only | **Required** |
| `IAMReadOnlyAccess` | Read-Only | Recommended |
| `AmazonEC2ReadOnlyAccess` | Read-Only | Optional |
| `AmazonS3ReadOnlyAccess` | Read-Only | Optional |
| `AWSCloudTrailReadOnlyAccess` | Read-Only | Optional |
| `CloudWatchReadOnlyAccess` | Read-Only | Optional |
| `AmazonEC2ContainerRegistry` | Read-Only | Optional |
1. **Sign in** to the same [AWS IAM Console](https://console.aws.amazon.com/iam/) created for AWS GuardDuty.
2. Search for **IAM** in the top menu bar.
3. In the **IAM** dashboard, click on IAM resources → **Policies**.
| **Policy Name** | **Access Type** | **Importance** |
| :------------------------------ | :-------------- | :------------- |
| `AmazonGuardDutyReadOnlyAccess` | Read-Only | **Required** |
| `IAMReadOnlyAccess` | Read-Only | Recommended |
| `AmazonEC2ReadOnlyAccess` | Read-Only | Optional |
| `AmazonS3ReadOnlyAccess` | Read-Only | Optional |
| `AWSCloudTrailReadOnlyAccess` | Read-Only | Optional |
| `CloudWatchReadOnlyAccess` | Read-Only | Optional |
| `AmazonEC2ContainerRegistry` | Read-Only | Optional |
1. **Sign in** to the same [AWS IAM Console](https://console.aws.amazon.com/iam/) created for AWS GuardDuty.
2. Search for **IAM** in the top menu bar.
3. In the **IAM** dashboard, click on IAM resources → **Policies**.
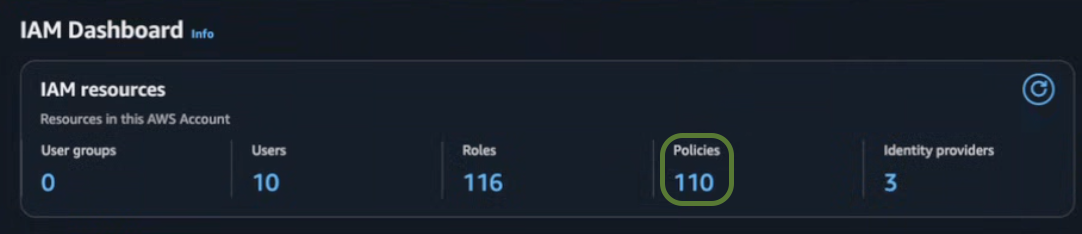 4. Click **Create policy** in the top right corner.
 5. Select **JSON** tab in the toggle tabs and paste the following:
 User can update the Policy Permissions mentioned in the JSON as per requirement.
```
{
"Version": "2012-10-17",
"Statement": [
{
"Effect": "Allow",
"Action": [
"ec2:DescribeInstances",
"ecs:DescribeTasks",
"ecr:DescribeImages",
"cloudtrail:LookupEvents",
"cloudtrail:DescribeTrails",
"cloudtrail:GetTrailStatus",
"logs:DescribeLogGroups",
"logs:DescribeLogStreams",
"logs:GetLogEvents",
"logs:FilterLogEvents",
"s3:GetBucketAcl",
"s3:GetBucketPublicAccessBlock",
"s3:GetBucketPolicy",
"s3:GetBucketTagging",
"s3:ListBucket",
"iam:GetUser",
"iam:ListAttachedUserPolicies",
"iam:SimulatePrincipalPolicy",
"guardduty:GetFindings",
"guardduty:ListFindings",
"guardduty:GetDetector",
"securityhub:GetFindings",
"securityhub:BatchUpdateFindings",
"securityhub:DescribeHub",
"securityhub:ListFindings"
],
"Resource": "*"
}
]
}
```
6. Click **Next**.
7. In the **Review and create** section, provide the required information for the **Policy details**.
* **Policy name** – Provide a meaningful name like `AirMDR-ReadOnlyPolicy`.
* **Description** (Optional) – Add a short description for this policy.
User can update the Policy Permissions mentioned in the JSON as per requirement.
```
{
"Version": "2012-10-17",
"Statement": [
{
"Effect": "Allow",
"Action": [
"ec2:DescribeInstances",
"ecs:DescribeTasks",
"ecr:DescribeImages",
"cloudtrail:LookupEvents",
"cloudtrail:DescribeTrails",
"cloudtrail:GetTrailStatus",
"logs:DescribeLogGroups",
"logs:DescribeLogStreams",
"logs:GetLogEvents",
"logs:FilterLogEvents",
"s3:GetBucketAcl",
"s3:GetBucketPublicAccessBlock",
"s3:GetBucketPolicy",
"s3:GetBucketTagging",
"s3:ListBucket",
"iam:GetUser",
"iam:ListAttachedUserPolicies",
"iam:SimulatePrincipalPolicy",
"guardduty:GetFindings",
"guardduty:ListFindings",
"guardduty:GetDetector",
"securityhub:GetFindings",
"securityhub:BatchUpdateFindings",
"securityhub:DescribeHub",
"securityhub:ListFindings"
],
"Resource": "*"
}
]
}
```
6. Click **Next**.
7. In the **Review and create** section, provide the required information for the **Policy details**.
* **Policy name** – Provide a meaningful name like `AirMDR-ReadOnlyPolicy`.
* **Description** (Optional) – Add a short description for this policy.
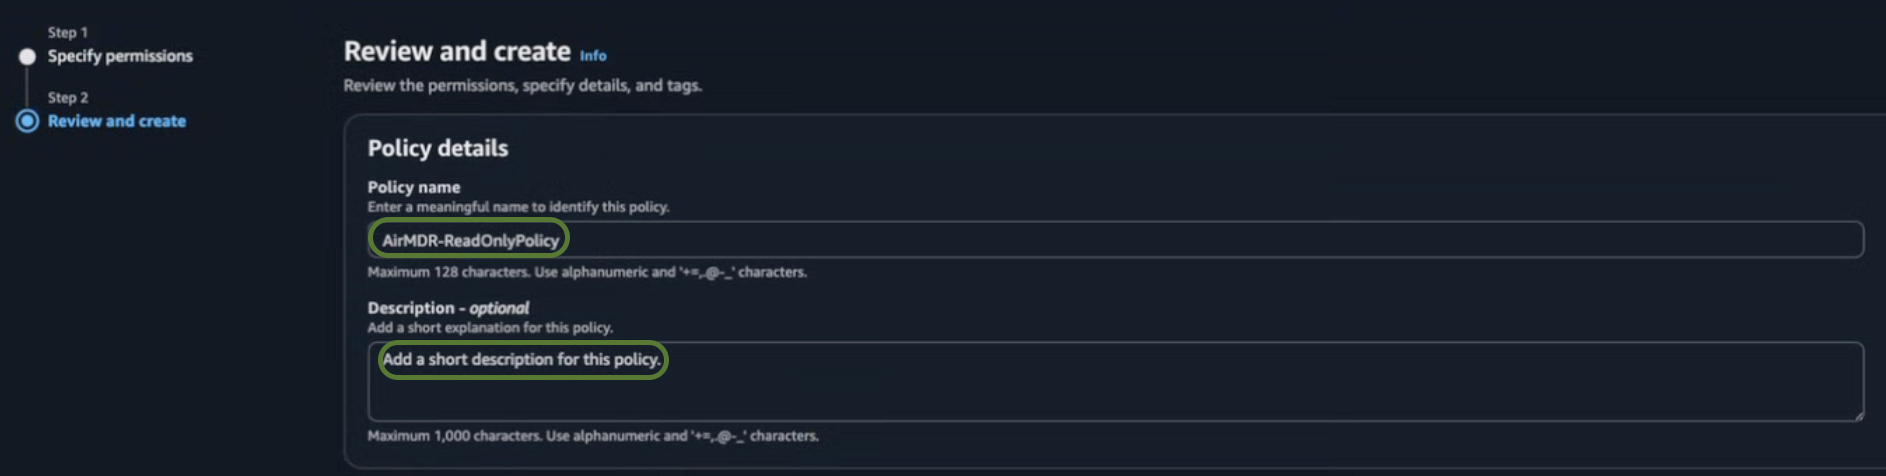 8. Review your selections (Permissions defined in this policy), and if everything is correct.
* **Review Permissions** – Ensure the attached policies meet your security needs.
* **Review Trust Policy** – Verify the trust policy when you use cross-account access or service.
8. Review your selections (Permissions defined in this policy), and if everything is correct.
* **Review Permissions** – Ensure the attached policies meet your security needs.
* **Review Trust Policy** – Verify the trust policy when you use cross-account access or service.
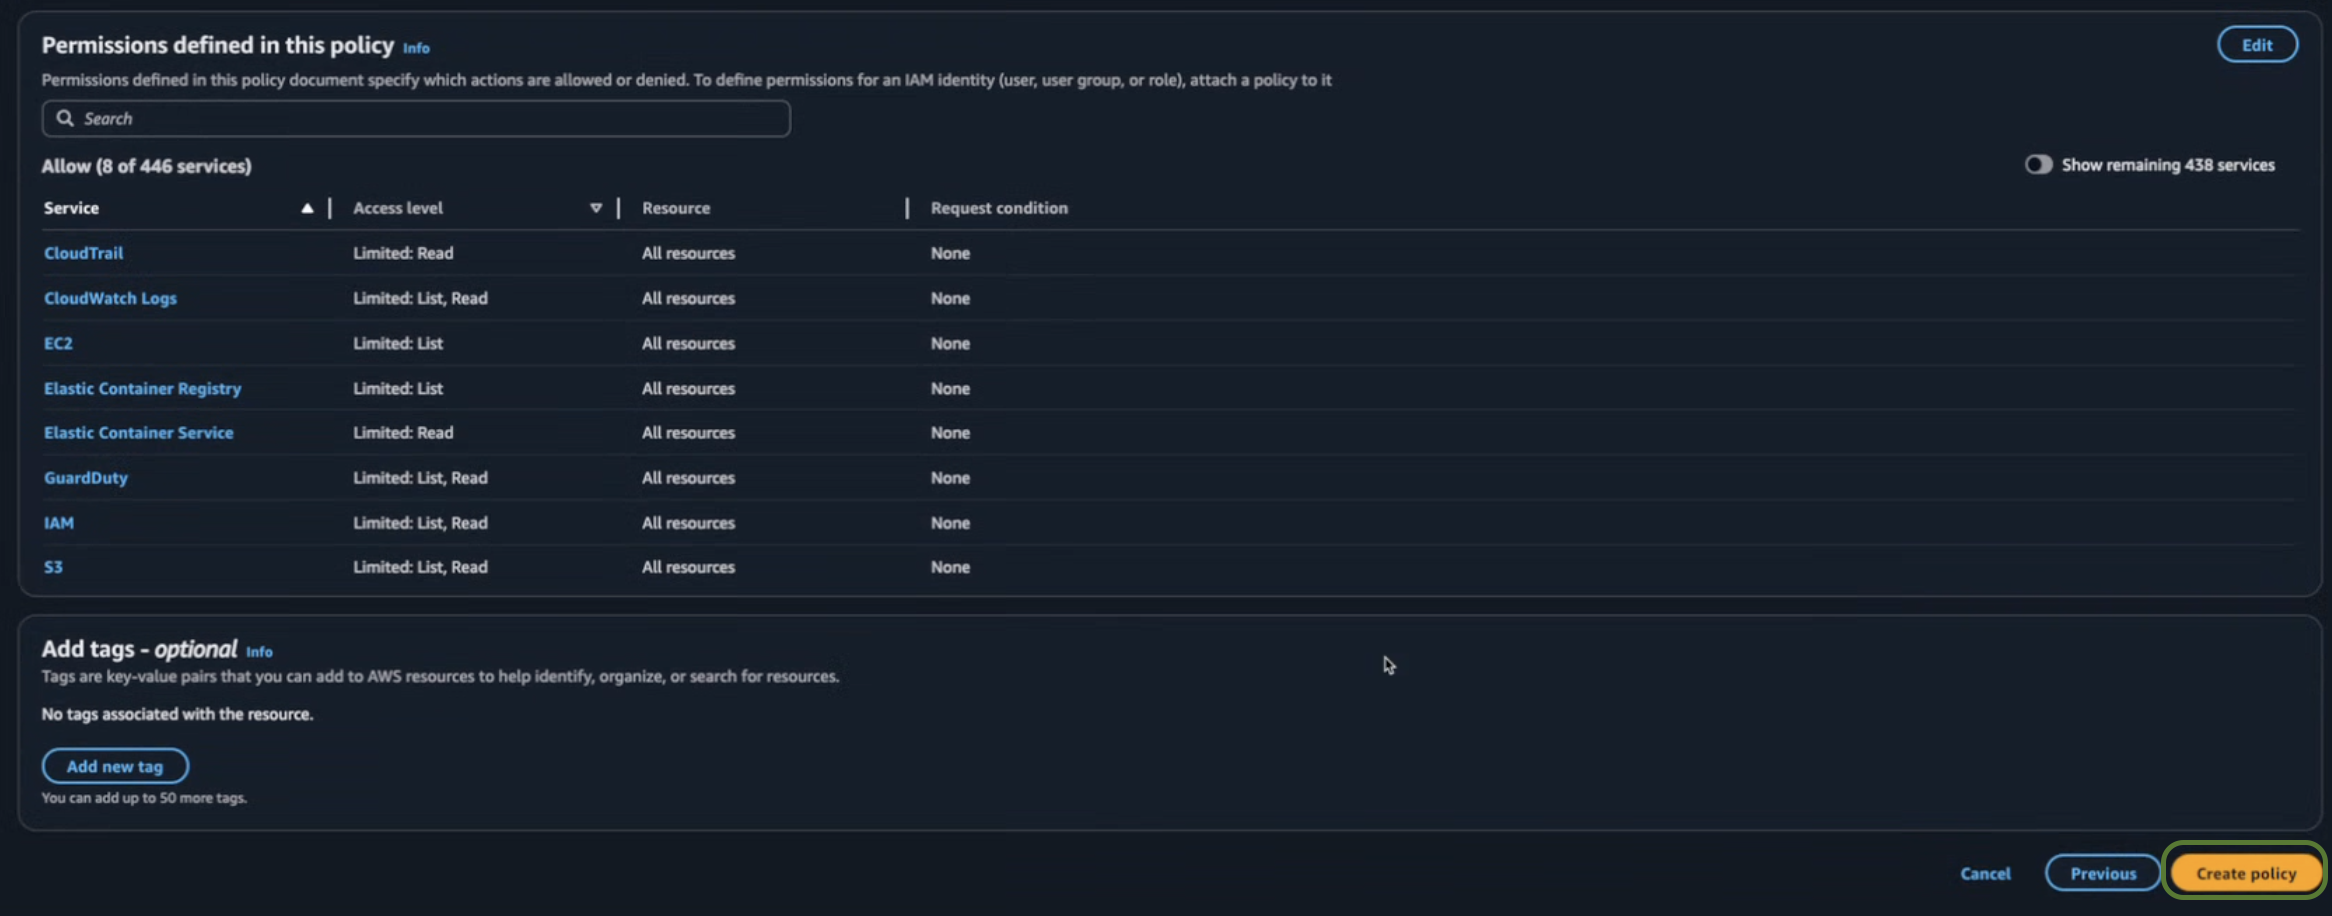 9. Click **Create policy**.
### Option 1: IAM User (Access Key Method)
* Navigate to **IAM → IAM Dashboard.**
* Click on IAM resources **→ User**.
* Click **Create user** in the top right corner.
9. Click **Create policy**.
### Option 1: IAM User (Access Key Method)
* Navigate to **IAM → IAM Dashboard.**
* Click on IAM resources **→ User**.
* Click **Create user** in the top right corner.
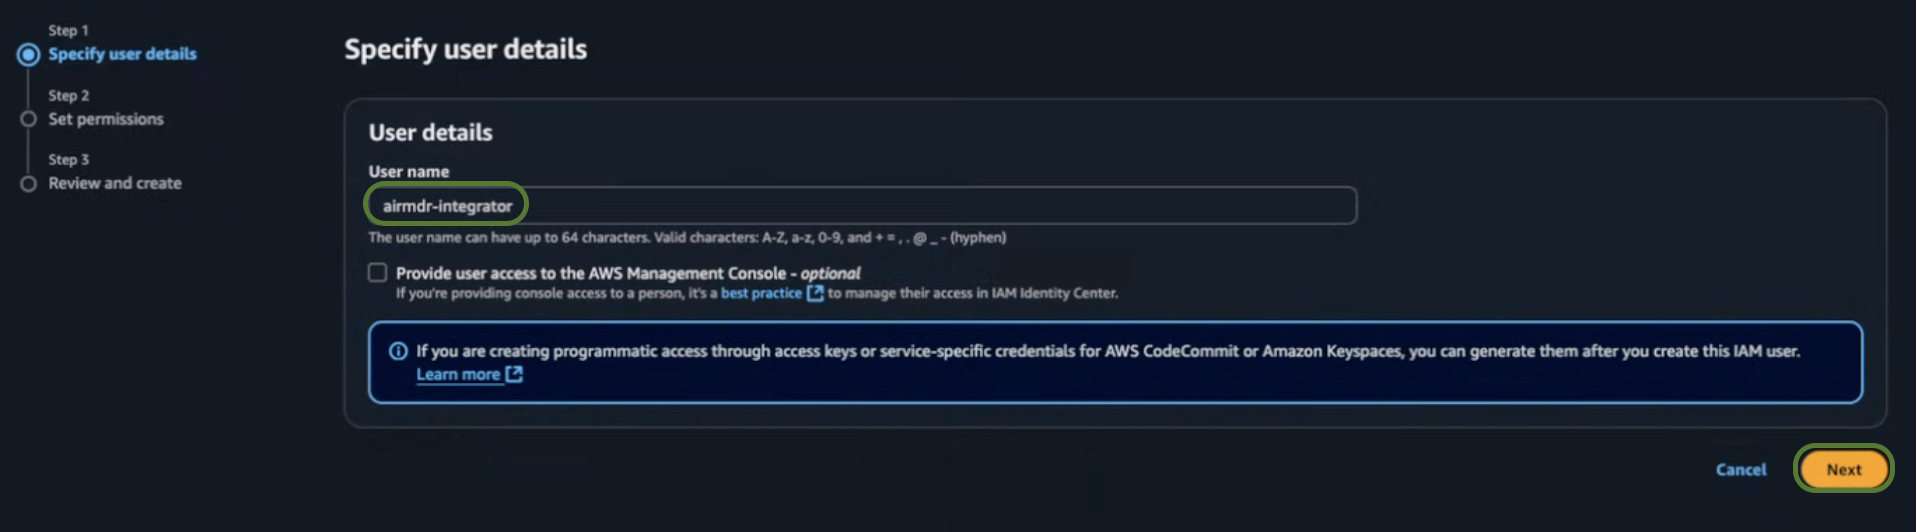
 * Enter a User name (e.g., `airmdr-integrator`).
* Click **Next**.
* Enter a User name (e.g., `airmdr-integrator`).
* Click **Next**.
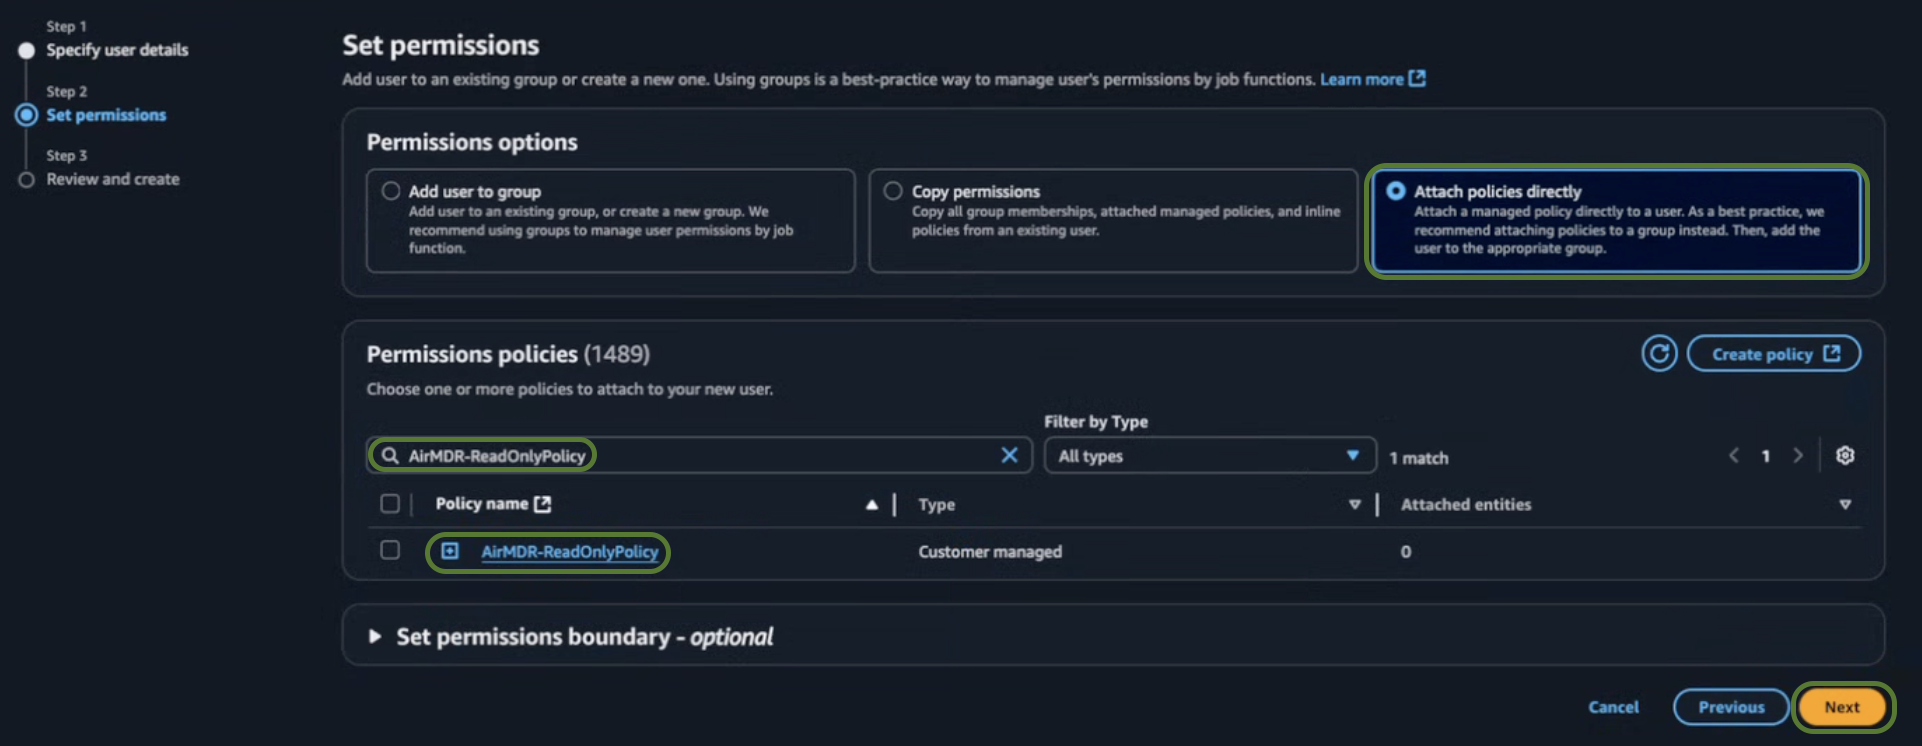
 * In the Set permissions section, select **Attach policies directly**.
* Search and select `AirMDR-ReadOnlyPolicy `.
Click [here](https://docs.airmdr.com/Integrations/AWS-Updated#create-iam-policy) for detailed steps to define the `AirMDR-ReadOnlyPolicy` in IAM.
* Click **Next.**
* In the Set permissions section, select **Attach policies directly**.
* Search and select `AirMDR-ReadOnlyPolicy `.
Click [here](https://docs.airmdr.com/Integrations/AWS-Updated#create-iam-policy) for detailed steps to define the `AirMDR-ReadOnlyPolicy` in IAM.
* Click **Next.**
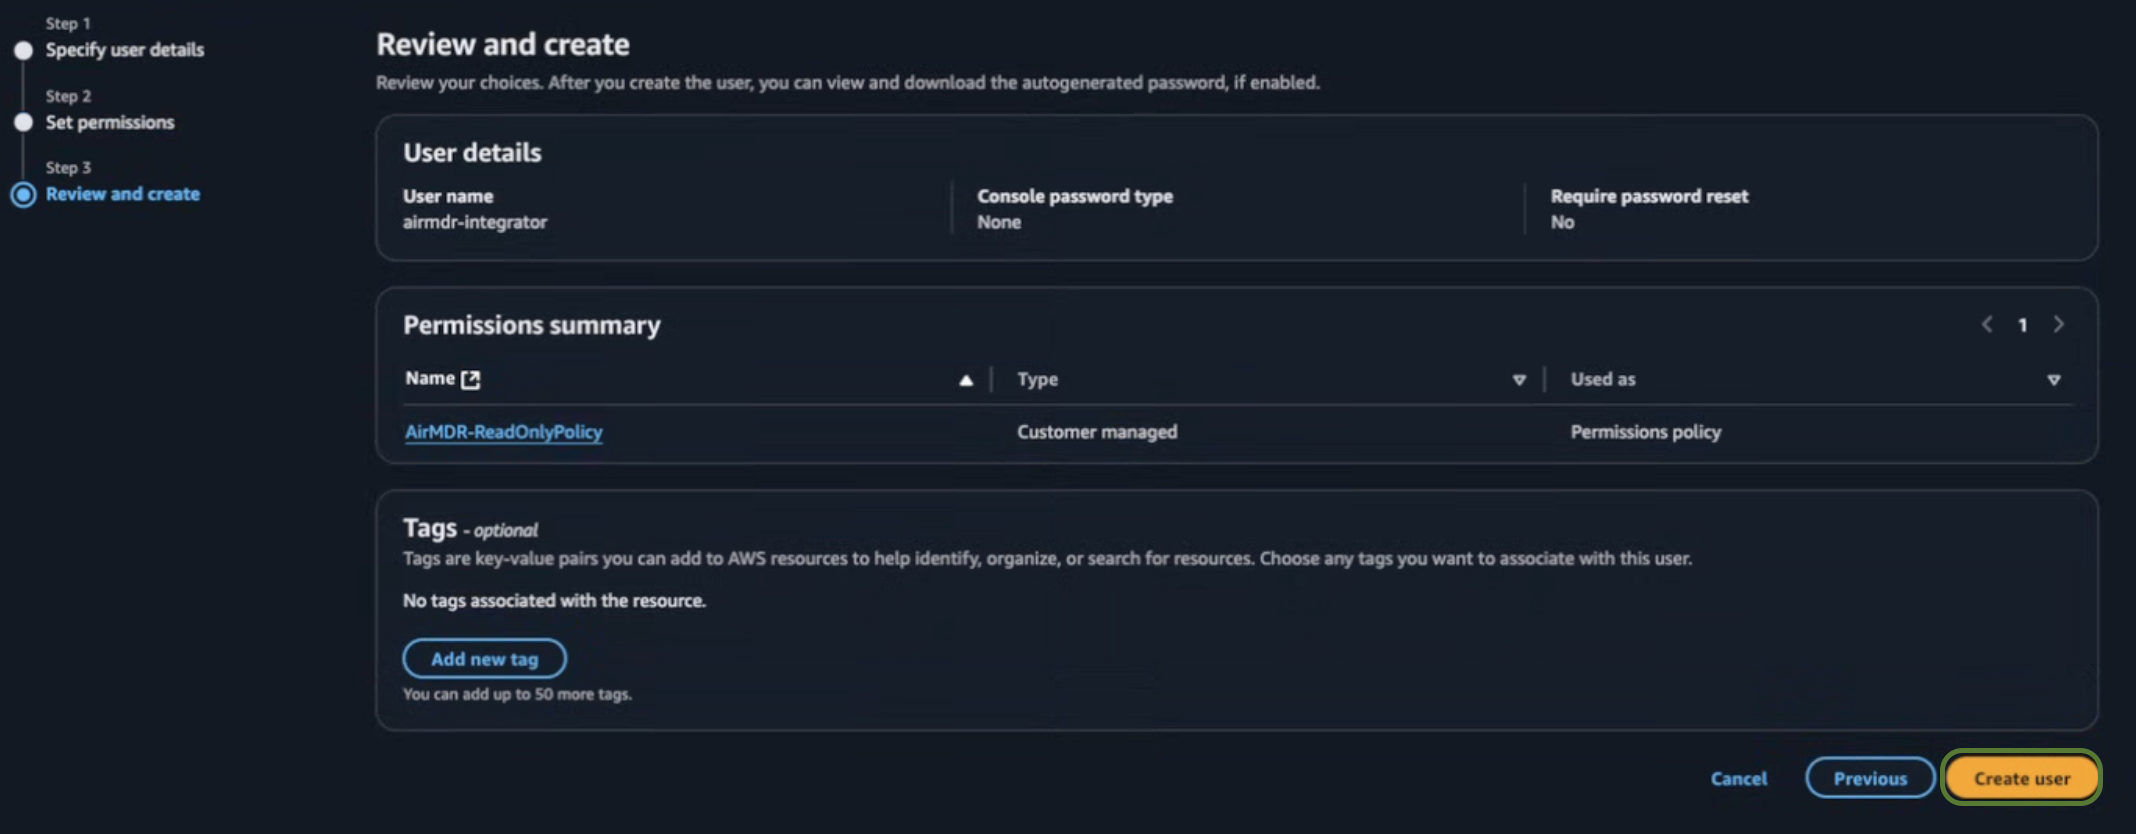
 * In the Review and create section, click **Create user**.
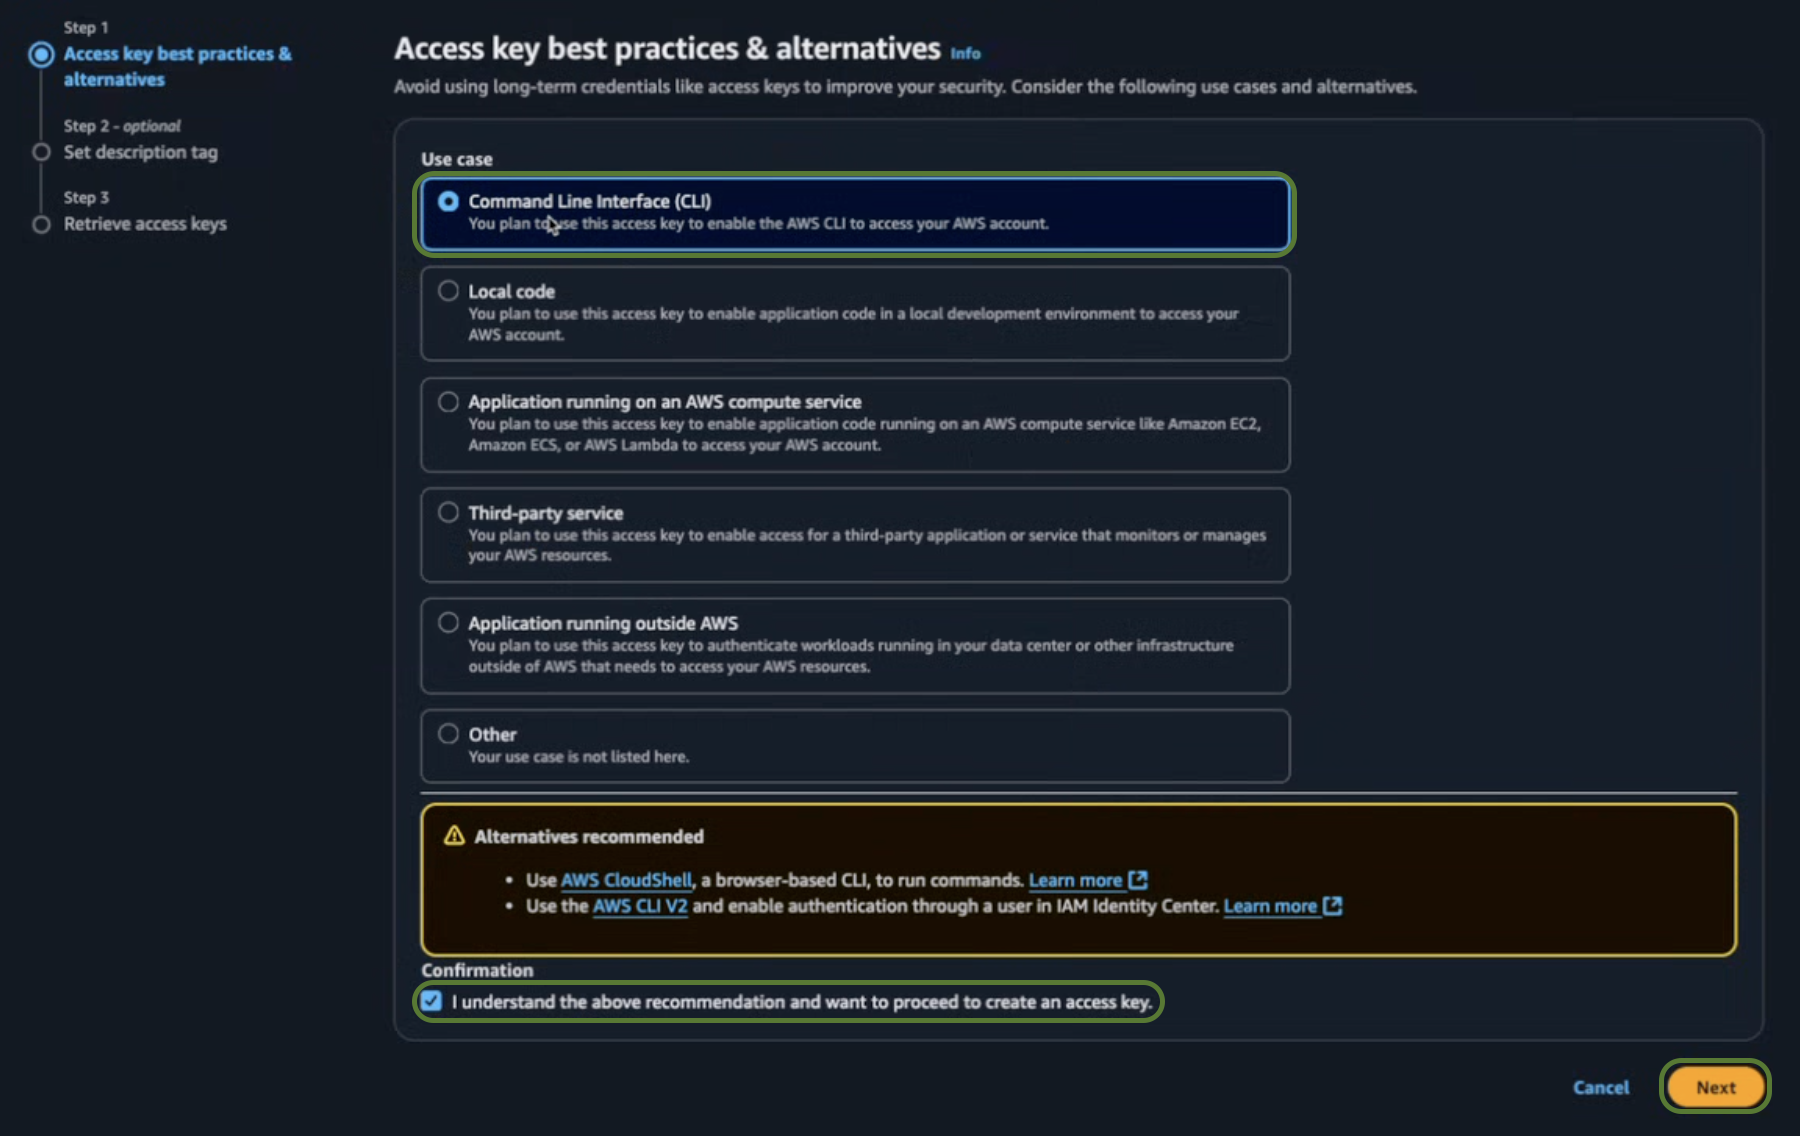
 * Search and select the User name (e.g., `airmdr-integrator`) created earlier.
* Click on **Create access key**.
* Select the **Command Line Interface (CLI)** Use case, and the confirmation checkbox.
* Click **Next**.
* Search and select the User name (e.g., `airmdr-integrator`) created earlier.
* Click on **Create access key**.
* Select the **Command Line Interface (CLI)** Use case, and the confirmation checkbox.
* Click **Next**.
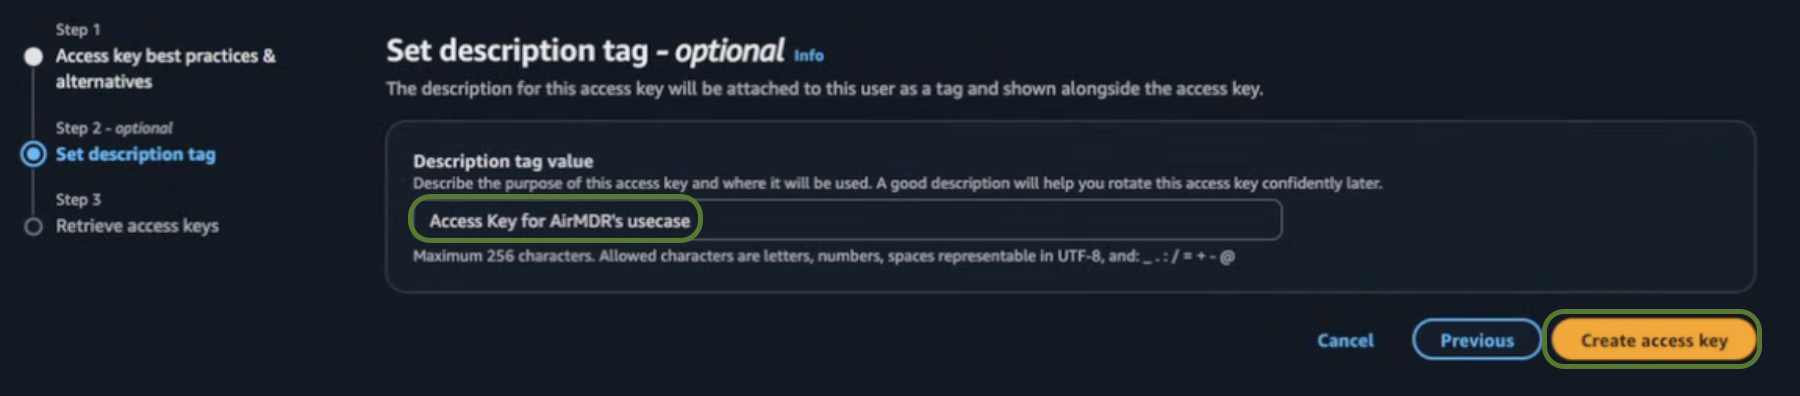
 * In the **set description tag - optional** section, provide the required information for the D**escription tag value**.
* **Description tag value** (Optional) – Access key for AirMDR's Use case.
* Click **Create access key**.
* In the **set description tag - optional** section, provide the required information for the D**escription tag value**.
* **Description tag value** (Optional) – Access key for AirMDR's Use case.
* Click **Create access key**.
 * On the Retrieve access keys screen, copy the:
* ✅ **Access Key ID**
* ✅ **Secret Access Key**
This is the only time you can view the **Access Key ID** and **Secret Access Key** so it is recommended to Download `.csv `file and save it securely in the password manager or organization vault for future reference
* Click **Done**.
### Option 2: IAM Role (Assume Role via STS)
If you need to grant **secure API access** to AWS services (e.g., EC2, Lambda, or third-party applications), you must create an **IAM role** with the right permissions.
* Navigate to **IAM → IAM Dashboard.**
* Click on IAM resources **→ Roles**.
* On the Retrieve access keys screen, copy the:
* ✅ **Access Key ID**
* ✅ **Secret Access Key**
This is the only time you can view the **Access Key ID** and **Secret Access Key** so it is recommended to Download `.csv `file and save it securely in the password manager or organization vault for future reference
* Click **Done**.
### Option 2: IAM Role (Assume Role via STS)
If you need to grant **secure API access** to AWS services (e.g., EC2, Lambda, or third-party applications), you must create an **IAM role** with the right permissions.
* Navigate to **IAM → IAM Dashboard.**
* Click on IAM resources **→ Roles**.
 * Click on **Create role** in the top right corner.
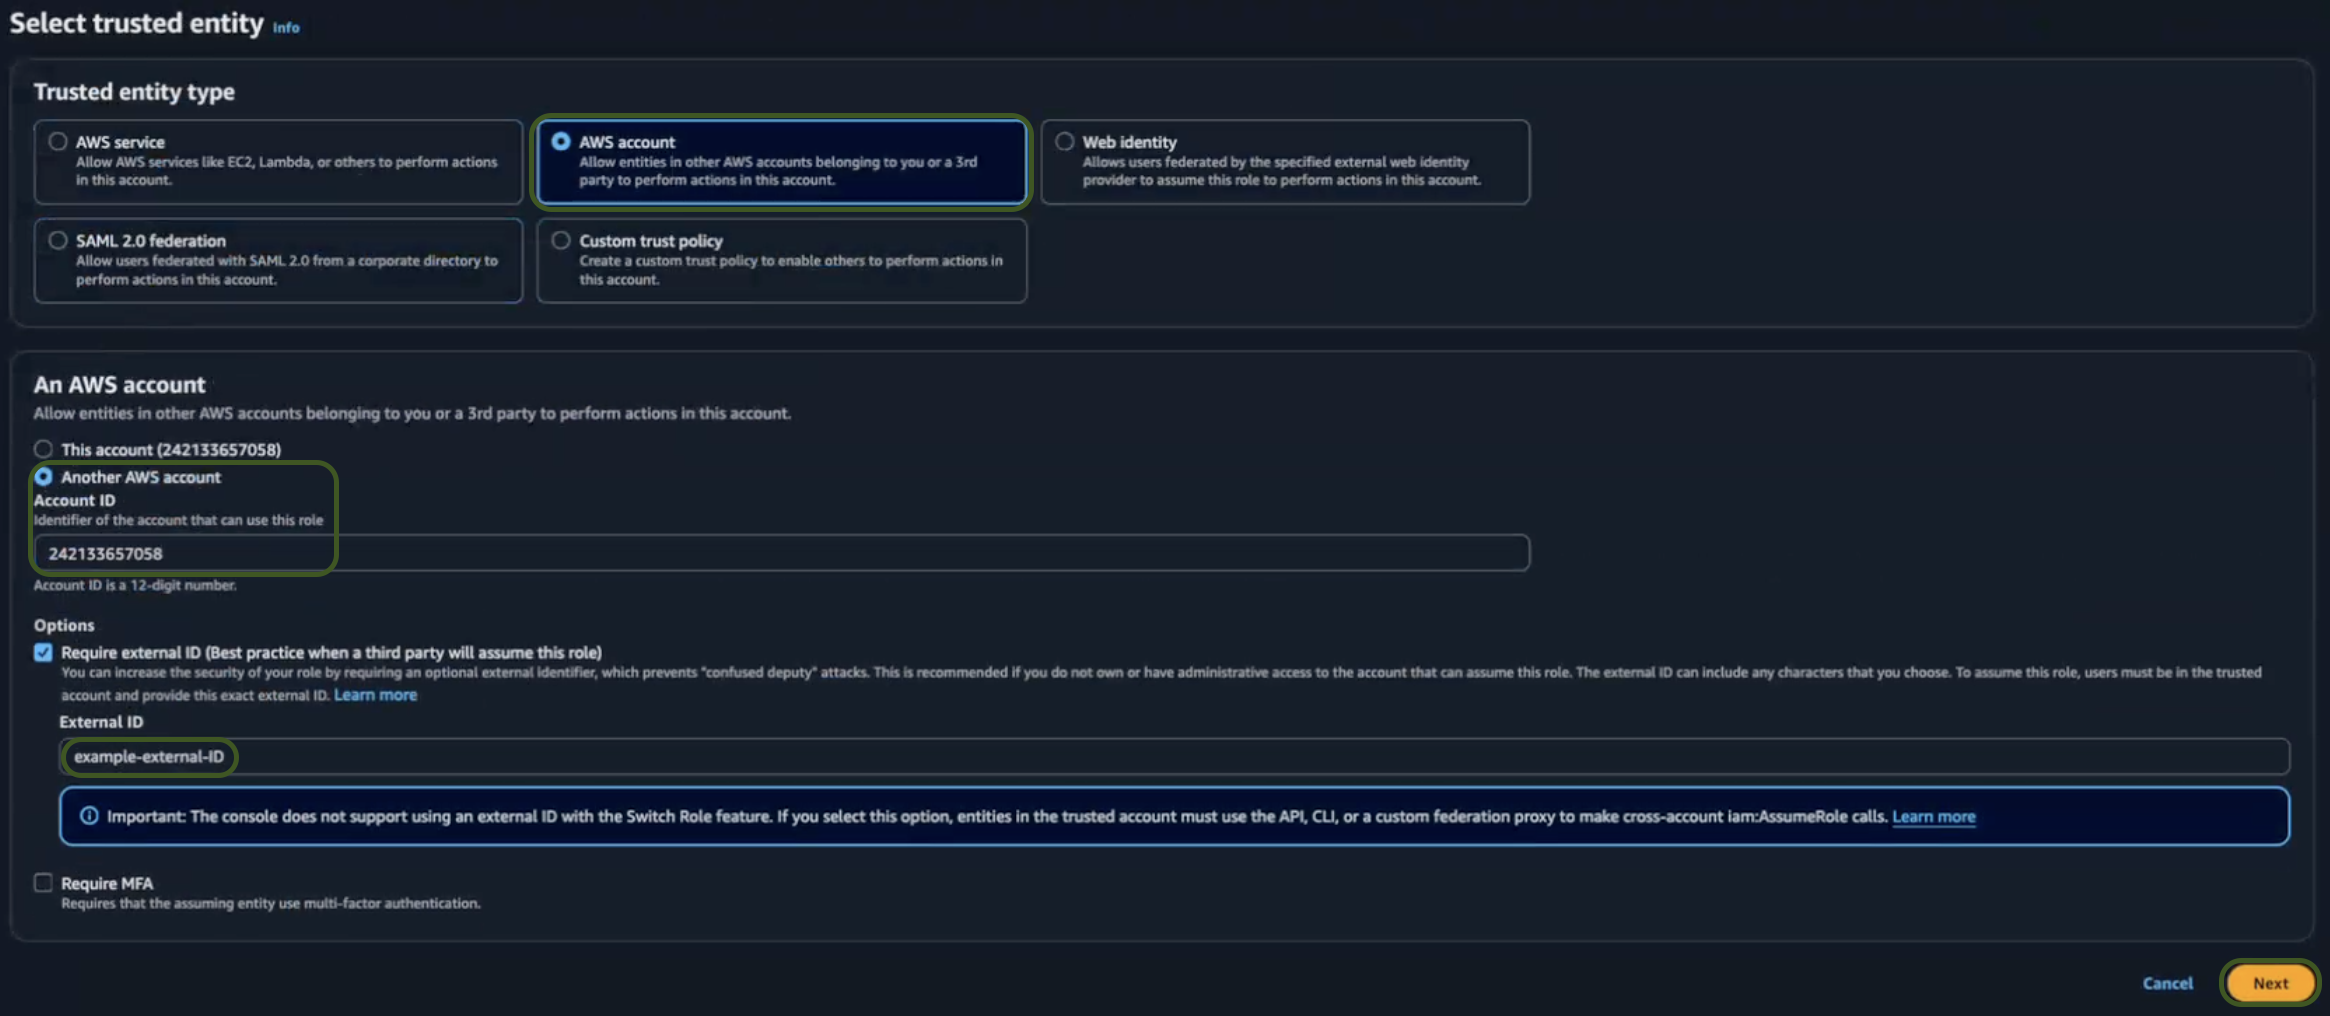
 * In the **Select a trusted entity → Trusted entity type section, chooseAWS Account** .
* In the **An AWS account** section, choose **Another AWS Account.**
* Enter the **AirMDR AWS Account ID**: **242133657058** only as an identifier of the account that can use this role.
Generally, the Account ID is a 12-digit Number, use only the Account ID mentioned above.
* Select the Required external ID Options checkbox (Best practice when a third party will assume this role).
* Provide a meaningful name for the **External ID** like `example-external-ID`.
**The** `ExternalId`**value must have a minimum of 2 characters and a maximum of 1,224 characters. The value must be alphanumeric without white space. It can also include the following symbols: plus (+), equal (=), comma (,), period (.), at (@), colon (:), forward slash (/), and hyphen (-)**
To enhance the Security:
1. Specify an External ID, a unique identifier that the trusted account must provide when assuming the role
2. To add an external\_id:
* Select the **Require an external ID** checkbox.
* Enter the unique agreed-upon external ID value.
* Do NOT check "**Require MFA**" unless the assuming account needs MFA.
* Click **Next**.
* In the **Select a trusted entity → Trusted entity type section, chooseAWS Account** .
* In the **An AWS account** section, choose **Another AWS Account.**
* Enter the **AirMDR AWS Account ID**: **242133657058** only as an identifier of the account that can use this role.
Generally, the Account ID is a 12-digit Number, use only the Account ID mentioned above.
* Select the Required external ID Options checkbox (Best practice when a third party will assume this role).
* Provide a meaningful name for the **External ID** like `example-external-ID`.
**The** `ExternalId`**value must have a minimum of 2 characters and a maximum of 1,224 characters. The value must be alphanumeric without white space. It can also include the following symbols: plus (+), equal (=), comma (,), period (.), at (@), colon (:), forward slash (/), and hyphen (-)**
To enhance the Security:
1. Specify an External ID, a unique identifier that the trusted account must provide when assuming the role
2. To add an external\_id:
* Select the **Require an external ID** checkbox.
* Enter the unique agreed-upon external ID value.
* Do NOT check "**Require MFA**" unless the assuming account needs MFA.
* Click **Next**.
 * In the **Add permissions** section, search and select `AirMDR-ReadOnlyPolicy`.
Click [here](https://docs.airmdr.com/Integrations/AWS-Updated#create-iam-policy) for detailed steps to define the `AirMDR-ReadOnlyPolicy` in IAM.
* Click **Next**.
* In the **Add permissions** section, search and select `AirMDR-ReadOnlyPolicy`.
Click [here](https://docs.airmdr.com/Integrations/AWS-Updated#create-iam-policy) for detailed steps to define the `AirMDR-ReadOnlyPolicy` in IAM.
* Click **Next**.
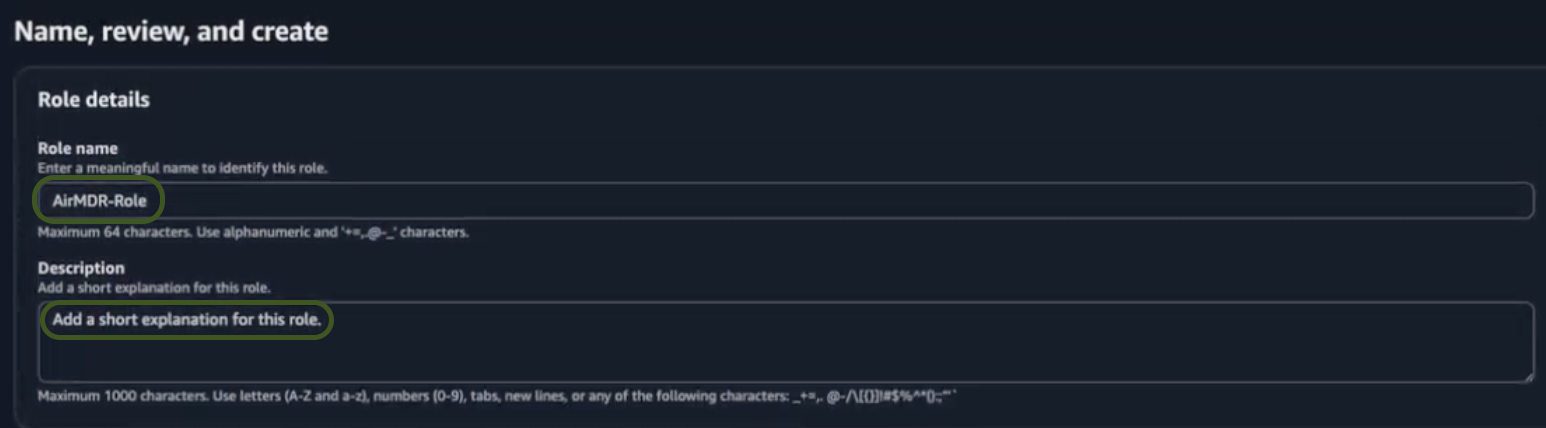
 * In the **Name, review and create** section.
* Provide the required information in the **Role details** section for the role.
* **Role Name** – Provide a meaningful name like `AirMDR-Role`.
* **Description** (Optional) – Add a short description for this role.
* In the **Name, review and create** section.
* Provide the required information in the **Role details** section for the role.
* **Role Name** – Provide a meaningful name like `AirMDR-Role`.
* **Description** (Optional) – Add a short description for this role.
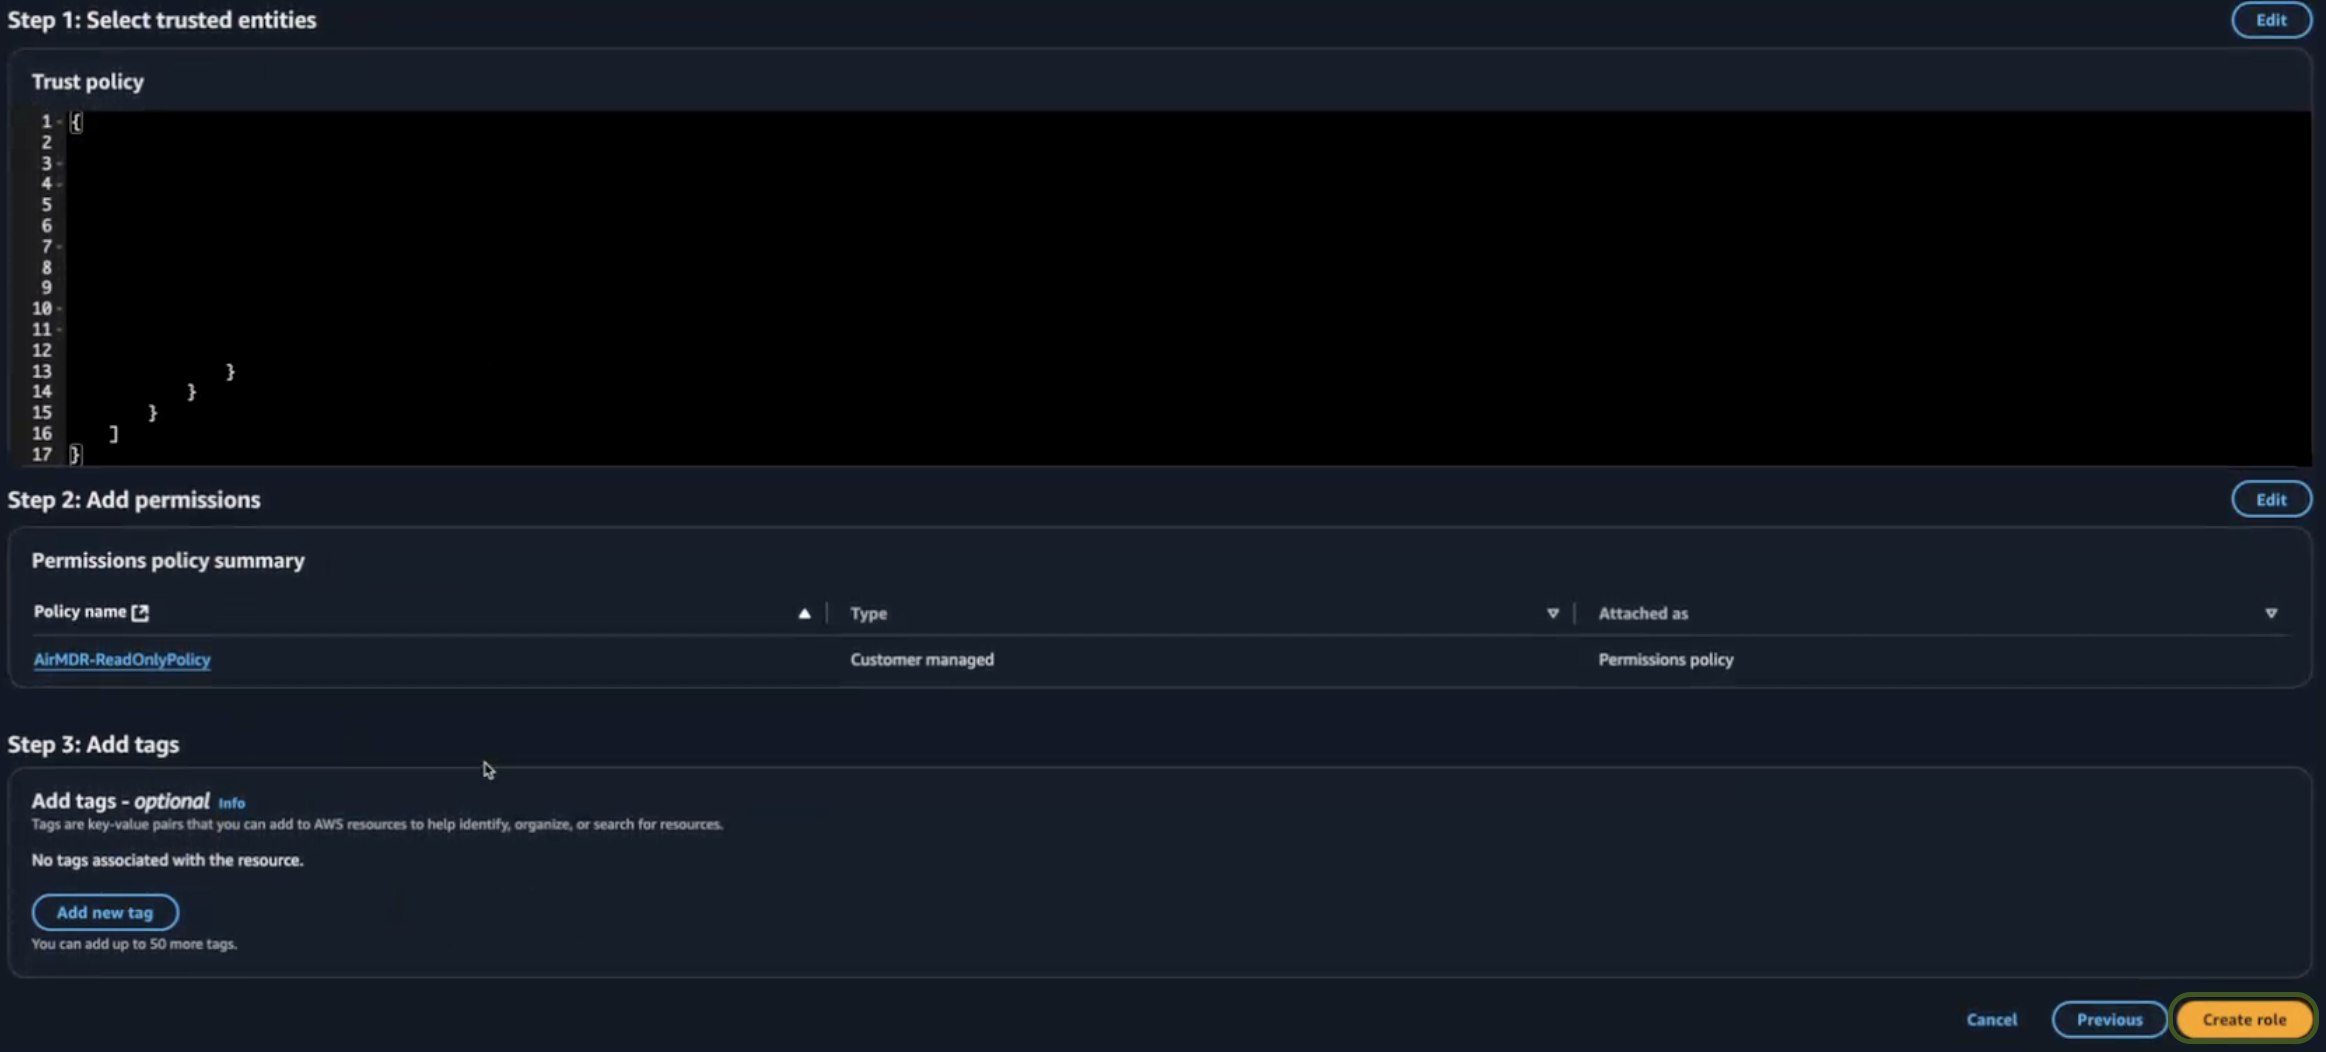
 * Review your selections (Permissions and Policies), and if everything is correct.
* **Review Permissions** – Ensure the attached policies meet your security needs.
* **Review Trust Policy** – Verify the trust policy when you use cross-account access or service.
* Click **Create role**.
* Review your selections (Permissions and Policies), and if everything is correct.
* **Review Permissions** – Ensure the attached policies meet your security needs.
* **Review Trust Policy** – Verify the trust policy when you use cross-account access or service.
* Click **Create role**.
 * Search and select the role (e.g., `AirMDR-Role`) created earlier.
* Once the role is created, click on the role name
* Copy and securely save the **Role ARN** (Amazon Resource Name):
* ✅ **Role ARN**
* ✅ **External ID** (entered earlier)
Securely save and share these credentials with the AirMDR support team to allow monitoring.
* Click **Done**.
### Option 3: Multi-Account Integration using AWS StackSet Method
1. **Create IAM Role ARN from Root (Management) Account**
* Sign in to the **Root AWS Account**.
* In the AWS Console Home, navigate to ****IAM → Roles.****
* Click on **Create role** in the top right corner.
* Choose **AWS Account** from Trusted entity type.
* Choose **Another AWS Account** from **An AWS account**.
* Enter:
* **Account ID**: `242133657058` (AirMDR’s AWS account)
* Enable **External ID** and set a secure unique string (you’ll need this again later).
* Assign the AWS policy: `AWSOrganizationsReadOnlyAccess`.
* Click **Next**.
* Provide the Role details
* Role name: Name the role (e.g., `AirMDROrgAccessRole`).
* Description: Add a short explanation of this role (Optional)
* Click Create role.
* After creation, open the role created (e.g., `AirMDROrgAccessRole`) and copy the **Role ARN** and **root Account ID**.
* Example: This becomes your `root_account_role_arn` parameter.
```
arn:aws:iam::123456789012:role/AirMDROrgAccessRole
```
* Example: Your `root_account_id` parameter will be showcased in the `arn` parameter or access it from the **AdministratorAccess** drop-down in the top-right corner.
```
123456789012
```
The account is generally **12-digit** shown on the page.
This account ID also helps AirMDR know whether to **ignore pulling data** from the root account if needed.
2. **External ID Used in Root Account Role Trust Policy**
* This is the same **External ID** you configured during role creation above.
* You can find it in **IAM → Roles → \[Your Role] → Trust relationships**.
Optional: If needed, edit the trust relationship and view the `sts:ExternalId` condition.
Example value of External ID:
**The** `ExternalId`**value must have a minimum of 2 characters and a maximum of 1,224 characters. The value must be alphanumeric without white space. It can also include the following symbols: plus (+), equal (=), comma (,), period (.), at (@), colon (:), forward slash (/), and hyphen (-)**
```
airmdr-stackset-unique-id-xyz
```
3. **AWS Stacksets**
This is the **common IAM role name** that you will create in every member account.
* Sign in to the **Root AWS Account**.
* In the AWS Console Home → **CloudFormation.**
* In the left navigation pane of CloudFormation, select **Stacksets**.
* Click on **Create StackSet** in the top right corner.
* Step 1: In the Choose a template page, select the radio buttons for the respective options as mentioned below:
* In the Permissions model → Service-managed permissions
* In the Prerequisite - Prepare Template → Template is ready
* In the Specify template → Upload a template file
Use the ***Choose file*** option to upload a template file in the format of YAML provided by AirMDR support team.\
\
If you do not have the template file (YAML format) request it from AirMDR support team.
Before you upload the template file (YAML format) update the `sts:ExternalId` with an unique value.
**The** `ExternalId`**value must have a minimum of 2 characters and a maximum of 1,224 characters. The value must be alphanumeric without white space. It can also include the following symbols: plus (+), equal (=), comma (,), period (.), at (@), colon (:), forward slash (/), and hyphen (-)**
**Template file (YAML format):**
```
AWSTemplateFormatVersion: "2010-09-09"
Description: "IAM Role with ReadOnly permissions for deployment across child accounts"
Parameters:
RoleName:
Type: String
Default: "AirMDRReadOnlyRole"
Description: "Name of the IAM role"
TrustedAccountId:
Type: String
Default: "242133657058"
Description: "AWS Account ID that can assume this role"
Resources:
AirMDRReadOnlyRole:
Type: AWS::IAM::Role
Properties:
RoleName: !Ref RoleName
AssumeRolePolicyDocument:
Version: "2012-10-17"
Statement:
- Effect: Allow
Principal:
AWS: !Sub "arn:aws:iam::${TrustedAccountId}:root"
Action: "sts:AssumeRole"
Condition:
StringEquals:
"sts:ExternalId": "airmdr-member-role-external-id"
Policies:
- PolicyName: "AirMDRReadOnlyPolicy"
PolicyDocument:
Version: "2012-10-17"
Statement:
# CloudTrail permissions
- Effect: Allow
Action:
- "cloudtrail:LookupEvents"
- "cloudtrail:GetTrailStatus"
- "cloudtrail:DescribeTrails"
Resource: "*"
# GuardDuty permissions
- Effect: Allow
Action:
- "guardduty:ListDetectors"
- "guardduty:GetFindings"
- "guardduty:ListFindings"
- "guardduty:DescribeDetector"
Resource: "*"
Tags:
- Key: "Purpose"
Value: "AirMDRReadOnly"
- Key: "ManagedBy"
Value: "CloudFormation-StackSets"
Outputs:
RoleArn:
Description: "ARN of the created role"
Value: !GetAtt AirMDRReadOnlyRole.Arn
Export:
Name: !Sub "${AWS::StackName}-RoleArn"
RoleName:
Description: "Name of the created role"
Value: !Ref AirMDRReadOnlyRole
Export:
Name: !Sub "${AWS::StackName}-RoleName"
AssumeRoleCommand:
Description: "AWS CLI command to assume this role"
Value: !Sub "aws sts assume-role --role-arn ${AirMDRReadOnlyRole.Arn} --role-session-name AirMDRReadOnlySession --external-id airmdr-member-role-external-id"
```
* Click **Next**.
* Step 2: In the Specify StackSet details page
* Provide a unique **StackSet name** (e.g., `AirMDR-StackSet`).
* Provide the StackSet description (Optional)
All the Parameters (`RoleName`, `SSOUserAccountId`and `TrustedAccountId`) are updated automatically as defined in the template file (YAML format).
* Click **Next**.
* Step 3: In the Configure StackSet options page, select the radio buttons for the respective options as mentioned below:
* In the "*Execution configuration → Managed execution"*, select the option **Inactive** (Stacksets performs one action at a time)
* In the *Capabilities*, acknowledge by selecting the checkbox.
* Click **Next**.
* Step 4: In the Set deployment options page, select the radio buttons for the respective options as mentioned below:
* In the "*Add stacks to stack set"*, select the option **Deploy new stacks**
* In the "*Deployment targets"*, select the option **Deployment to organisation**
* In the "Auto-deployment options → *Automatic deployment"*, select the option **Activated**
* In the "Auto-deployment options → *Account removal behaviour*", select the option **Delete stacks**
* In the "*Specify Regions*", choose the applicable region **code** (as per organizational requirements) in which you want to deploy stacks.
Example: `us-east-1 `(This will be your `region_name` parameter).
* In the "Deployment options → *Region concurrency*", select the option **Sequential**
* In the "Deployment options → Concurrency mode", select the option **Strict failure tolerance**
* Click **Next**.
* Step 4: In the **Review** page:
* Review all the Permissions, StackSet details, StackSet configuration options, Deployment Options provided
* Click **Submit**.
Upon successful completion of assigning the role name (e.g.,`AirMDRReadOnlyRole`), and an **external ID** with unique value. \
The same Role is created across all the child accounts.
## ✅ Final Summary of Collected Parameters
| Parameter | Example Value |
| :-------------------------- | :--------------------------------------------------- |
| `arn` | `arn:aws:iam::123456789012:role/AirMDROrgAccessRole` |
| `external_id` | `airmdr-stackset-unique-id-xyz` |
| `root_account_id` | `123456789012` |
| `cross_account_role_name` | `AirMDRReadOnlyRole` |
| `cross_account_external_id` | `airmdr-member-role-external-id` |
| `region_name` | `us-east-1` |
Securely save and share these credentials with the AirMDR support team to allow monitoring.
### Where to find the generated AWS Authentication Parameters in the Console (UI Steps)
| **Credential** | **How to Get It (UI Path)** |
| :---------------------------- | :-------------------------------------------------------------------------------------------------------------- |
| **Access Key ID** | IAM → Users → Select user → **Security credentials** tab → Scroll to **Access keys** section |
| **Secret Access Key** | Shown only once during Access Key creation. If lost, delete and **create a new access key** under "Access keys" |
| **Role ARN** | IAM → Roles → Click on created role (e.g., `AirMDROrgAccessRole`) → **Copy ARN** from top section |
| **External ID** | IAM → Roles → Select role → **Trust relationships** → View or edit policy to see `sts:ExternalId` |
| **Region Name** | Top-right corner of AWS Console (e.g., `us-east-1`, `ap-south-1`) or in the region dropdown in any service page |
| **Root Account ID** | Click account name (top-right) → **My Account** → Find **12-digit Account ID** under “Account settings” |
| **Cross Account Role Name** | IAM → Roles (in member account) → Name of role created (e.g., `AirMDRReadOnlyRole`) |
| **Cross Account External ID** | IAM → Roles (in member account) → Select role → **Trust relationships** → Check for `sts:ExternalId` value |
### Skills Provided by this Integration
| Skill ID | Purpose | Permissions Required |
| :---------------------------------------- | :----------------------------------------------------------------------------------------------------------------------------------------------------------------------------------------------------------------------------------------------------------------------------------------------------------------------------------------------- | :--------------------------------------------------------------------------------- |
| **Lookup AWS CloudTrail Events** | Retrieve events from AWS CloudTrail. Use this skill to monitor and audit account activity across your AWS infrastructure, ensuring compliance and security. \ For example, you can track changes made to specific AWS resources or by certain users. | AWSCloudTrail\_ReadOnlyAccess |
| **Filter AWS CloudWatch Log Events** | Filter and retrieve logs from specified AWS CloudWatch LogGroups and LogStreams based on various parameters such as time range and filter patterns. This skill is useful for analyzing and debugging application behavior by examining log data. The output includes detailed log event information such as timestamps, messages, and event IDs. | CloudWatchLogsReadOnlyAccess |
| **Get AWS Guard Duty Findings** | Retrieve detailed security incident findings from AWS GuardDuty. Use this skill to analyze potential threats and vulnerabilities detected by GuardDuty, helping you maintain the security and integrity of your AWS environments. The output includes comprehensive details about each finding, such as severity, type, and involved resources. | AmazonGuardDutyReadOnlyAccess |
| **Get AWS SecurityHub Findings** | Retrieve detailed findings from AWS SecurityHub based on specified filters. Use this skill to analyze security alerts and vulnerabilities detected in your AWS environment. You can filter findings by attributes such as account name or resource application name to focus on specific areas of interest. | AWSSecurityHubReadOnlyAccess |
| **Get AWS CloudWatch Log Events** | Retrieve log events from specified AWS CloudWatch LogGroups and LogStreams. Use this skill to monitor, troubleshoot, and audit activities within your AWS environment by accessing detailed log data. The output includes log event details such as timestamp, message content, and ingestion time. | CloudWatchLogsReadOnlyAccess |
| **Execute AWS Athena Query** | Use this skill to execute SQL queries in AWS Athena, allowing you to analyze large-scale data directly in S3. This is useful for data analysis and reporting purposes. The output includes detailed query results and execution metadata. | AmazonAthenaFullAccess |
| **Get AWS Caller Permissions** | Check if the AWS caller has the required permissions specified in the input policies list. This skill helps verify IAM permissions before performing actions that require specific AWS permissions. | |
| **Update AWS SecurityHub Finding Status** | Update the workflow status of a specific finding in AWS SecurityHub. This skill allows you to change the status of security findings to track their investigation and resolution progress. | |
| **general\_aws\_query** | Execute AWS service commands across different services using Boto3 python client. | AmazonEC2ReadOnlyAccess |
| **Execute OpenSearch Query** | Execute search queries against AWS OpenSearch domains. Use this skill to search and retrieve documents from specified OpenSearch indices using custom query DSL. The output includes the complete search response with matching documents and metadata. | AmazonOpenSearchServiceReadOnlyAccess
* Search and select the role (e.g., `AirMDR-Role`) created earlier.
* Once the role is created, click on the role name
* Copy and securely save the **Role ARN** (Amazon Resource Name):
* ✅ **Role ARN**
* ✅ **External ID** (entered earlier)
Securely save and share these credentials with the AirMDR support team to allow monitoring.
* Click **Done**.
### Option 3: Multi-Account Integration using AWS StackSet Method
1. **Create IAM Role ARN from Root (Management) Account**
* Sign in to the **Root AWS Account**.
* In the AWS Console Home, navigate to ****IAM → Roles.****
* Click on **Create role** in the top right corner.
* Choose **AWS Account** from Trusted entity type.
* Choose **Another AWS Account** from **An AWS account**.
* Enter:
* **Account ID**: `242133657058` (AirMDR’s AWS account)
* Enable **External ID** and set a secure unique string (you’ll need this again later).
* Assign the AWS policy: `AWSOrganizationsReadOnlyAccess`.
* Click **Next**.
* Provide the Role details
* Role name: Name the role (e.g., `AirMDROrgAccessRole`).
* Description: Add a short explanation of this role (Optional)
* Click Create role.
* After creation, open the role created (e.g., `AirMDROrgAccessRole`) and copy the **Role ARN** and **root Account ID**.
* Example: This becomes your `root_account_role_arn` parameter.
```
arn:aws:iam::123456789012:role/AirMDROrgAccessRole
```
* Example: Your `root_account_id` parameter will be showcased in the `arn` parameter or access it from the **AdministratorAccess** drop-down in the top-right corner.
```
123456789012
```
The account is generally **12-digit** shown on the page.
This account ID also helps AirMDR know whether to **ignore pulling data** from the root account if needed.
2. **External ID Used in Root Account Role Trust Policy**
* This is the same **External ID** you configured during role creation above.
* You can find it in **IAM → Roles → \[Your Role] → Trust relationships**.
Optional: If needed, edit the trust relationship and view the `sts:ExternalId` condition.
Example value of External ID:
**The** `ExternalId`**value must have a minimum of 2 characters and a maximum of 1,224 characters. The value must be alphanumeric without white space. It can also include the following symbols: plus (+), equal (=), comma (,), period (.), at (@), colon (:), forward slash (/), and hyphen (-)**
```
airmdr-stackset-unique-id-xyz
```
3. **AWS Stacksets**
This is the **common IAM role name** that you will create in every member account.
* Sign in to the **Root AWS Account**.
* In the AWS Console Home → **CloudFormation.**
* In the left navigation pane of CloudFormation, select **Stacksets**.
* Click on **Create StackSet** in the top right corner.
* Step 1: In the Choose a template page, select the radio buttons for the respective options as mentioned below:
* In the Permissions model → Service-managed permissions
* In the Prerequisite - Prepare Template → Template is ready
* In the Specify template → Upload a template file
Use the ***Choose file*** option to upload a template file in the format of YAML provided by AirMDR support team.\
\
If you do not have the template file (YAML format) request it from AirMDR support team.
Before you upload the template file (YAML format) update the `sts:ExternalId` with an unique value.
**The** `ExternalId`**value must have a minimum of 2 characters and a maximum of 1,224 characters. The value must be alphanumeric without white space. It can also include the following symbols: plus (+), equal (=), comma (,), period (.), at (@), colon (:), forward slash (/), and hyphen (-)**
**Template file (YAML format):**
```
AWSTemplateFormatVersion: "2010-09-09"
Description: "IAM Role with ReadOnly permissions for deployment across child accounts"
Parameters:
RoleName:
Type: String
Default: "AirMDRReadOnlyRole"
Description: "Name of the IAM role"
TrustedAccountId:
Type: String
Default: "242133657058"
Description: "AWS Account ID that can assume this role"
Resources:
AirMDRReadOnlyRole:
Type: AWS::IAM::Role
Properties:
RoleName: !Ref RoleName
AssumeRolePolicyDocument:
Version: "2012-10-17"
Statement:
- Effect: Allow
Principal:
AWS: !Sub "arn:aws:iam::${TrustedAccountId}:root"
Action: "sts:AssumeRole"
Condition:
StringEquals:
"sts:ExternalId": "airmdr-member-role-external-id"
Policies:
- PolicyName: "AirMDRReadOnlyPolicy"
PolicyDocument:
Version: "2012-10-17"
Statement:
# CloudTrail permissions
- Effect: Allow
Action:
- "cloudtrail:LookupEvents"
- "cloudtrail:GetTrailStatus"
- "cloudtrail:DescribeTrails"
Resource: "*"
# GuardDuty permissions
- Effect: Allow
Action:
- "guardduty:ListDetectors"
- "guardduty:GetFindings"
- "guardduty:ListFindings"
- "guardduty:DescribeDetector"
Resource: "*"
Tags:
- Key: "Purpose"
Value: "AirMDRReadOnly"
- Key: "ManagedBy"
Value: "CloudFormation-StackSets"
Outputs:
RoleArn:
Description: "ARN of the created role"
Value: !GetAtt AirMDRReadOnlyRole.Arn
Export:
Name: !Sub "${AWS::StackName}-RoleArn"
RoleName:
Description: "Name of the created role"
Value: !Ref AirMDRReadOnlyRole
Export:
Name: !Sub "${AWS::StackName}-RoleName"
AssumeRoleCommand:
Description: "AWS CLI command to assume this role"
Value: !Sub "aws sts assume-role --role-arn ${AirMDRReadOnlyRole.Arn} --role-session-name AirMDRReadOnlySession --external-id airmdr-member-role-external-id"
```
* Click **Next**.
* Step 2: In the Specify StackSet details page
* Provide a unique **StackSet name** (e.g., `AirMDR-StackSet`).
* Provide the StackSet description (Optional)
All the Parameters (`RoleName`, `SSOUserAccountId`and `TrustedAccountId`) are updated automatically as defined in the template file (YAML format).
* Click **Next**.
* Step 3: In the Configure StackSet options page, select the radio buttons for the respective options as mentioned below:
* In the "*Execution configuration → Managed execution"*, select the option **Inactive** (Stacksets performs one action at a time)
* In the *Capabilities*, acknowledge by selecting the checkbox.
* Click **Next**.
* Step 4: In the Set deployment options page, select the radio buttons for the respective options as mentioned below:
* In the "*Add stacks to stack set"*, select the option **Deploy new stacks**
* In the "*Deployment targets"*, select the option **Deployment to organisation**
* In the "Auto-deployment options → *Automatic deployment"*, select the option **Activated**
* In the "Auto-deployment options → *Account removal behaviour*", select the option **Delete stacks**
* In the "*Specify Regions*", choose the applicable region **code** (as per organizational requirements) in which you want to deploy stacks.
Example: `us-east-1 `(This will be your `region_name` parameter).
* In the "Deployment options → *Region concurrency*", select the option **Sequential**
* In the "Deployment options → Concurrency mode", select the option **Strict failure tolerance**
* Click **Next**.
* Step 4: In the **Review** page:
* Review all the Permissions, StackSet details, StackSet configuration options, Deployment Options provided
* Click **Submit**.
Upon successful completion of assigning the role name (e.g.,`AirMDRReadOnlyRole`), and an **external ID** with unique value. \
The same Role is created across all the child accounts.
## ✅ Final Summary of Collected Parameters
| Parameter | Example Value |
| :-------------------------- | :--------------------------------------------------- |
| `arn` | `arn:aws:iam::123456789012:role/AirMDROrgAccessRole` |
| `external_id` | `airmdr-stackset-unique-id-xyz` |
| `root_account_id` | `123456789012` |
| `cross_account_role_name` | `AirMDRReadOnlyRole` |
| `cross_account_external_id` | `airmdr-member-role-external-id` |
| `region_name` | `us-east-1` |
Securely save and share these credentials with the AirMDR support team to allow monitoring.
### Where to find the generated AWS Authentication Parameters in the Console (UI Steps)
| **Credential** | **How to Get It (UI Path)** |
| :---------------------------- | :-------------------------------------------------------------------------------------------------------------- |
| **Access Key ID** | IAM → Users → Select user → **Security credentials** tab → Scroll to **Access keys** section |
| **Secret Access Key** | Shown only once during Access Key creation. If lost, delete and **create a new access key** under "Access keys" |
| **Role ARN** | IAM → Roles → Click on created role (e.g., `AirMDROrgAccessRole`) → **Copy ARN** from top section |
| **External ID** | IAM → Roles → Select role → **Trust relationships** → View or edit policy to see `sts:ExternalId` |
| **Region Name** | Top-right corner of AWS Console (e.g., `us-east-1`, `ap-south-1`) or in the region dropdown in any service page |
| **Root Account ID** | Click account name (top-right) → **My Account** → Find **12-digit Account ID** under “Account settings” |
| **Cross Account Role Name** | IAM → Roles (in member account) → Name of role created (e.g., `AirMDRReadOnlyRole`) |
| **Cross Account External ID** | IAM → Roles (in member account) → Select role → **Trust relationships** → Check for `sts:ExternalId` value |
### Skills Provided by this Integration
| Skill ID | Purpose | Permissions Required |
| :---------------------------------------- | :----------------------------------------------------------------------------------------------------------------------------------------------------------------------------------------------------------------------------------------------------------------------------------------------------------------------------------------------- | :--------------------------------------------------------------------------------- |
| **Lookup AWS CloudTrail Events** | Retrieve events from AWS CloudTrail. Use this skill to monitor and audit account activity across your AWS infrastructure, ensuring compliance and security. \ For example, you can track changes made to specific AWS resources or by certain users. | AWSCloudTrail\_ReadOnlyAccess |
| **Filter AWS CloudWatch Log Events** | Filter and retrieve logs from specified AWS CloudWatch LogGroups and LogStreams based on various parameters such as time range and filter patterns. This skill is useful for analyzing and debugging application behavior by examining log data. The output includes detailed log event information such as timestamps, messages, and event IDs. | CloudWatchLogsReadOnlyAccess |
| **Get AWS Guard Duty Findings** | Retrieve detailed security incident findings from AWS GuardDuty. Use this skill to analyze potential threats and vulnerabilities detected by GuardDuty, helping you maintain the security and integrity of your AWS environments. The output includes comprehensive details about each finding, such as severity, type, and involved resources. | AmazonGuardDutyReadOnlyAccess |
| **Get AWS SecurityHub Findings** | Retrieve detailed findings from AWS SecurityHub based on specified filters. Use this skill to analyze security alerts and vulnerabilities detected in your AWS environment. You can filter findings by attributes such as account name or resource application name to focus on specific areas of interest. | AWSSecurityHubReadOnlyAccess |
| **Get AWS CloudWatch Log Events** | Retrieve log events from specified AWS CloudWatch LogGroups and LogStreams. Use this skill to monitor, troubleshoot, and audit activities within your AWS environment by accessing detailed log data. The output includes log event details such as timestamp, message content, and ingestion time. | CloudWatchLogsReadOnlyAccess |
| **Execute AWS Athena Query** | Use this skill to execute SQL queries in AWS Athena, allowing you to analyze large-scale data directly in S3. This is useful for data analysis and reporting purposes. The output includes detailed query results and execution metadata. | AmazonAthenaFullAccess |
| **Get AWS Caller Permissions** | Check if the AWS caller has the required permissions specified in the input policies list. This skill helps verify IAM permissions before performing actions that require specific AWS permissions. | |
| **Update AWS SecurityHub Finding Status** | Update the workflow status of a specific finding in AWS SecurityHub. This skill allows you to change the status of security findings to track their investigation and resolution progress. | |
| **general\_aws\_query** | Execute AWS service commands across different services using Boto3 python client. | AmazonEC2ReadOnlyAccess |
| **Execute OpenSearch Query** | Execute search queries against AWS OpenSearch domains. Use this skill to search and retrieve documents from specified OpenSearch indices using custom query DSL. The output includes the complete search response with matching documents and metadata. | AmazonOpenSearchServiceReadOnlyAccess
AmazonOpenSearchIngestionReadOnlyAccess |
To view the details of Input Parameters and Output for the respective skills
* Go to [AirMDR → AWS](https://app.airmdr.com/integrations?search=Amazon+Web+Services\&provider=f3c701f2-a808-482c-ab3c-473391eae6b2) Integration page.
* Select the **Skills** tab and click on the required listed skills.
### Configure AWS in the AirMDR Integrations Dashboard
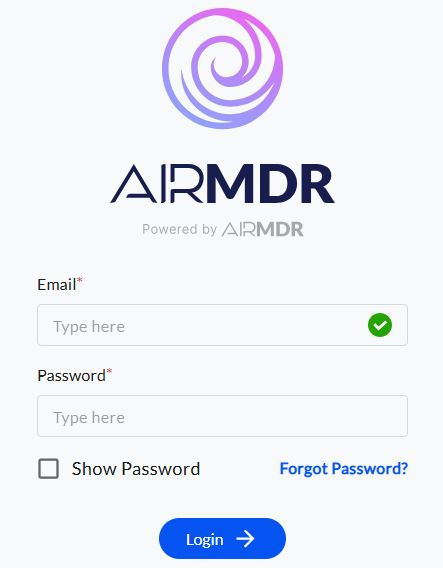
1. Navigate to [AirMDR](https://app.airmdr.com/auth/login), provide the credentials, and click **Login.**
 2. Navigate to the AirMDR Integrations Dashboard in the left navigation pane and select **Integrations.**
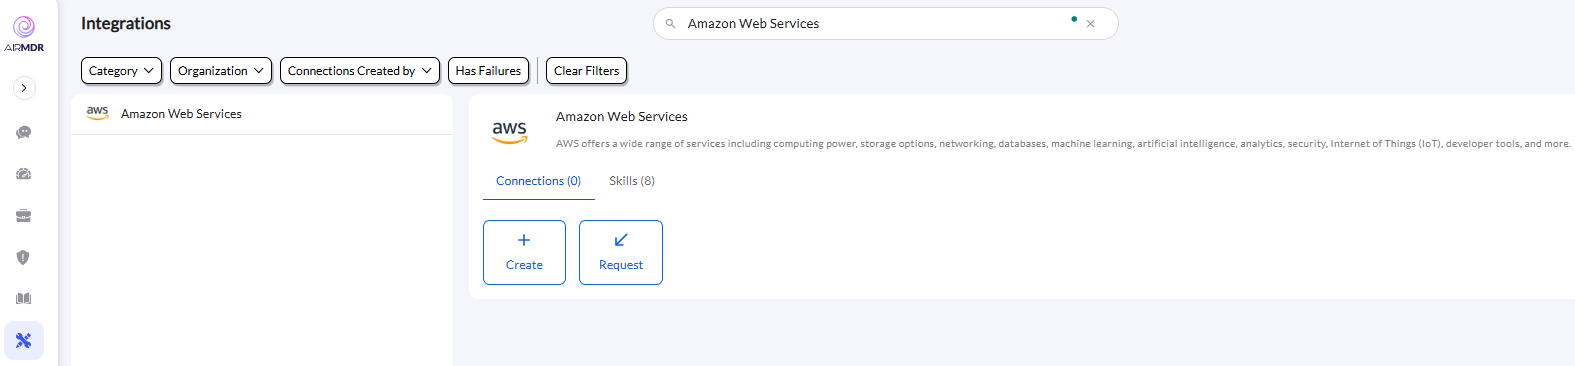
3. Use the search option, enter the keyword "**Amazon Web Services**", select the **Connections** tab, and click the **+ Create** icon.
2. Navigate to the AirMDR Integrations Dashboard in the left navigation pane and select **Integrations.**
3. Use the search option, enter the keyword "**Amazon Web Services**", select the **Connections** tab, and click the **+ Create** icon.
 4. Enter an unique name to the Instance (e.g., `your org name-AWS`) to easily identify the user connection by AirMDR.
5. AirMDR supports multiple authentication methods for integrating with your AWS environment:
* **IAM User (Access Key Method)**
1. In the Authentication Details **→ DO IT YOURSELF**
2. Go to **Step. 2** and provide the values: Required Fields in the Authentication Details field params:
* `access_key`: Access Key ID of the IAM user
* `secret_key`: Secret Access Key associated with the IAM user
> This key is generated when creating the Access Key for the user.
3. In the **Step. 5** enter the region name.
* `region_name`: AWS region to be used for integration (e.g., `us-east-1`)
4. Click the **“Create”** button to save the integration configuration.
5. Click the **“Authenticate”** button to validate the credentials and authorize the connection.
* **IAM Role (Assume Role Method)**
1. In the Authentication Details **→ DO IT YOURSELF**
2. In the **Step. 3** provide the values: Required Fields in the Authentication Details field params:
* `role_arn`: ARN of the IAM role to assume
* `external_id`: External ID configured in the IAM role's trust policy
3. In the **Step. 5** enter the region name.
* `region_name`: AWS region to be used for integration (e.g., `us-east-1`)
4. Click the **“Create”** button to save the integration configuration.
5. Click the **“Authenticate”** button to validate the credentials and authorize the connection.
* **Multi-Account Integration using AWS Stackset Method**
1. In the Authentication Details **→ DO IT YOURSELF**
2. In the **Step. 4** provide the values: Required Fields in the Authentication Details field params:
* `root_account_role_arn`: ARN of the IAM role in the **root account** used to list accounts
* `root_account_external_id`: External ID in the root account role’s trust policy
* `root_account_id`: Account ID of the root/management account
* `cross_account_role_name`: Name of the IAM role created in **all member accounts**
* `cross_account_external_id`: External ID configured in member accounts’ trust policies
3. In the **Step. 5** enter the region name.
* `region_name`: AWS region to be used for integration (e.g., `us-east-1`)
4. Click the **“Create”** button to save the integration configuration.
5. Click the **“Authenticate”** button to validate the credentials and authorize the connection.
4. Enter an unique name to the Instance (e.g., `your org name-AWS`) to easily identify the user connection by AirMDR.
5. AirMDR supports multiple authentication methods for integrating with your AWS environment:
* **IAM User (Access Key Method)**
1. In the Authentication Details **→ DO IT YOURSELF**
2. Go to **Step. 2** and provide the values: Required Fields in the Authentication Details field params:
* `access_key`: Access Key ID of the IAM user
* `secret_key`: Secret Access Key associated with the IAM user
> This key is generated when creating the Access Key for the user.
3. In the **Step. 5** enter the region name.
* `region_name`: AWS region to be used for integration (e.g., `us-east-1`)
4. Click the **“Create”** button to save the integration configuration.
5. Click the **“Authenticate”** button to validate the credentials and authorize the connection.
* **IAM Role (Assume Role Method)**
1. In the Authentication Details **→ DO IT YOURSELF**
2. In the **Step. 3** provide the values: Required Fields in the Authentication Details field params:
* `role_arn`: ARN of the IAM role to assume
* `external_id`: External ID configured in the IAM role's trust policy
3. In the **Step. 5** enter the region name.
* `region_name`: AWS region to be used for integration (e.g., `us-east-1`)
4. Click the **“Create”** button to save the integration configuration.
5. Click the **“Authenticate”** button to validate the credentials and authorize the connection.
* **Multi-Account Integration using AWS Stackset Method**
1. In the Authentication Details **→ DO IT YOURSELF**
2. In the **Step. 4** provide the values: Required Fields in the Authentication Details field params:
* `root_account_role_arn`: ARN of the IAM role in the **root account** used to list accounts
* `root_account_external_id`: External ID in the root account role’s trust policy
* `root_account_id`: Account ID of the root/management account
* `cross_account_role_name`: Name of the IAM role created in **all member accounts**
* `cross_account_external_id`: External ID configured in member accounts’ trust policies
3. In the **Step. 5** enter the region name.
* `region_name`: AWS region to be used for integration (e.g., `us-east-1`)
4. Click the **“Create”** button to save the integration configuration.
5. Click the **“Authenticate”** button to validate the credentials and authorize the connection.