> ## Documentation Index
> Fetch the complete documentation index at: https://docs.airmdr.com/llms.txt
> Use this file to discover all available pages before exploring further.
# 🔐 M365 Quarantine Emails
> AirMDR requires secure, delegated access to your Microsoft 365 tenant to perform automated quarantined email retrieval. The integration leverages a registered Azure AD App with a certificate-based authentication mechanism.
## ✅ Pre-requisites
Before AirMDR can integrate with your Microsoft 365 tenant to retrieve quarantined emails, the following **technical and organizational prerequisites** must be met:\
\
**Microsoft 365 Tenant Requirements**
| Requirement | Description |
| :-------------------------------- | :-------------------------------------------------------------------------- |
| Microsoft 365 Tenant | An active M365 tenant with admin access |
| Microsoft Defender for Office 365 | Plan 1 or Plan 2 licensed (for access to quarantine APIs) |
| Global or Security Admin Role | A user with sufficient privileges to register applications and consent APIs |
**Azure AD App Setup Requirements**
| Requirement | Description |
| :-------------------------- | :----------------------------------------------------------------------------------------- |
| Access to Azure Portal | To register an application and manage certificates |
| App Registration Permission | Must be able to create an app in **Azure Active Directory** |
| Upload Public Certificate | You will receive a `.cer` file from AirMDR to upload to your Azure AD application |
| Grant Admin Consent | Required to authorize API permissions (e.g., `Mail.Read`, `Security.Read.All`) for the app |
### Onboarding Guide - step by step process to `get_ms365_quarantined_emails`
This guide outlines the process to provide credentials securely, by creating an Azure AD application and uploading a certificate, so AirMDR can access Microsoft 365 quarantine APIs on your behalf. This enables AirMDR security team to audit, review, or act on potentially malicious emails.
1. Log in to your [Azure Portal](https://portal.azure.com/) using a user with **Global Admin** or **Application Administrator** permissions.
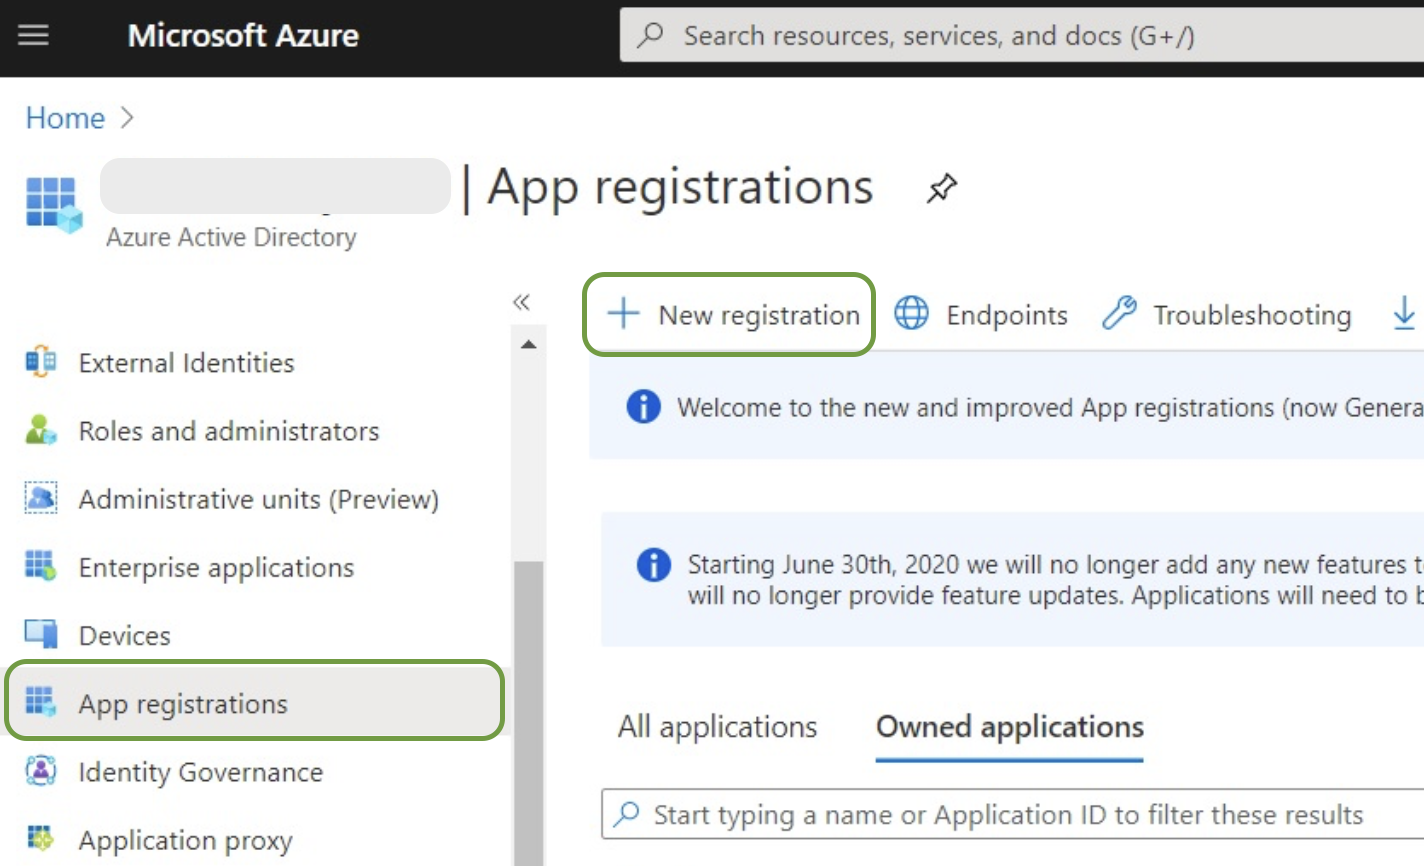
2. Navigate to **Microsoft Entra ID** → **App registrations** → **New registration.**
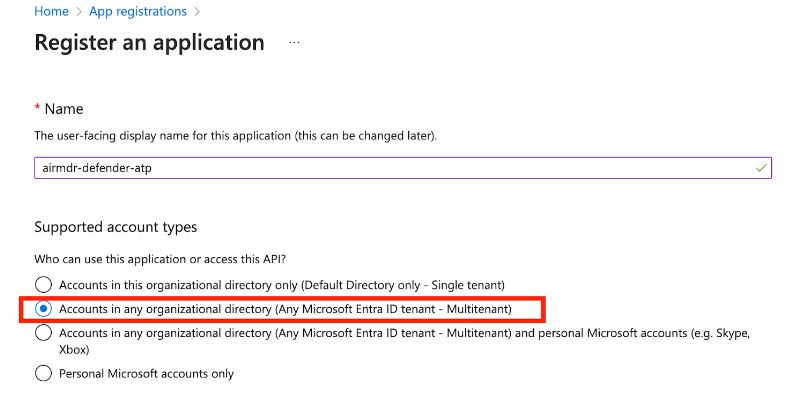
 3. Fill out the mandatory details:
* **Name**: `AirMDR Quarantine Access`
* **Supported account types**: Select "*Accounts in any organizational directory (Any Microsoft Entra ID tenant - Multitenant)*" option).
3. Fill out the mandatory details:
* **Name**: `AirMDR Quarantine Access`
* **Supported account types**: Select "*Accounts in any organizational directory (Any Microsoft Entra ID tenant - Multitenant)*" option).
 4. Click **Register**.
**Redirect URI (Optional)**: If your app uses authentication, enter a URL (e.g., `https://myapp.com/auth`).
4. Click **Register**.
**Redirect URI (Optional)**: If your app uses authentication, enter a URL (e.g., `https://myapp.com/auth`).
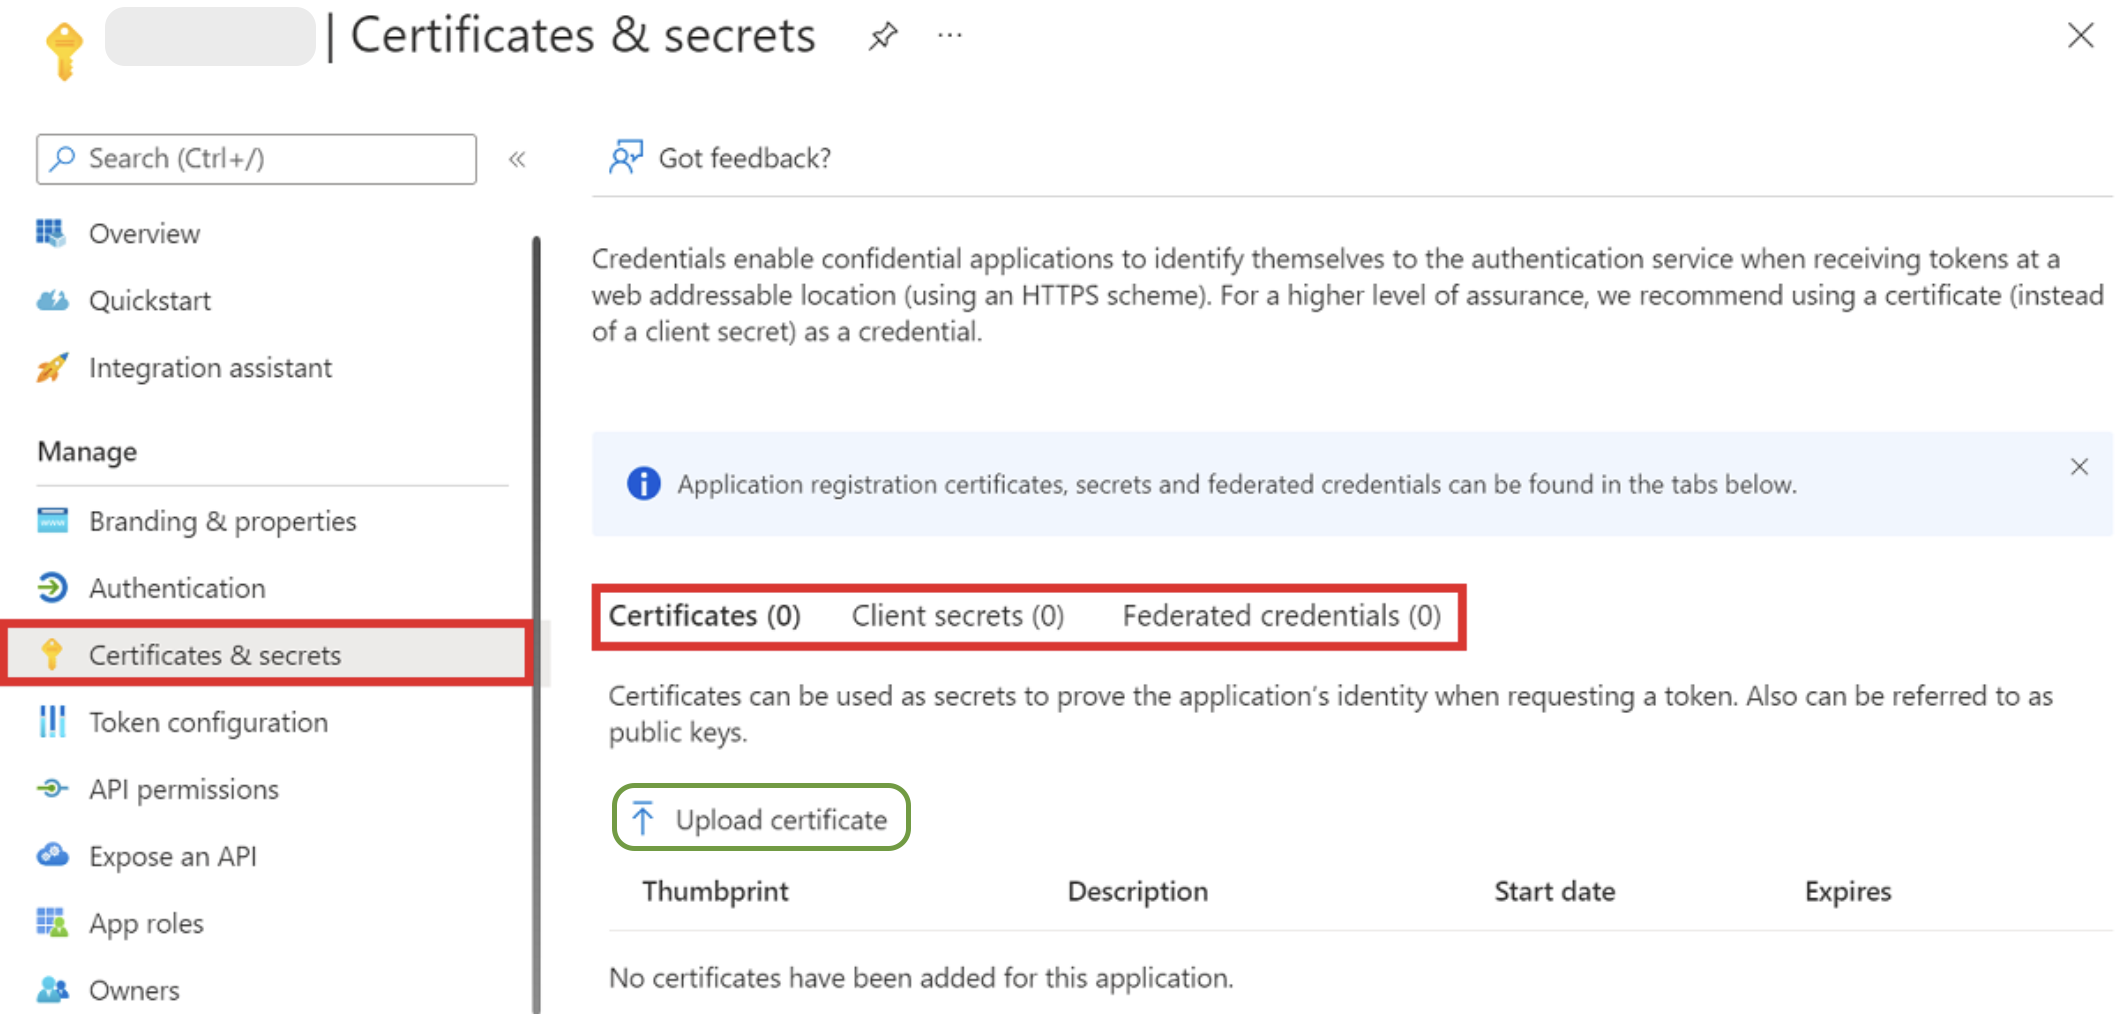
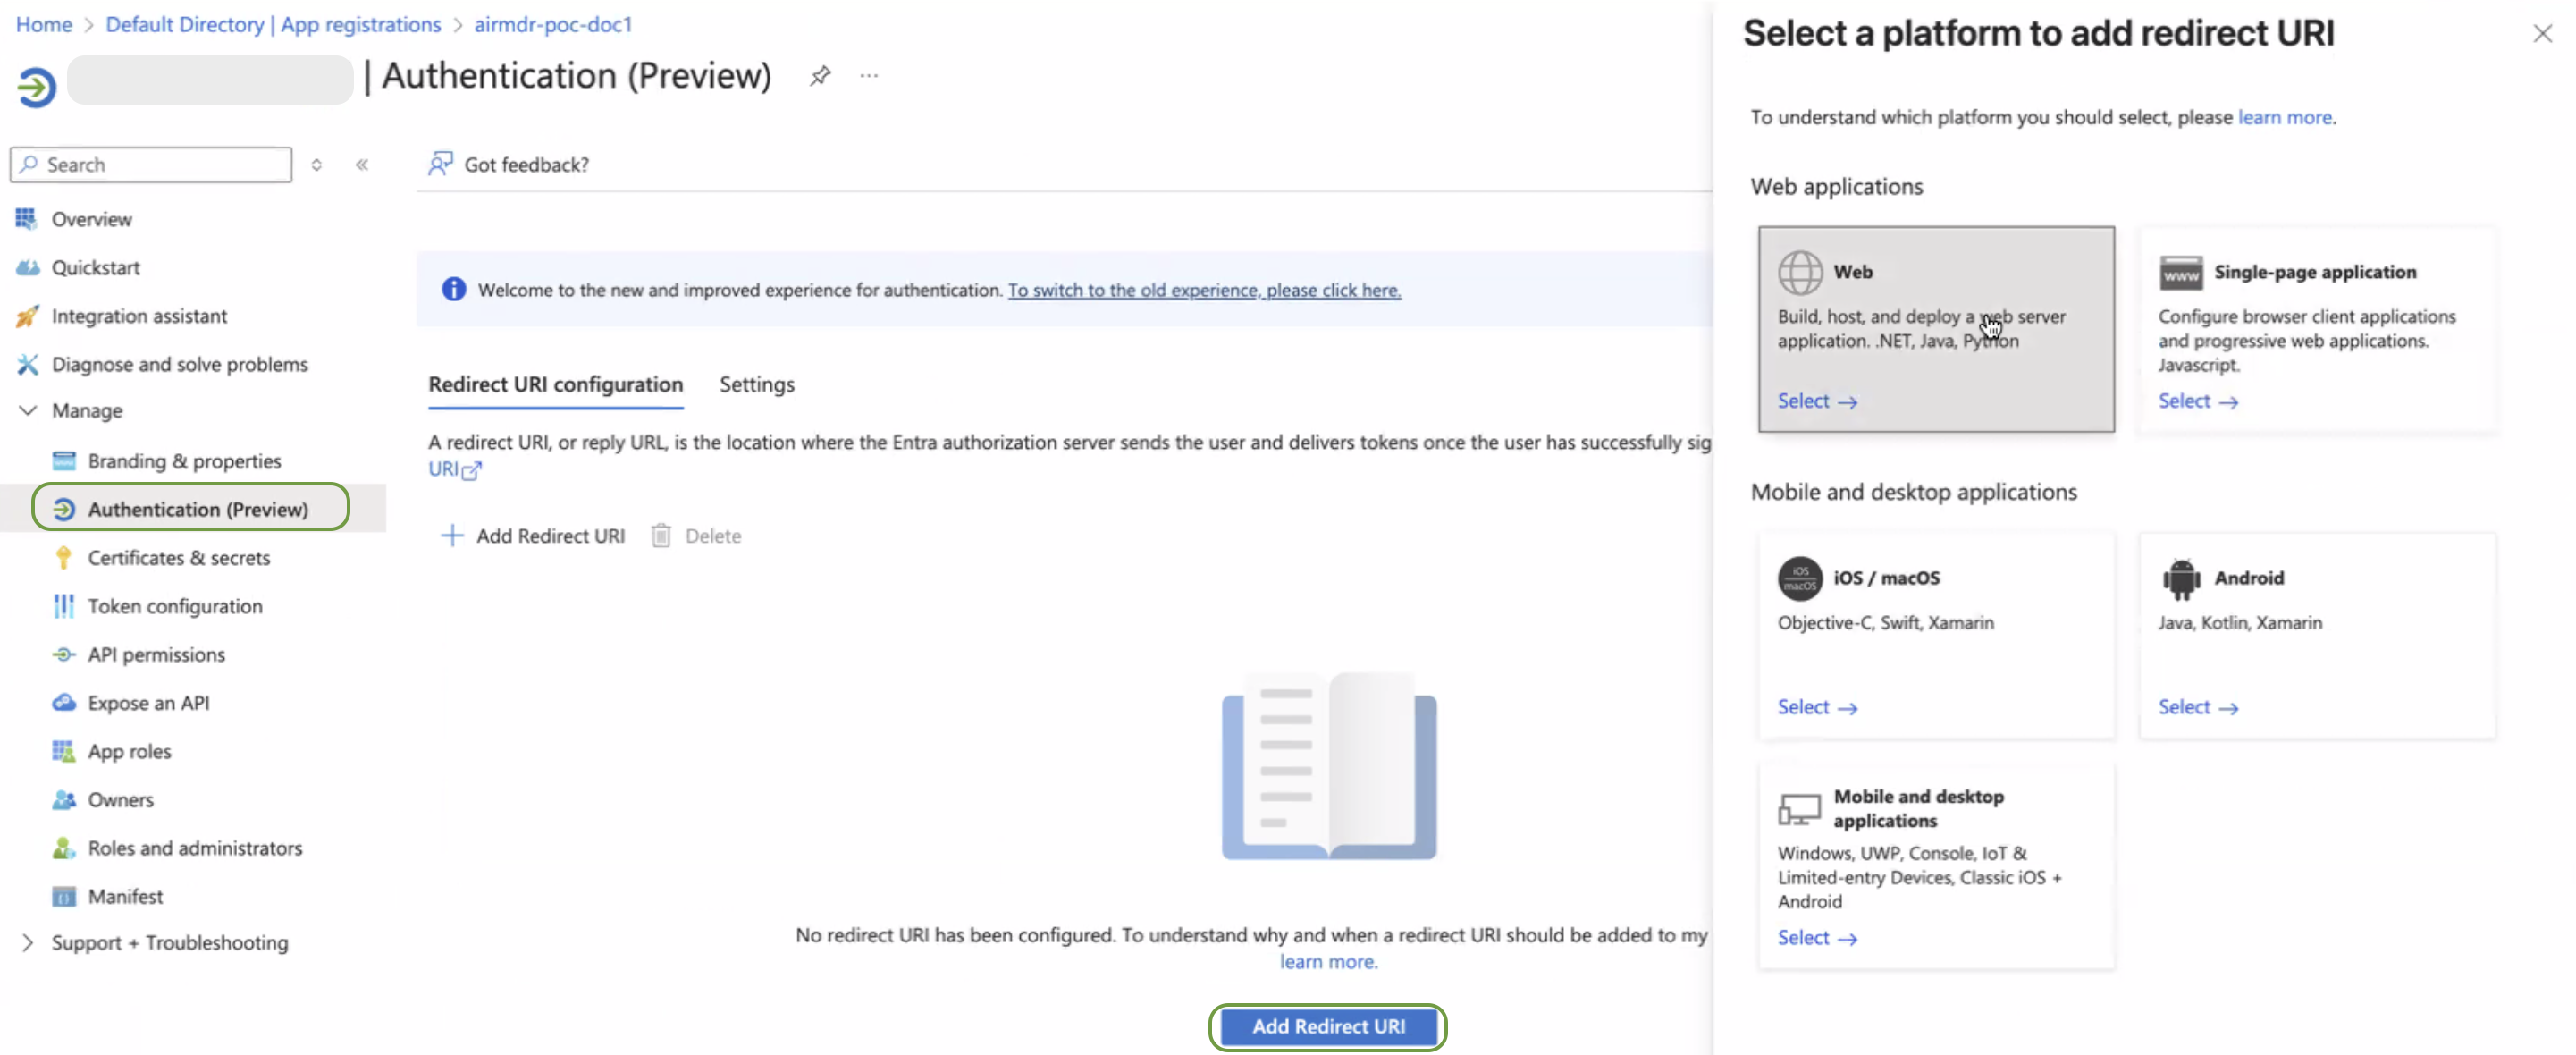 1. After registering the app, navigate to the **Manage** → **Certificates & secrets** section.
2. Under **Certificates**, click **Upload certificate**.
1. After registering the app, navigate to the **Manage** → **Certificates & secrets** section.
2. Under **Certificates**, click **Upload certificate**.
 3. Select a file and upload the public certificate provided by **AirMDR** (usually a `.cer` file).
If you do not already have the certificate, please request **AirMDR to generate and provide a new certificate** for you.
4. Once uploaded, **copy the thumbprint** of the certificate and click on **Add** at the bottom of the page.
Share the **thumbprint** (**SHA-1 hash**) of the certificate data with AirMDR.
3. Select a file and upload the public certificate provided by **AirMDR** (usually a `.cer` file).
If you do not already have the certificate, please request **AirMDR to generate and provide a new certificate** for you.
4. Once uploaded, **copy the thumbprint** of the certificate and click on **Add** at the bottom of the page.
Share the **thumbprint** (**SHA-1 hash**) of the certificate data with AirMDR.
 1. In the application Overview page left navigation pane, select **Manage** dropdown.
2. Navigate to **API Permissions** and click **+ Add a permission.**
1. In the application Overview page left navigation pane, select **Manage** dropdown.
2. Navigate to **API Permissions** and click **+ Add a permission.**
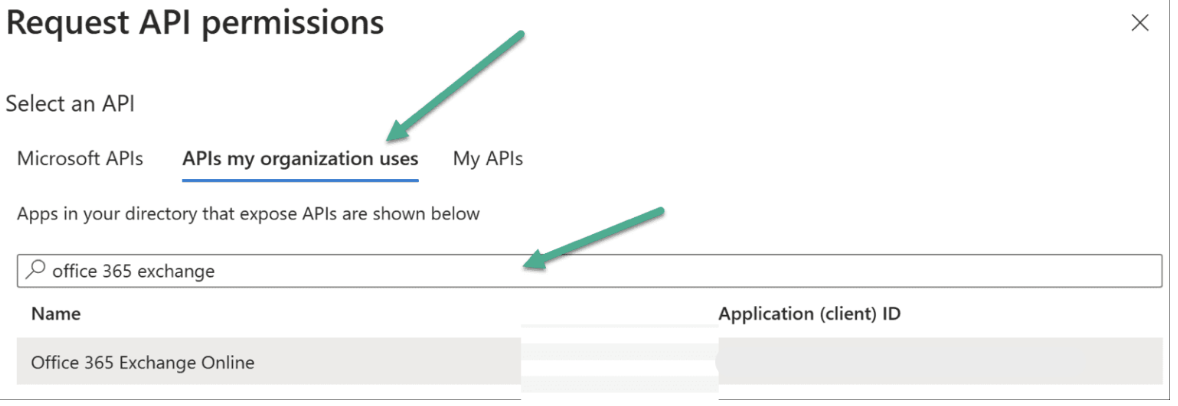
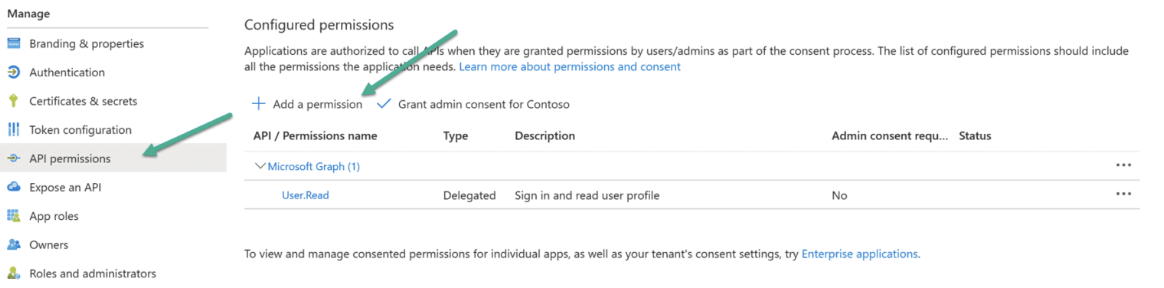 3. On the **Request API permissions** page, choose **APIs my organization uses** tab.
4. Search and select **Office 365 Exchange Online** exactly as shown.
3. On the **Request API permissions** page, choose **APIs my organization uses** tab.
4. Search and select **Office 365 Exchange Online** exactly as shown.
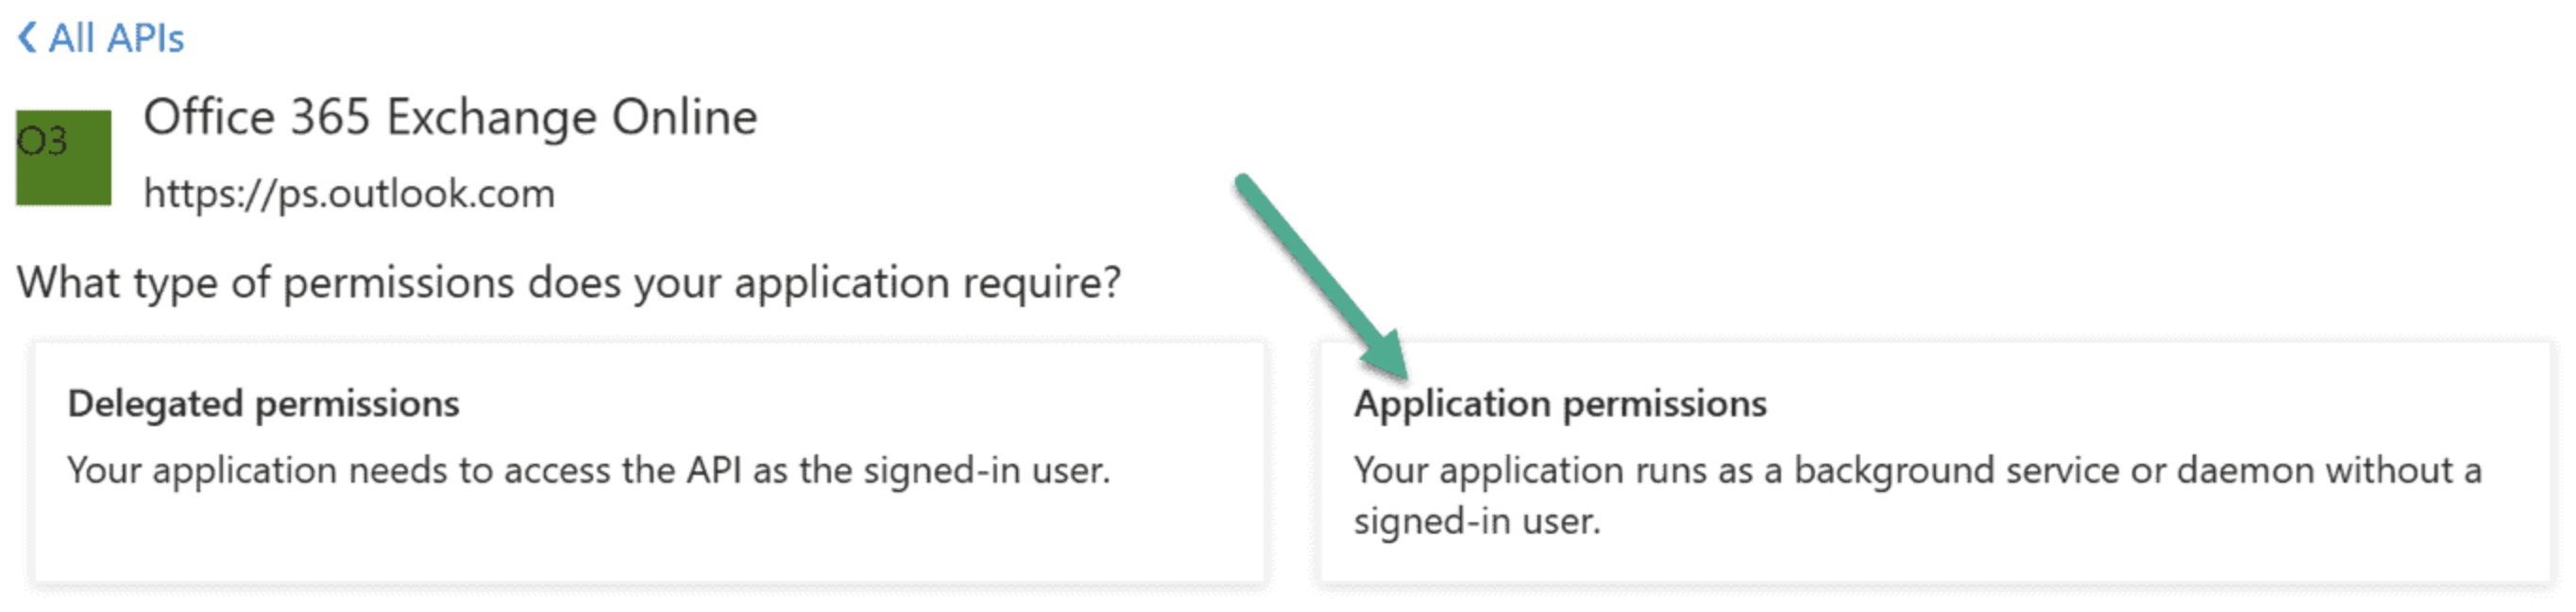
 5. Choose **Application permissions**.
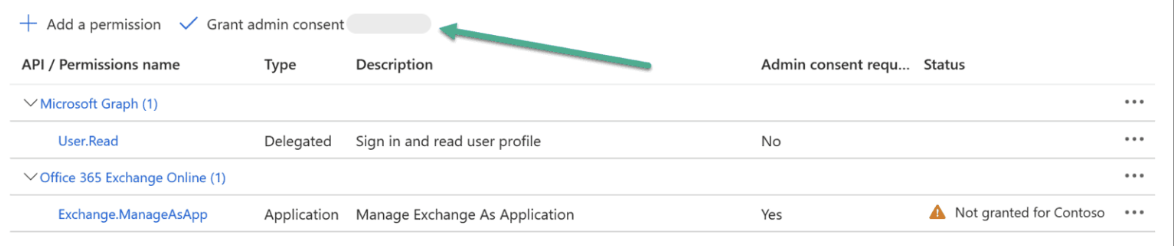
 6. Search and select the required permissions as shown:
* **To Manage Exchange as Application** - `Exchange.ManageAsApp`
6. Search and select the required permissions as shown:
* **To Manage Exchange as Application** - `Exchange.ManageAsApp`
 7. Choose **Grant admin consent**.
 8. Navigate to **Manage** → **Roles and administrators** page, to assign the Exchange Administrator role to the application.
9. Search and select the **Exchange Administrator** role.
8. Navigate to **Manage** → **Roles and administrators** page, to assign the Exchange Administrator role to the application.
9. Search and select the **Exchange Administrator** role.
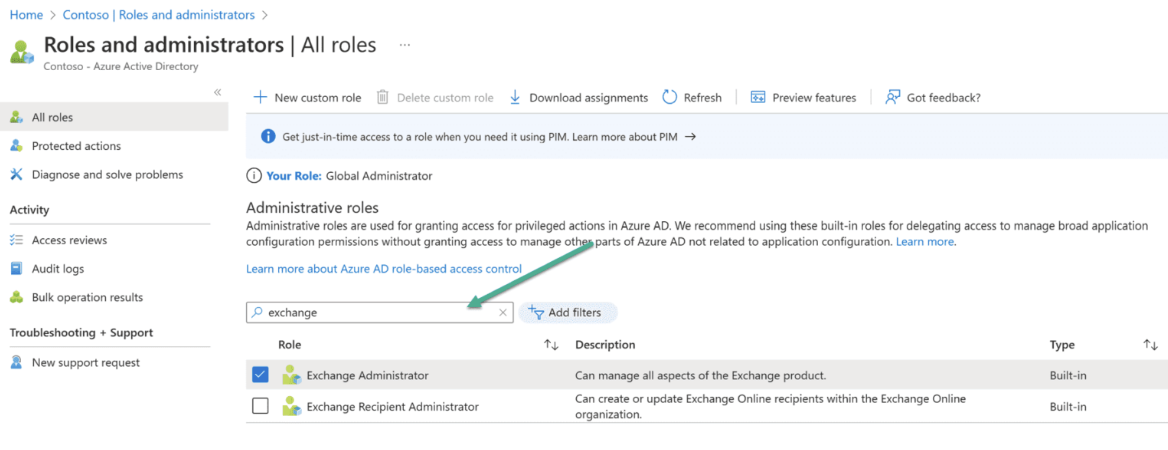 10. Choose **Add assignments**, and add the app registration we created.
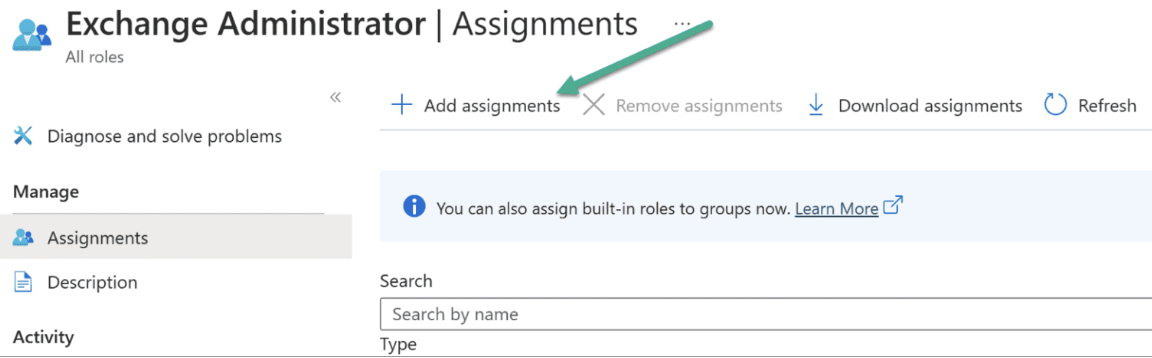 11. In the search bar enter the application name "**For example**: `AirMDR Quarantine Access`" given earlier.
12. Click on **Add** at the bottom of the page.
13. Navigate to \*\*Entra ID \*\*→\*\*Manage \*\* →\*\*App registrations \*\* →**All Applications**
14. Search and select the application name.
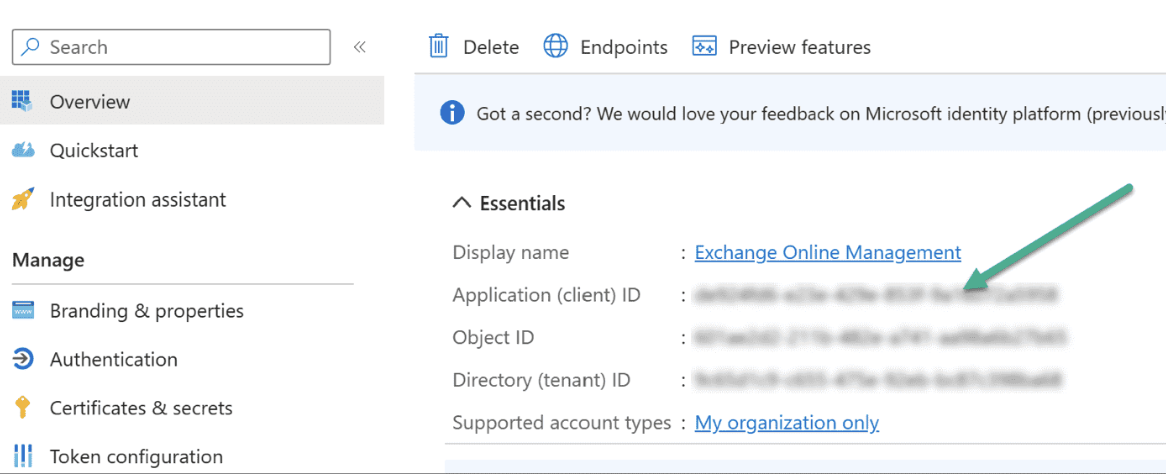
15. In the **Overview** page copy all the required essentials (Application (client) ID, Directory (tenant) ID).
11. In the search bar enter the application name "**For example**: `AirMDR Quarantine Access`" given earlier.
12. Click on **Add** at the bottom of the page.
13. Navigate to \*\*Entra ID \*\*→\*\*Manage \*\* →\*\*App registrations \*\* →**All Applications**
14. Search and select the application name.
15. In the **Overview** page copy all the required essentials (Application (client) ID, Directory (tenant) ID).
 1. In the left navigation pane, select **Manage** dropdown.
2. Click **Certificates & secrets**.
3. Click **+ New client secret**.
1. In the left navigation pane, select **Manage** dropdown.
2. Click **Certificates & secrets**.
3. Click **+ New client secret**.
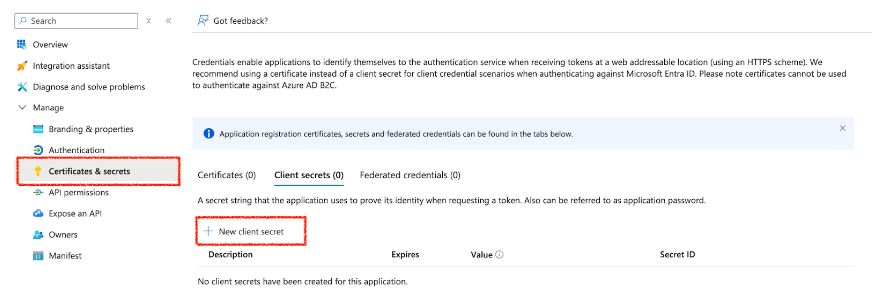 4. Enter a description (e.g., `MySecretKey`) and set expiration.
5. Click **Add**.
Copy and secure the **Secret ID** and **Value** (**Client Secret**) immediately – (It won’t be shown again!)
## 📤 **Information to Provide to AirMDR**
1. Go to [**Azure Portal**](https://portal.azure.com/) → **Entra ID.**
2. Click **App registrations** and select your **registered app.**
3. Under the **Overview** section, locate the **Application (client) ID** and **Tenant ID (Directory ID).**
4. Click the **Copy** icon **📋** next to the Client ID, and the Tenant ID respectively.
Securely share the **Client (Application) ID, Tenant ID, Client Secret Value,** **Secret ID, Certificate Thumbprint,** and the **Tenant Domain** (**Organization**) to AirMDR.
| Field | Description |
| :---------------------------------------- | :------------------------------------------------------------------------------------------ |
| **Client (Application) ID and Tenant ID** | Found under the **Overview** section of the registered Azure AD app |
| **Certificate Thumbprint** | Found in the **Certificates & Secrets** tab after uploading the certificate |
| **Tenant Domain** (**Organization**) | Usually in the form `.onmicrosoft.com` (e.g., `foundationcap.onmicrosoft.com`) |
| **Client Secret Value **and**Secret ID** | **Client Secret Value **and**Secret ID** securely saved earlier for Authentication |
> **Example:**\
> For a customer like FCAP, the domain was `foundationcap.onmicrosoft.com`. The `.onmicrosoft.com` suffix is common across tenants.
If you need assistance during this process, contact [AirMDR](mailto:support@airmdr.com) support.
## 💼 AirMDR Internal Requirements
Once credentials are received:
* AirMDR will create a **connection in the Connection Manager** using:
* `Provider type: Microsoft`
* The credentials listed above
* Access is used **only for retrieving quarantined emails** via Microsoft Graph or Defender APIs
## 🔁 Future Automation
Once AirMDR agents are deployed to the customer's remote infrastructure:
* The current **Powersheller instance** used to perform these operations can be deprecated.
* The onboarding steps (like certificate auth and quarantine sync) will be handled **directly by remote agents**.
This ensures full automation, scalability, and centralized control without requiring manual setup steps on an ongoing basis.
## 🛑 Security & Access Best Practices
* ✅ Certificate-based auth ensures **non-password-based secure access**
* ✅ Permissions are **application-only** and limited to read quarantine info
4. Enter a description (e.g., `MySecretKey`) and set expiration.
5. Click **Add**.
Copy and secure the **Secret ID** and **Value** (**Client Secret**) immediately – (It won’t be shown again!)
## 📤 **Information to Provide to AirMDR**
1. Go to [**Azure Portal**](https://portal.azure.com/) → **Entra ID.**
2. Click **App registrations** and select your **registered app.**
3. Under the **Overview** section, locate the **Application (client) ID** and **Tenant ID (Directory ID).**
4. Click the **Copy** icon **📋** next to the Client ID, and the Tenant ID respectively.
Securely share the **Client (Application) ID, Tenant ID, Client Secret Value,** **Secret ID, Certificate Thumbprint,** and the **Tenant Domain** (**Organization**) to AirMDR.
| Field | Description |
| :---------------------------------------- | :------------------------------------------------------------------------------------------ |
| **Client (Application) ID and Tenant ID** | Found under the **Overview** section of the registered Azure AD app |
| **Certificate Thumbprint** | Found in the **Certificates & Secrets** tab after uploading the certificate |
| **Tenant Domain** (**Organization**) | Usually in the form `.onmicrosoft.com` (e.g., `foundationcap.onmicrosoft.com`) |
| **Client Secret Value **and**Secret ID** | **Client Secret Value **and**Secret ID** securely saved earlier for Authentication |
> **Example:**\
> For a customer like FCAP, the domain was `foundationcap.onmicrosoft.com`. The `.onmicrosoft.com` suffix is common across tenants.
If you need assistance during this process, contact [AirMDR](mailto:support@airmdr.com) support.
## 💼 AirMDR Internal Requirements
Once credentials are received:
* AirMDR will create a **connection in the Connection Manager** using:
* `Provider type: Microsoft`
* The credentials listed above
* Access is used **only for retrieving quarantined emails** via Microsoft Graph or Defender APIs
## 🔁 Future Automation
Once AirMDR agents are deployed to the customer's remote infrastructure:
* The current **Powersheller instance** used to perform these operations can be deprecated.
* The onboarding steps (like certificate auth and quarantine sync) will be handled **directly by remote agents**.
This ensures full automation, scalability, and centralized control without requiring manual setup steps on an ongoing basis.
## 🛑 Security & Access Best Practices
* ✅ Certificate-based auth ensures **non-password-based secure access**
* ✅ Permissions are **application-only** and limited to read quarantine info