> ## Documentation Index
> Fetch the complete documentation index at: https://docs.airmdr.com/llms.txt
> Use this file to discover all available pages before exploring further.
# Microsoft Teams
> Microsoft Teams is a collaboration platform developed by Microsoft, designed to facilitate real-time communication, file sharing, and teamwork within organizations. It integrates seamlessly with Microsoft 365 services and provides centralized workspaces for teams to manage discussions, meetings, tasks, and shared content.
## Overview
The **Microsoft Teams integration** enables AirMDR to send alerts, notifications, and workflow updates directly to Microsoft Teams channels. This helps security teams receive real-time updates, collaborate on incidents, and streamline response actions within their communication workflows.
AirMDR supports two integration methods:
* [**Method 1:** Microsoft Graph API (Advanced & scalable)](https://docs.airmdr.com/Integrations/MSTeams#method-2-microsoft-graph-api-advanced)
* [**Method 2:** Incoming Webhook (Simple setup)](https://docs.airmdr.com/Integrations/MSTeams#method-1-configure-incoming-webhook-in-ms-teams)
## Supported Versions
| Component | Supported Version |
| :------------------ | :---------------------------------- |
| Microsoft Teams | Microsoft 365 (Cloud) |
| Microsoft Graph API | v1.0 |
| AirMDR Platform | Current supported cloud deployments |
## Authentication
AirMDR supports two authentication methods for Microsoft Teams:
| Parameter | Description |
| :-------------- | :------------------------ |
| Tenant ID | Azure AD Directory ID |
| Client ID | Application (Client) ID |
| Client Secret | Secret for authentication |
| Sender Username | Service account email |
| Sender Password | Service account password |
* Uses OAuth-based authentication via Microsoft Graph
* Supports advanced automation and messaging
* Requires Azure AD configuration
This step requires administrative privileges in Azure AD.
| Parameter | Description |
| :---------- | :----------------------------- |
| Webhook URL | Teams channel webhook endpoint |
* No API authentication required
* Simple and fast setup
* Limited customization and control
### Pre-requisites
>
> Users must have **owner or member access** to the Microsoft Teams channel.
>
>
>
> Microsoft Teams app installed or access via [Teams Web](https://teams.microsoft.com/).
>
>
>
> Permission to manage connectors in the selected channel.
>
### Method 1: Microsoft Graph API (Advanced)
1. Go to **Azure Portal**
2. Search for **Microsoft Entra ID**
3. In the left navigation pane, click on **Manage** dropdown.
4. Select **App registrations → + New registration**
5. Enter:
* Application name
* Supported account types
* Redirect URl (optional)
6. Click **Register**
1. Post registration.
2. Under the All applications section click on the application (Example: MS Teams Setup) created. Copy:
* Application (Client) ID
* Directory (Tenant) ID
1. Navigate to the newly created application.
2. Click on **Manage** dropdown and select **API Permissions.**
3. Select **+ Add a permission → Microsoft Graph**.
4. Click on **Delegated permissions.**
5. Select **Application permissions**
6. In the **Select permissions** search option Add required permissions:
* `User.Read`
* `User.ReadBasic.All`
* `Chat.Create`
* `Chat.ReadWrite`
* `ChatMessage.Send`
7. Click **Grant admin consent for Default Directory**.
Only admin have access to **Grant admin consent for Default Directory.**
1. Click on **Manage** dropdown.
2. Navigate to **Certificates & secrets → Client Secrets → + New client secret**
3. Provide:
* Description
* Expiry
4. Click **Add**
5. Copy the **Client Secret**
This value will not be shown again.
1. Create a new Microsoft 365 user: [teams-bot@yourtenant.onmicrosoft.com](mailto:teams-bot@yourtenant.onmicrosoft.com)
2. Assign:
* **Microsoft Teams license**
3. Disable MFA for this account
Graph API uses password-based authentication. MFA must be disabled.
### Method 2: Configure Incoming Webhook in MS Teams
1. Launch the **Microsoft Teams** app or navigate to [teams.microsoft.com](http://teams.microsoft.com).
2. Sign in using your organizational credentials.
If you already have Target Teams & Channel to integrate, skip this step.
1. In the **Teams** sidebar, select the **Chat** icon.
2. Navigate to **Teams and channels**, click on the more options **ellipsis (⋯)**.
3. Select **Your teams and channels**, and click on **Create team** icon in the top right corner.
4. In the Create a team pop-up, enter the mandatory values
* **Team name**: (For example `AirMDR Logs`)
* **Name the first channel**: (For example `Workflow Test Channel`)
5. Click **Create**.
Make sure to add the team members to the newly created Teams channel and click **Add**.
1. In the **Teams** sidebar, select the desired **Team**.
2. Click on the specific **Channel** (For example `Workflow Test Channel`) where you want to post messages.
1. Click on the more options **ellipsis (⋯)** next to the channel name (For example `Workflow Test Channel`).
2. Select **Workflows** from the context menu you want to setup for your team\  If you do not see “**Workflows**,” ensure the feature is enabled in your tenant or contact your IT administrator.
3. In the pop-up search for and choose "**Post to a channel when webhook request is received**" option. \
If you do not see “**Workflows**,” ensure the feature is enabled in your tenant or contact your IT administrator.
3. In the pop-up search for and choose "**Post to a channel when webhook request is received**" option. \  For this workflow to run, all apps must have a valid connection.
4. Select the radio button option beside **Microsoft Teams** option.
5. Click **Next**.
1. In the **Details**, select your **Microsoft Teams Team** and **Microsoft Teams Channel**.
2. Click **Add workflow**.
3. In the same pop-up window, click on **Manage your workflow** option at the bottom left corner.
4. Click **Edit**, to manage your workflow. \
For this workflow to run, all apps must have a valid connection.
4. Select the radio button option beside **Microsoft Teams** option.
5. Click **Next**.
1. In the **Details**, select your **Microsoft Teams Team** and **Microsoft Teams Channel**.
2. Click **Add workflow**.
3. In the same pop-up window, click on **Manage your workflow** option at the bottom left corner.
4. Click **Edit**, to manage your workflow. \ 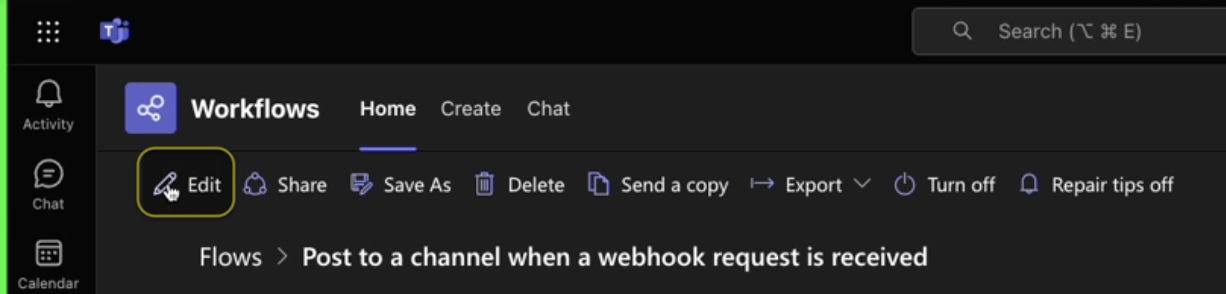 5. Once the User is redirected to the edit page, double-click on the respective display boxes to expand and view the content. \
 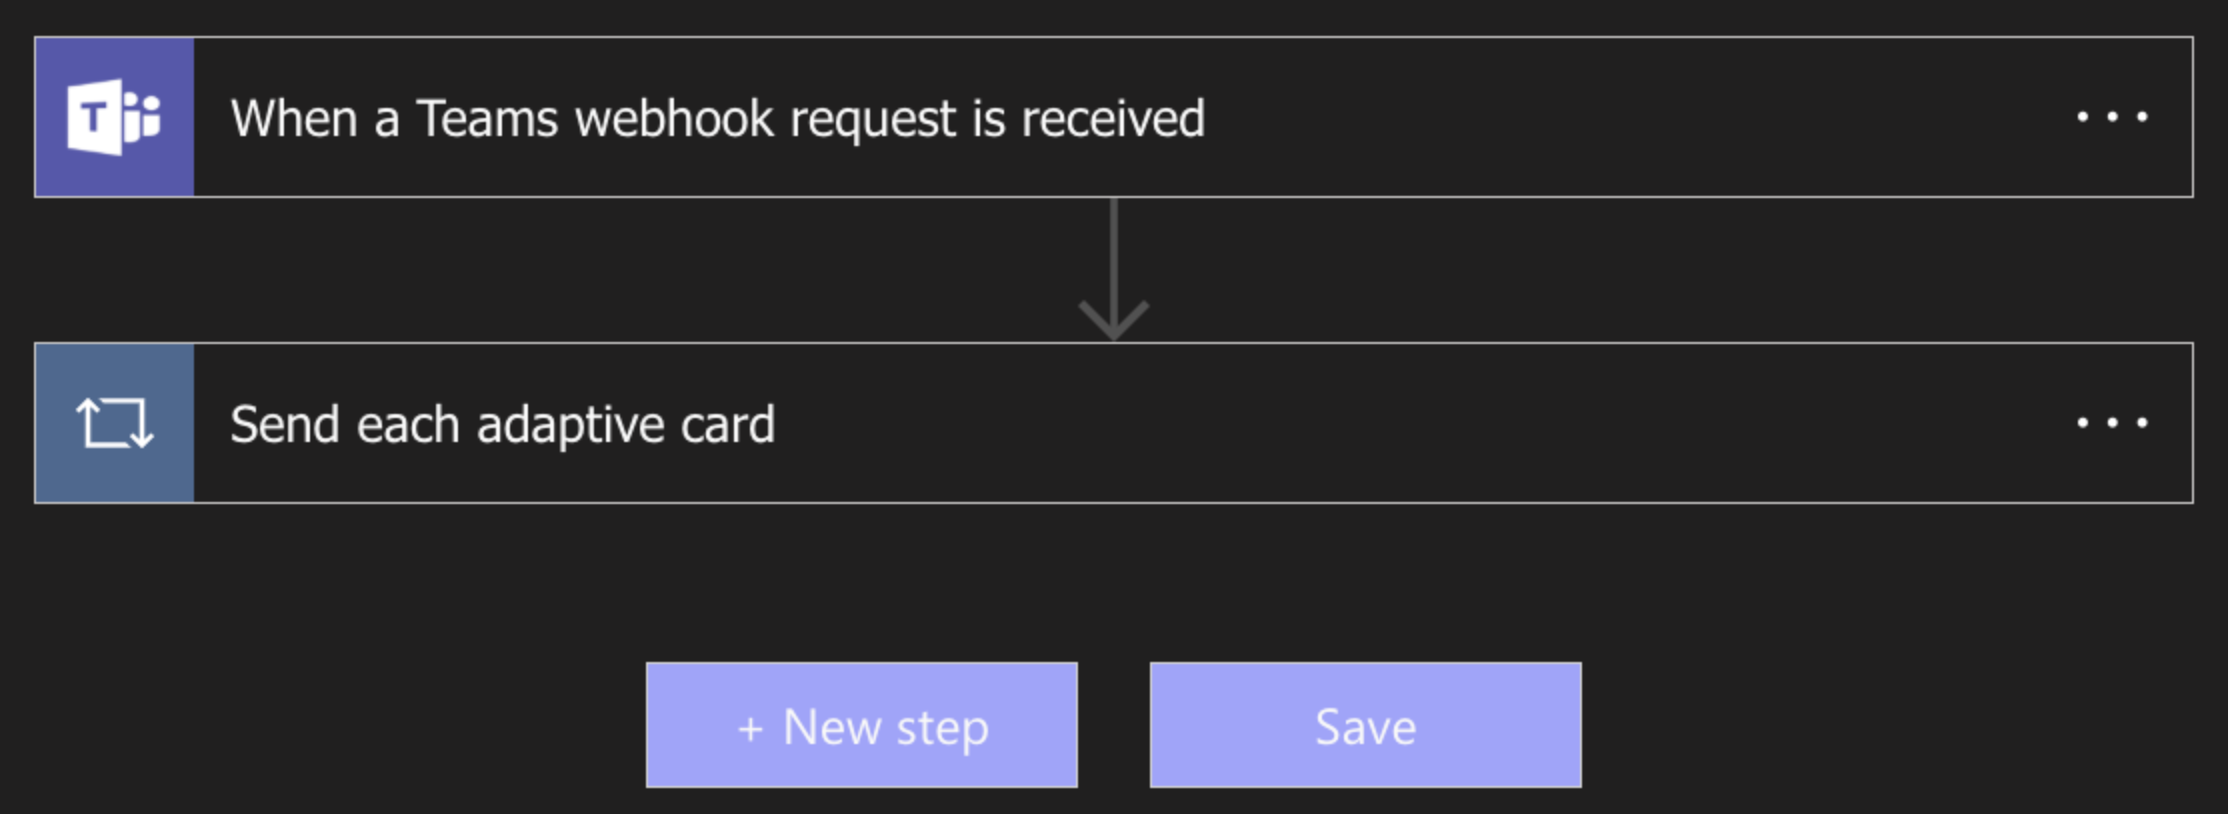 * Double-click and select "**When a Teams webhook request is received**" option to view "**who can trigger the flow**" and the "**POST URL**".
**Copy the POST URL** for future reference. That is, for the connector credential and webhook configuration in the AirMDR web interface.
* Double-click and select "**Send each adaptive card**" option.
* In the "Select an output from previous steps" search box, follow the below steps to ensure the **output** format is set to **attachments**
* Delete the existing **body.attachments**
* In the **Dynamic content** list, select the **attachments**.\
* Double-click and select "**When a Teams webhook request is received**" option to view "**who can trigger the flow**" and the "**POST URL**".
**Copy the POST URL** for future reference. That is, for the connector credential and webhook configuration in the AirMDR web interface.
* Double-click and select "**Send each adaptive card**" option.
* In the "Select an output from previous steps" search box, follow the below steps to ensure the **output** format is set to **attachments**
* Delete the existing **body.attachments**
* In the **Dynamic content** list, select the **attachments**.\ 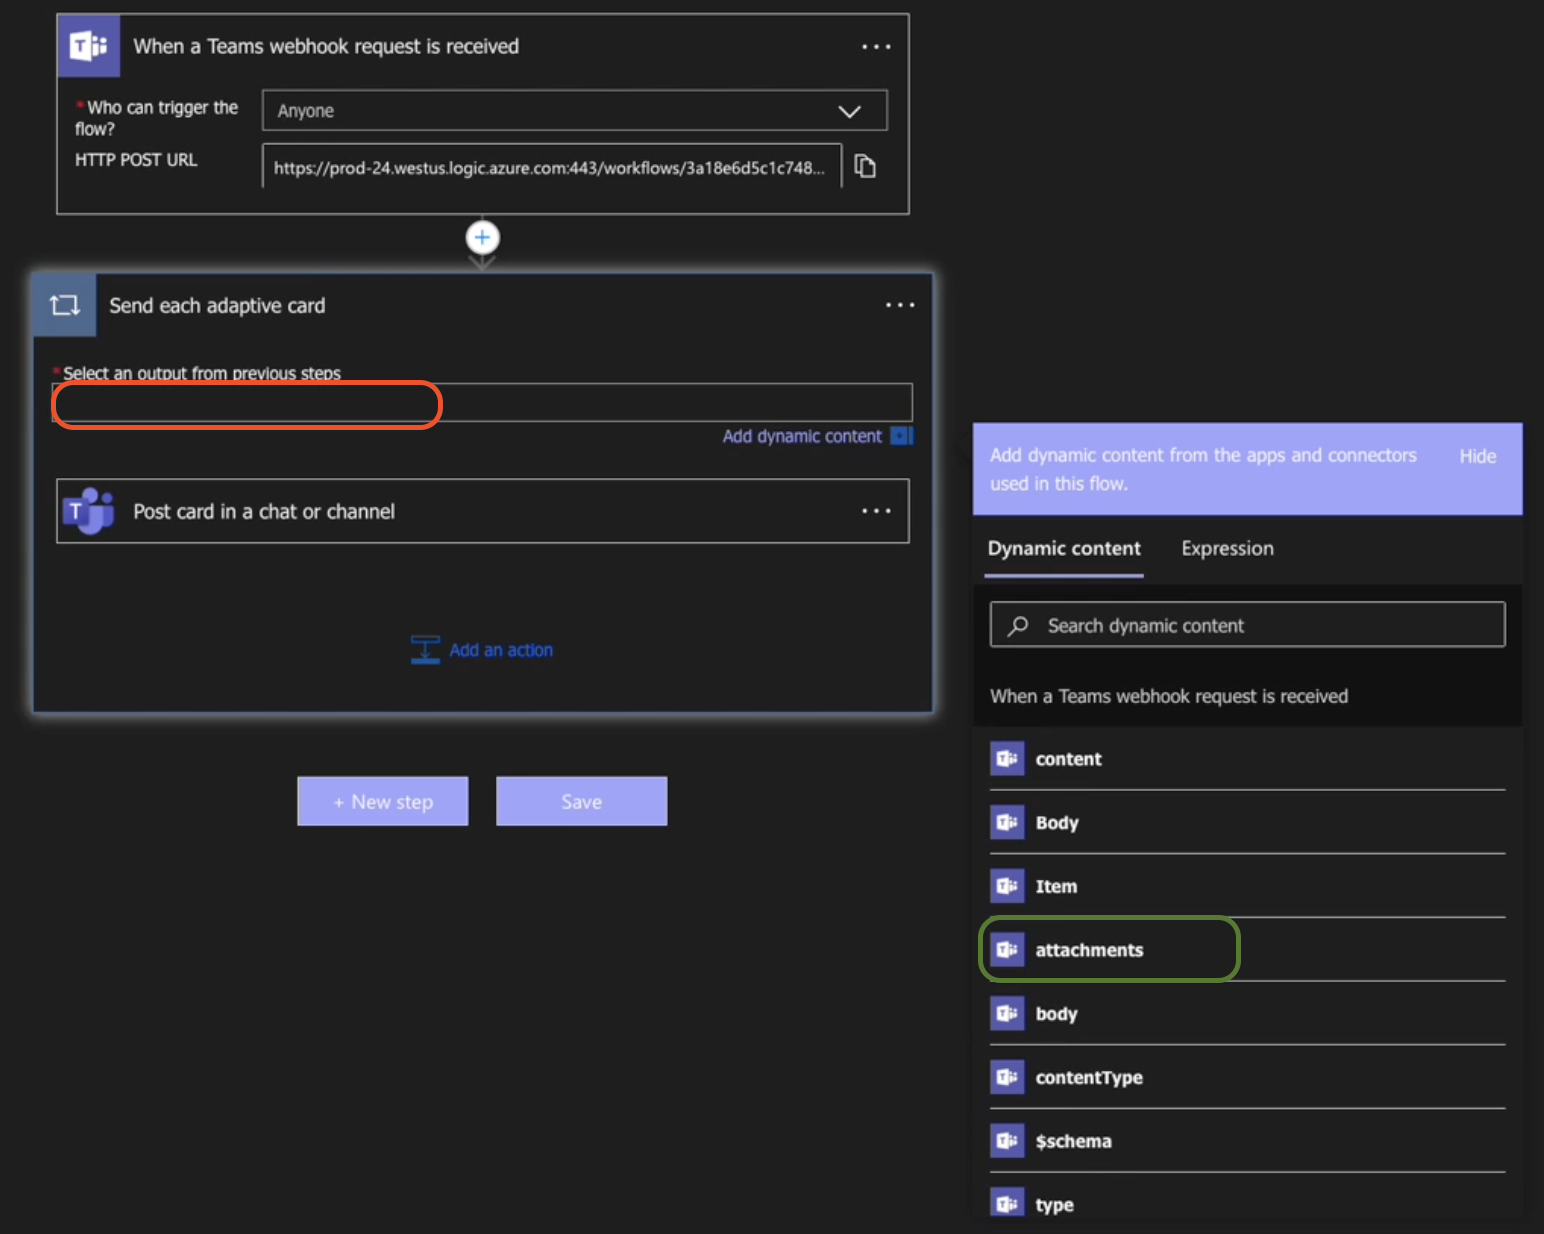 * For private Team channels, use the dropdowns to set **Post as:** **Flow Bot**.
* Make sure **Post in**, **Team** and **Channel** fields are pointing to correct desired values.
* Ensure the **Adaptive card** is defined as **content.**\
* For private Team channels, use the dropdowns to set **Post as:** **Flow Bot**.
* Make sure **Post in**, **Team** and **Channel** fields are pointing to correct desired values.
* Ensure the **Adaptive card** is defined as **content.**\ 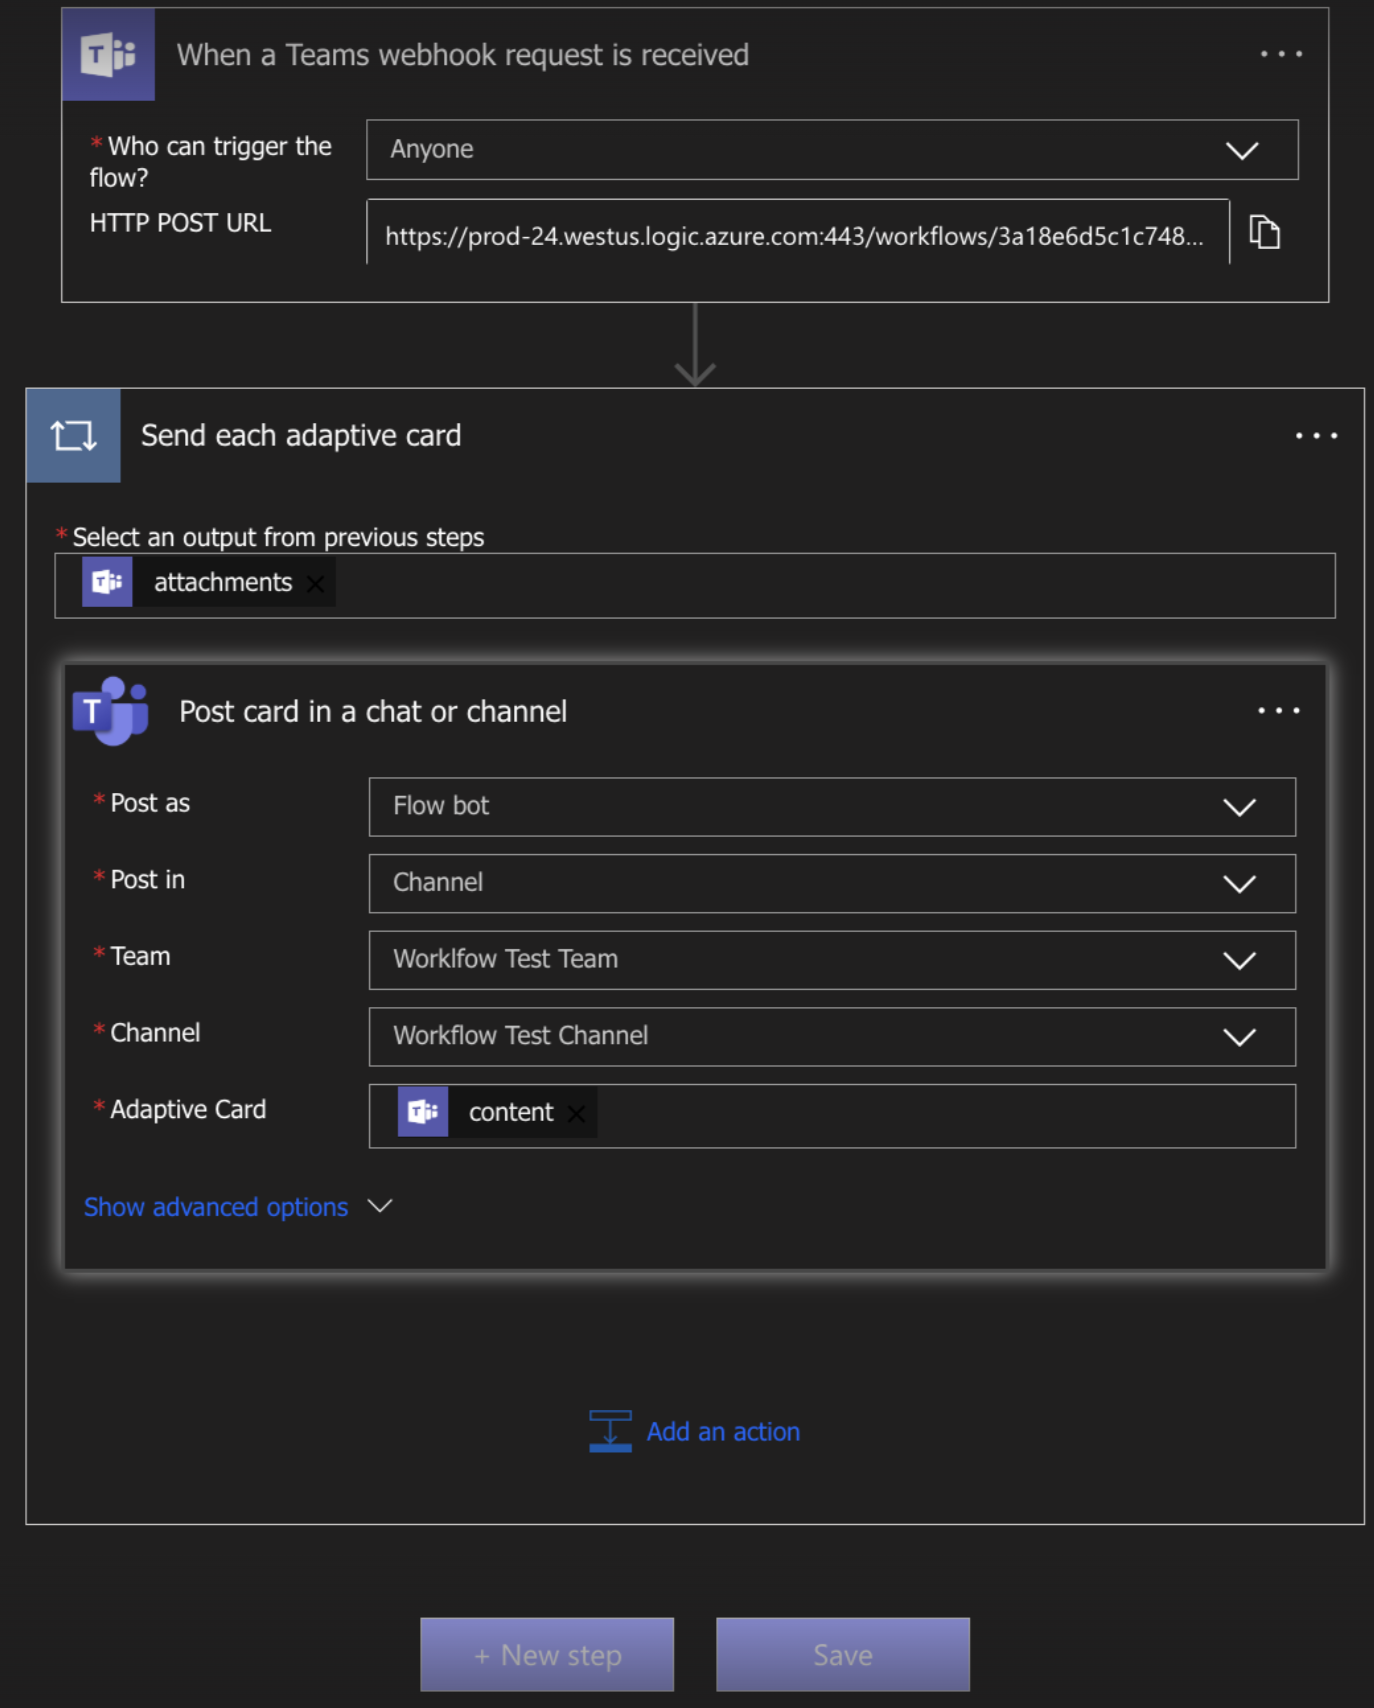 6. Click **Save**.
### Microsoft Teams - Test Case Scenarios
User can now send a message using a simple HTTP POST request using Postman or cURL.
**Example POST Request using cURL:**
```text theme={null}
curl --location '' \
--header 'Content-Type: application/json' \
--data '{
"attachments": [
{
"contentType": "application/vnd.microsoft.card.adaptive",
"content": {
"type": "AdaptiveCard",
"$schema": "http://adaptivecards.io/schemas/adaptive-card.json",
"version": "1.0",
"body": [
{
"type": "TextBlock",
"text": "✅ This is a new test message from curl!",
"wrap": true
}
]
}
}
]
}'
```
The payload must be a valid JSON object with a `text` field. You can also include rich card formatting using **MessageCard** schema if needed.
Replace `` with the URL copied from the Teams UI.
**Response Sample**
`202 Accepted`
**Example POST Request using cURL:**
```text theme={null}
curl -X POST "https://login.microsoftonline.com/{tenant_id}/oauth2/v2.0/token" \
-H "Content-Type: application/x-www-form-urlencoded" \
-d "grant_type=password" \
-d "client_id={client_id}" \
-d "client_secret={client_secret}" \
-d "username={sender_username}" \
-d "password={sender_password}" \
-d "scope=https://graph.microsoft.com/.default"
```
**Successful Response Sample**
```text theme={null}
{
"token_type": "Bearer",
"scope": "https://graph.microsoft.com/Mail.Read https://graph.microsoft.com/User.Read",
"expires_in": 3599,
"ext_expires_in": 3599,
"access_token": "eyJ0*****************************************...",
"refresh_token": "MC4AAA...long_string...AAA"
}
```
**Error Response Sample**
```text theme={null}
{
"error": "invalid_grant",
"error_description": "AADSTS50126: Error validating credentials due to invalid username or password.",
"error_codes": [50126],
"timestamp": "2026-04-09 10:30:00Z",
"trace_id": "...",
"correlation_id": "..."
}
```
### Configure Microsoft Teams in AirMDR Integrations Dashboard
1. Navigate to [AirMDR](https://app.airmdr.com/auth/login), provide the credentials and click **Login**
2. Navigate to the AirMDR Integrations Dashboard in the left navigation pane and select **Integrations**.
3. Use the search option, enter the keyword "**Microsoft Teams**", select the **Connections** tab, and click **+ Create** button.
4. Enter an unique name to the Instance (e.g., `your org name-MSTeams`) to easily identify the user connection by AirMDR.
5. For **Webhook URL:** Enter the generated **Webhook URL** in the Authentication Details field params, and click **Save**.\
(or)
6. For **Azure AD:** Enter the Azure AD application credentials like **Tenant ID, Client ID, Client Secret, Sender Username, Sender Password**, and **Remote Agent** in the Authentication Details field params, and click **Save**.
### Skills provided by this Integration
| **Skill ID** | **Purpose** |
| :--------------------------- | :------------------------------------------------------------------------------------------------------------------------------------------------------ |
| Send Microsoft Teams DM | Send a direct message to a Microsoft Teams user by their email address using the Graph API. Useful for targeted, user-specific notifications or alerts. |
| Send Microsoft Teams Message | Send a message to a Microsoft Teams channel using a webhook. This skill is useful for real-time notifications or alerts. |
To view the details of Input Parameters and Output for the respective skills
* Go to [AirMDR → Microsoft Teams](https://app.airmdr.com/integrationsv2/8cee0997-1578-485e-bdc4-22982ccc8b30/skills?search=Microsoft+Teams) Integration page.
* Select the **Skills** tab and click on the required listed skills.
## Additional Information
| Error | Cause | Resolution |
| :-------------------- | :------------------------ | :------------------ |
| Invalid Webhook URL | Incorrect or expired URL | Regenerate webhook |
| Authentication failed | Wrong client secret | Recreate secret |
| Permission denied | Missing Graph permissions | Grant admin consent |
| MFA enabled | Service account blocked | Disable MFA |
| Token expired | OAuth token expired | Reauthenticate |
To manage the webhook:
1. Go to the **channel’s connectors** (as in Step 3).
2. Click **Configured** (top-left tab).
3. Locate your webhook, and click **Manage** or **Remove**.
* Rotate webhook URLs periodically for security and use **Webhook** for simple use cases.
* Do not expose webhook URLs in public repositories or logs.
* Use appropriate **naming conventions** to identify webhook sources.
* Use **Graph API** for automation workflows and limit Graph permissions to minimum required
* Secure service account credentials
* 📧 Contact [**AirMDR Support**](mailto:support@airmdr.com) through your designated support channel.
* 🔁 Rotate credentials regularly.
* 🔄 Reconnect in AirMDR when secrets are changed.
6. Click **Save**.
### Microsoft Teams - Test Case Scenarios
User can now send a message using a simple HTTP POST request using Postman or cURL.
**Example POST Request using cURL:**
```text theme={null}
curl --location '' \
--header 'Content-Type: application/json' \
--data '{
"attachments": [
{
"contentType": "application/vnd.microsoft.card.adaptive",
"content": {
"type": "AdaptiveCard",
"$schema": "http://adaptivecards.io/schemas/adaptive-card.json",
"version": "1.0",
"body": [
{
"type": "TextBlock",
"text": "✅ This is a new test message from curl!",
"wrap": true
}
]
}
}
]
}'
```
The payload must be a valid JSON object with a `text` field. You can also include rich card formatting using **MessageCard** schema if needed.
Replace `` with the URL copied from the Teams UI.
**Response Sample**
`202 Accepted`
**Example POST Request using cURL:**
```text theme={null}
curl -X POST "https://login.microsoftonline.com/{tenant_id}/oauth2/v2.0/token" \
-H "Content-Type: application/x-www-form-urlencoded" \
-d "grant_type=password" \
-d "client_id={client_id}" \
-d "client_secret={client_secret}" \
-d "username={sender_username}" \
-d "password={sender_password}" \
-d "scope=https://graph.microsoft.com/.default"
```
**Successful Response Sample**
```text theme={null}
{
"token_type": "Bearer",
"scope": "https://graph.microsoft.com/Mail.Read https://graph.microsoft.com/User.Read",
"expires_in": 3599,
"ext_expires_in": 3599,
"access_token": "eyJ0*****************************************...",
"refresh_token": "MC4AAA...long_string...AAA"
}
```
**Error Response Sample**
```text theme={null}
{
"error": "invalid_grant",
"error_description": "AADSTS50126: Error validating credentials due to invalid username or password.",
"error_codes": [50126],
"timestamp": "2026-04-09 10:30:00Z",
"trace_id": "...",
"correlation_id": "..."
}
```
### Configure Microsoft Teams in AirMDR Integrations Dashboard
1. Navigate to [AirMDR](https://app.airmdr.com/auth/login), provide the credentials and click **Login**
2. Navigate to the AirMDR Integrations Dashboard in the left navigation pane and select **Integrations**.
3. Use the search option, enter the keyword "**Microsoft Teams**", select the **Connections** tab, and click **+ Create** button.
4. Enter an unique name to the Instance (e.g., `your org name-MSTeams`) to easily identify the user connection by AirMDR.
5. For **Webhook URL:** Enter the generated **Webhook URL** in the Authentication Details field params, and click **Save**.\
(or)
6. For **Azure AD:** Enter the Azure AD application credentials like **Tenant ID, Client ID, Client Secret, Sender Username, Sender Password**, and **Remote Agent** in the Authentication Details field params, and click **Save**.
### Skills provided by this Integration
| **Skill ID** | **Purpose** |
| :--------------------------- | :------------------------------------------------------------------------------------------------------------------------------------------------------ |
| Send Microsoft Teams DM | Send a direct message to a Microsoft Teams user by their email address using the Graph API. Useful for targeted, user-specific notifications or alerts. |
| Send Microsoft Teams Message | Send a message to a Microsoft Teams channel using a webhook. This skill is useful for real-time notifications or alerts. |
To view the details of Input Parameters and Output for the respective skills
* Go to [AirMDR → Microsoft Teams](https://app.airmdr.com/integrationsv2/8cee0997-1578-485e-bdc4-22982ccc8b30/skills?search=Microsoft+Teams) Integration page.
* Select the **Skills** tab and click on the required listed skills.
## Additional Information
| Error | Cause | Resolution |
| :-------------------- | :------------------------ | :------------------ |
| Invalid Webhook URL | Incorrect or expired URL | Regenerate webhook |
| Authentication failed | Wrong client secret | Recreate secret |
| Permission denied | Missing Graph permissions | Grant admin consent |
| MFA enabled | Service account blocked | Disable MFA |
| Token expired | OAuth token expired | Reauthenticate |
To manage the webhook:
1. Go to the **channel’s connectors** (as in Step 3).
2. Click **Configured** (top-left tab).
3. Locate your webhook, and click **Manage** or **Remove**.
* Rotate webhook URLs periodically for security and use **Webhook** for simple use cases.
* Do not expose webhook URLs in public repositories or logs.
* Use appropriate **naming conventions** to identify webhook sources.
* Use **Graph API** for automation workflows and limit Graph permissions to minimum required
* Secure service account credentials
* 📧 Contact [**AirMDR Support**](mailto:support@airmdr.com) through your designated support channel.
* 🔁 Rotate credentials regularly.
* 🔄 Reconnect in AirMDR when secrets are changed.