> ## Documentation Index
> Fetch the complete documentation index at: https://docs.airmdr.com/llms.txt
> Use this file to discover all available pages before exploring further.
# AirMDR Self‑Serve Integration
> This documentation explains how to onboard, validate, and troubleshoot alert sources in AirMDR using the Self-Help Integration.
## Introduction
The **Self‑Serve Integration** feature in AirMDR empowers organizational administrators and developers to create and deploy their own integrations without engineering assistance.\
This module enables defining new integration providers, configuring authentication methods, building skills (custom actions), and testing them directly from the AirMDR console.
With Self‑Help Integration, super‑admins can:
* Add new third‑party integration providers on demand
* Define authentication and connection parameters
* Create reusable skills for automation workflows
* Deploy and test integrations instantly inside AirMDR
## **Prerequisites**
* **Role:** Organization Super Admin privileges in AirMDR
* **Access:** Integration Dashboard in the left navigation panel
* **Dependencies:** Internet access to AirMDR GitHub integration templates (for authentication examples)
* **Knowledge:** Basic understanding of Python and REST APIs (for writing skill code)
## **Workflow Summary**
| Step | Action | Outcome |
| :--- | :-------------------------------------------------------------------------------------------------------------------- | :----------------------------------------------------------------------- |
| 1 | [Define Provider](https://docs.airmdr.com/essentials/AirMDR-SelfHelp-Integration#creating-a-new-integration-provider) | Creates integration entry |
| 2 | [Set Authentication](https://docs.airmdr.com/essentials/AirMDR-SelfHelp-Integration#configuring-authentication) | Configures provider credentials |
| 3 | [Generate Form](https://docs.airmdr.com/essentials/AirMDR-SelfHelp-Integration#test-and-generate-form) | Enables dynamic credential input fields based on connection parameters |
| 4 | [Test Authentication](https://docs.airmdr.com/essentials/AirMDR-SelfHelp-Integration#test-and-generate-form) | Confirms connection validity using the test\_authentication() function |
| 5 | [Add Skill](https://docs.airmdr.com/essentials/AirMDR-SelfHelp-Integration#creating-skills) | Defines custom logic/action (fetch, enrich, notify, etc.) |
| 6 | [Generate Skill](https://docs.airmdr.com/essentials/AirMDR-SelfHelp-Integration#generate-and-deploy-skill) | Generates a working skill definition inside the integration |
| 7 | [Deploy Integration](https://docs.airmdr.com/essentials/AirMDR-SelfHelp-Integration#generate-and-deploy-skill) | Makes the integration and skill available inside AirMDR |
| 8 | [Add Connection](https://docs.airmdr.com/essentials/AirMDR-SelfHelp-Integration#add-a-connection-in-airmdr) | Registers live credentials (e.g., API URL, API Key) for use in playbooks |
| 9 | [Use in Playbook](https://docs.airmdr.com/essentials/AirMDR-SelfHelp-Integration#using-the-connection-in-a-playbook) | Deployed skill appears as selectable option in playbook step editor |
## **Navigating to the AirMDR Integrations Dashboard**
1. Log in to [**AirMDR**](https://app.airmdr.com/) using super‑admin credentials.
2. From the left navigation pane, select [Integrations ](https://app.airmdr.com/integrationsv2) **→ Dashboard**.
3. Choose the desired **organization** from the dropdown menu.
The **Organization dropdown** will only appear if the current org has one or more **child organizations**.\
If no child orgs exist, the dropdown will be hidden and the integration will apply to the current org by default.
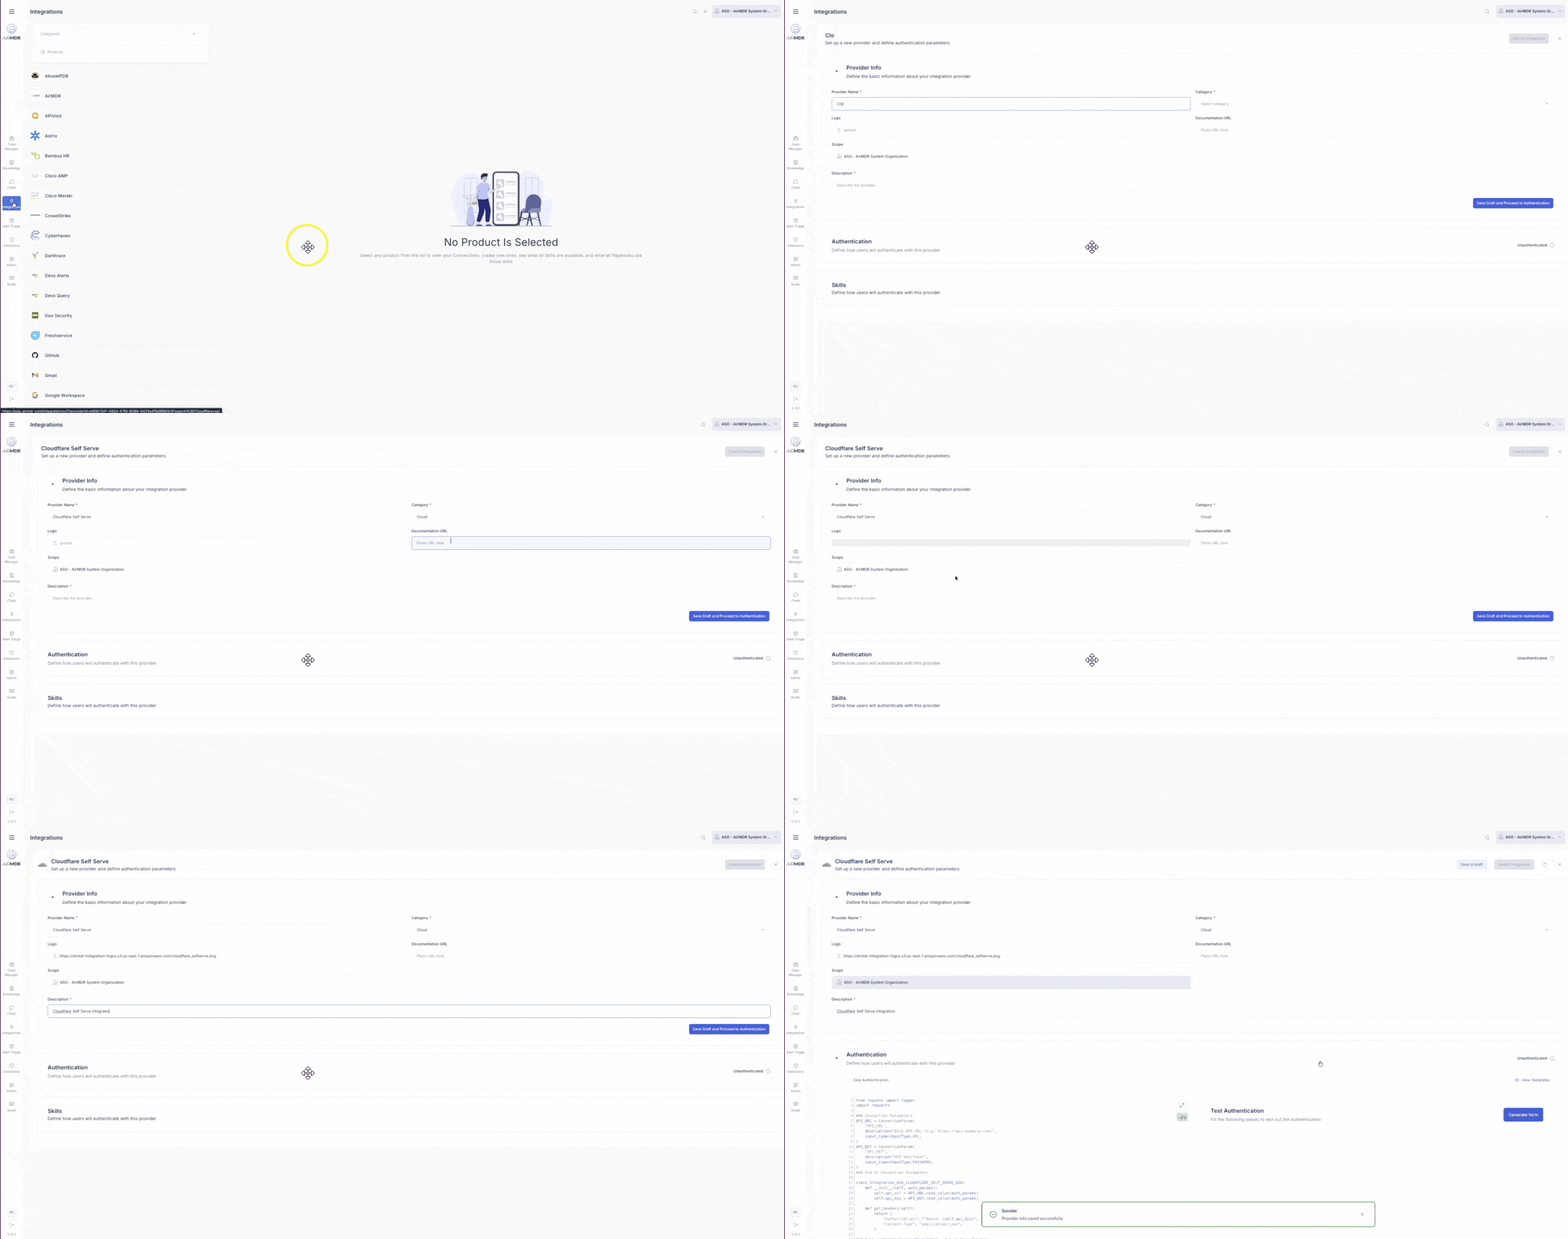
4. Click the **“+”** icon (top‑right corner) to create a new integration provider.
## **Creating a New Integration Provider**
1. Define Provider Information
2. Fill in the following fields:
| Field | Description |
| :-------------------- | :-------------------------------------------------- |
| **Provider Name** | Display name of your integration provider |
| **Category** | Choose the most relevant integration category |
| **Logo Upload** | Upload a logo image (SVG/PNG preferred) |
| **Documentation URL** | Link to external or internal provider documentation |
| **Description** | Short summary of what the integration does |
3. Click **Save Draft and Proceed to Authentication**.
 ## **Configuring Authentication**
In this step, define how users will authenticate with the integration provider.
### **Choose Authentication Type**
* Click **View Templates** to open the official [**AirMDR Integration Templates repository**](https://github.com/AirMDR/self-serve-integration-templates).
* In the [**authentication\_types**](https://github.com/AirMDR/self-serve-integration-templates/tree/main/authentication_types) folder, review available options:
* `api_key`
* `base64`
* `basic_auth`
* `oauth2`
Each template provides a predefined Python snippet and connection structure.
**Tip:** Start with the authentication model that matches your provider’s API specification.
### **Connection Parameters**
Inside your authentication template, you must define a **Connection Parameters** block:
```
### Connection Parameters
API_URL = ConnectionParam(
"API_URL",
description="Base API URL (e.g. https://api.example.com)",
input_type=InputType.URL,
)
API_KEY = ConnectionParam(
"API_KEY",
description="Authentication key for API access",
input_type=InputType.SECRET,
)
### End of Connection Parameters
```
**Guidelines**
* Begin with `### Connection Parameters` and end with `### End of Connection Parameters`.
* Declare each parameter as a `ConnectionParam` object.
* Read parameters from `auth_params` using `ConnectionParam.read_value`.
Example:
```
self.api_url = API_URL.read_value(auth_params)
self.api_key = API_KEY.read_value(auth_params)
```
🔒 **Note:** Type conversion is handled internally by `read_value`; no additional parsing is required.
### **Integration Class Declaration**
Create a class to encapsulate your integration logic:
```
class MyIntegrationProvider:
"""Defines connection and authentication handling."""
```
The class name is automatically captured by AirMDR for registration.
### **Test Authentication Function**
Every integration must include a test function:
```
def test_authentication(auth_params):
"""
Called from the UI to verify authentication credentials.
Returns HTTP 200 on success.
"""
```
The platform executes this function to confirm connection before allowing deployment.
### **Test and Generate Form**
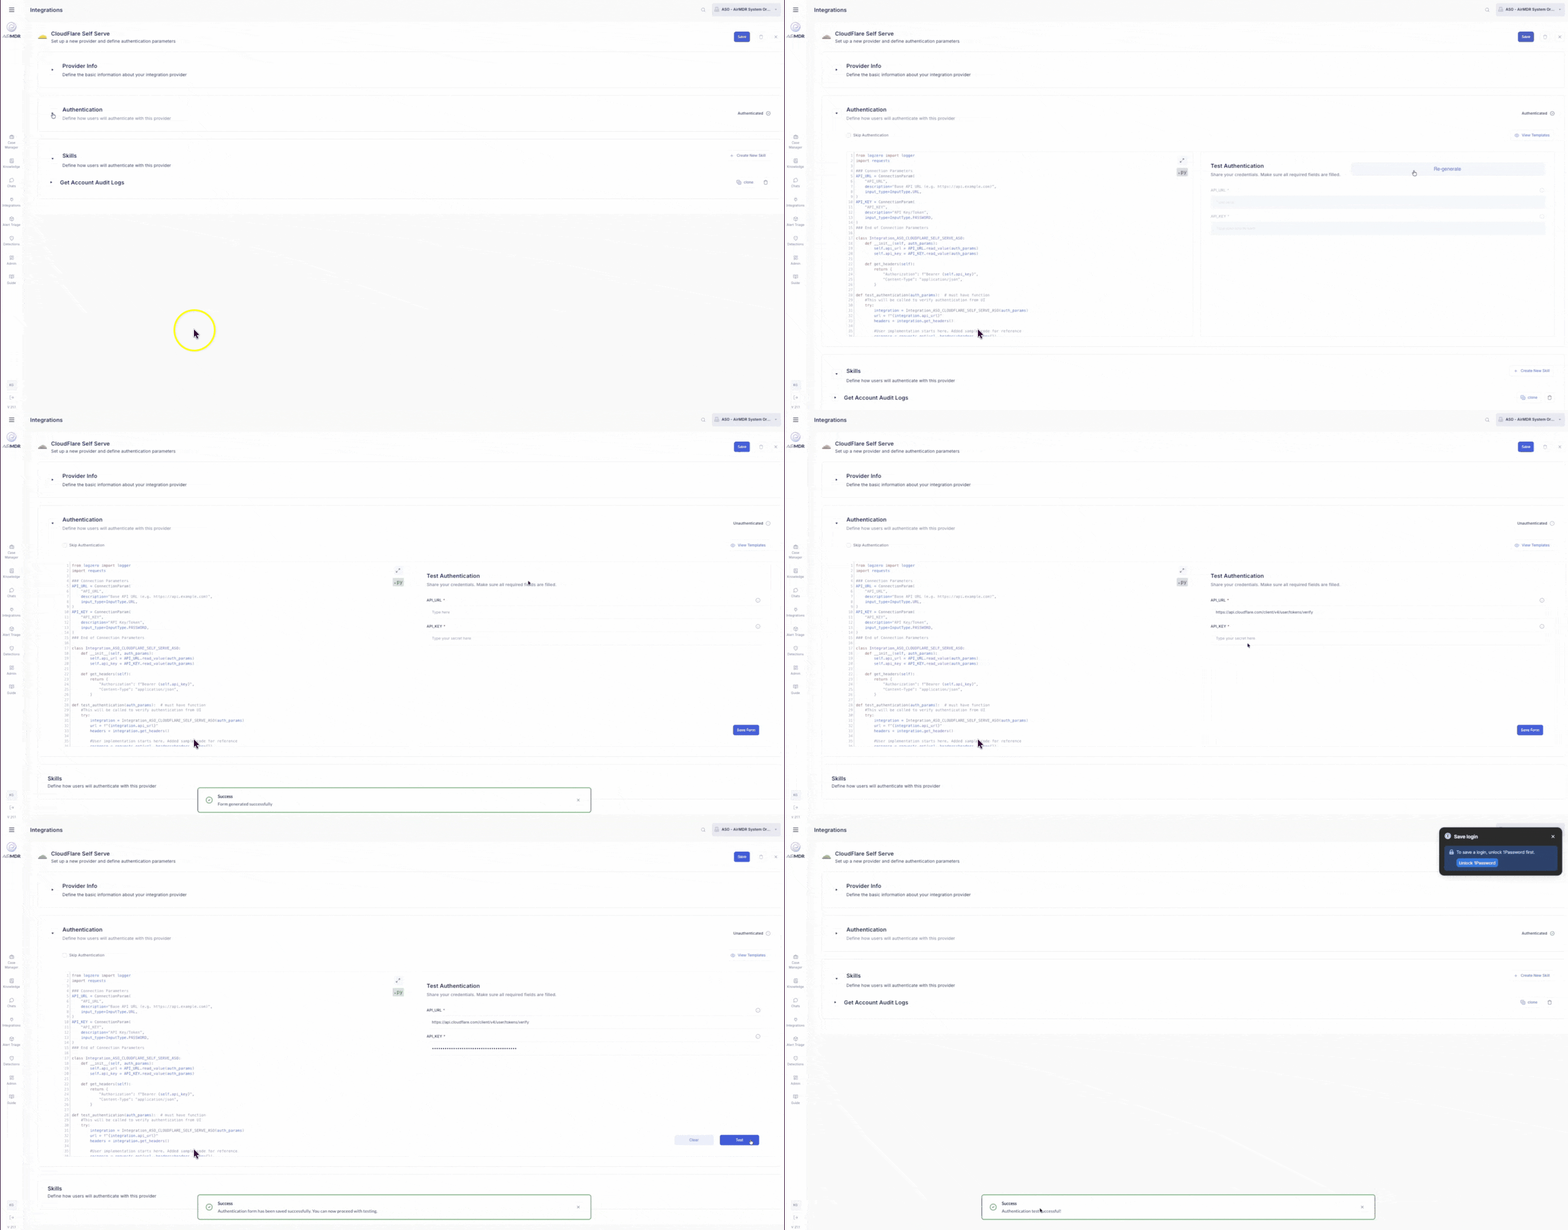
1. After defining your parameters and class, click **Generate Form**.
2. Enter your **API URL** and **API Key** (if applicable).
3. Click **Test Authentication** to validate credentials.
**If successful, proceed to skill creation.**
**Skipping Authentication (Optional)**
If your provider does not require authentication, select the checkbox **“Skip Authentication”** and continue.
## **Configuring Authentication**
In this step, define how users will authenticate with the integration provider.
### **Choose Authentication Type**
* Click **View Templates** to open the official [**AirMDR Integration Templates repository**](https://github.com/AirMDR/self-serve-integration-templates).
* In the [**authentication\_types**](https://github.com/AirMDR/self-serve-integration-templates/tree/main/authentication_types) folder, review available options:
* `api_key`
* `base64`
* `basic_auth`
* `oauth2`
Each template provides a predefined Python snippet and connection structure.
**Tip:** Start with the authentication model that matches your provider’s API specification.
### **Connection Parameters**
Inside your authentication template, you must define a **Connection Parameters** block:
```
### Connection Parameters
API_URL = ConnectionParam(
"API_URL",
description="Base API URL (e.g. https://api.example.com)",
input_type=InputType.URL,
)
API_KEY = ConnectionParam(
"API_KEY",
description="Authentication key for API access",
input_type=InputType.SECRET,
)
### End of Connection Parameters
```
**Guidelines**
* Begin with `### Connection Parameters` and end with `### End of Connection Parameters`.
* Declare each parameter as a `ConnectionParam` object.
* Read parameters from `auth_params` using `ConnectionParam.read_value`.
Example:
```
self.api_url = API_URL.read_value(auth_params)
self.api_key = API_KEY.read_value(auth_params)
```
🔒 **Note:** Type conversion is handled internally by `read_value`; no additional parsing is required.
### **Integration Class Declaration**
Create a class to encapsulate your integration logic:
```
class MyIntegrationProvider:
"""Defines connection and authentication handling."""
```
The class name is automatically captured by AirMDR for registration.
### **Test Authentication Function**
Every integration must include a test function:
```
def test_authentication(auth_params):
"""
Called from the UI to verify authentication credentials.
Returns HTTP 200 on success.
"""
```
The platform executes this function to confirm connection before allowing deployment.
### **Test and Generate Form**
1. After defining your parameters and class, click **Generate Form**.
2. Enter your **API URL** and **API Key** (if applicable).
3. Click **Test Authentication** to validate credentials.
**If successful, proceed to skill creation.**
**Skipping Authentication (Optional)**
If your provider does not require authentication, select the checkbox **“Skip Authentication”** and continue.
 ## **Creating Skills**
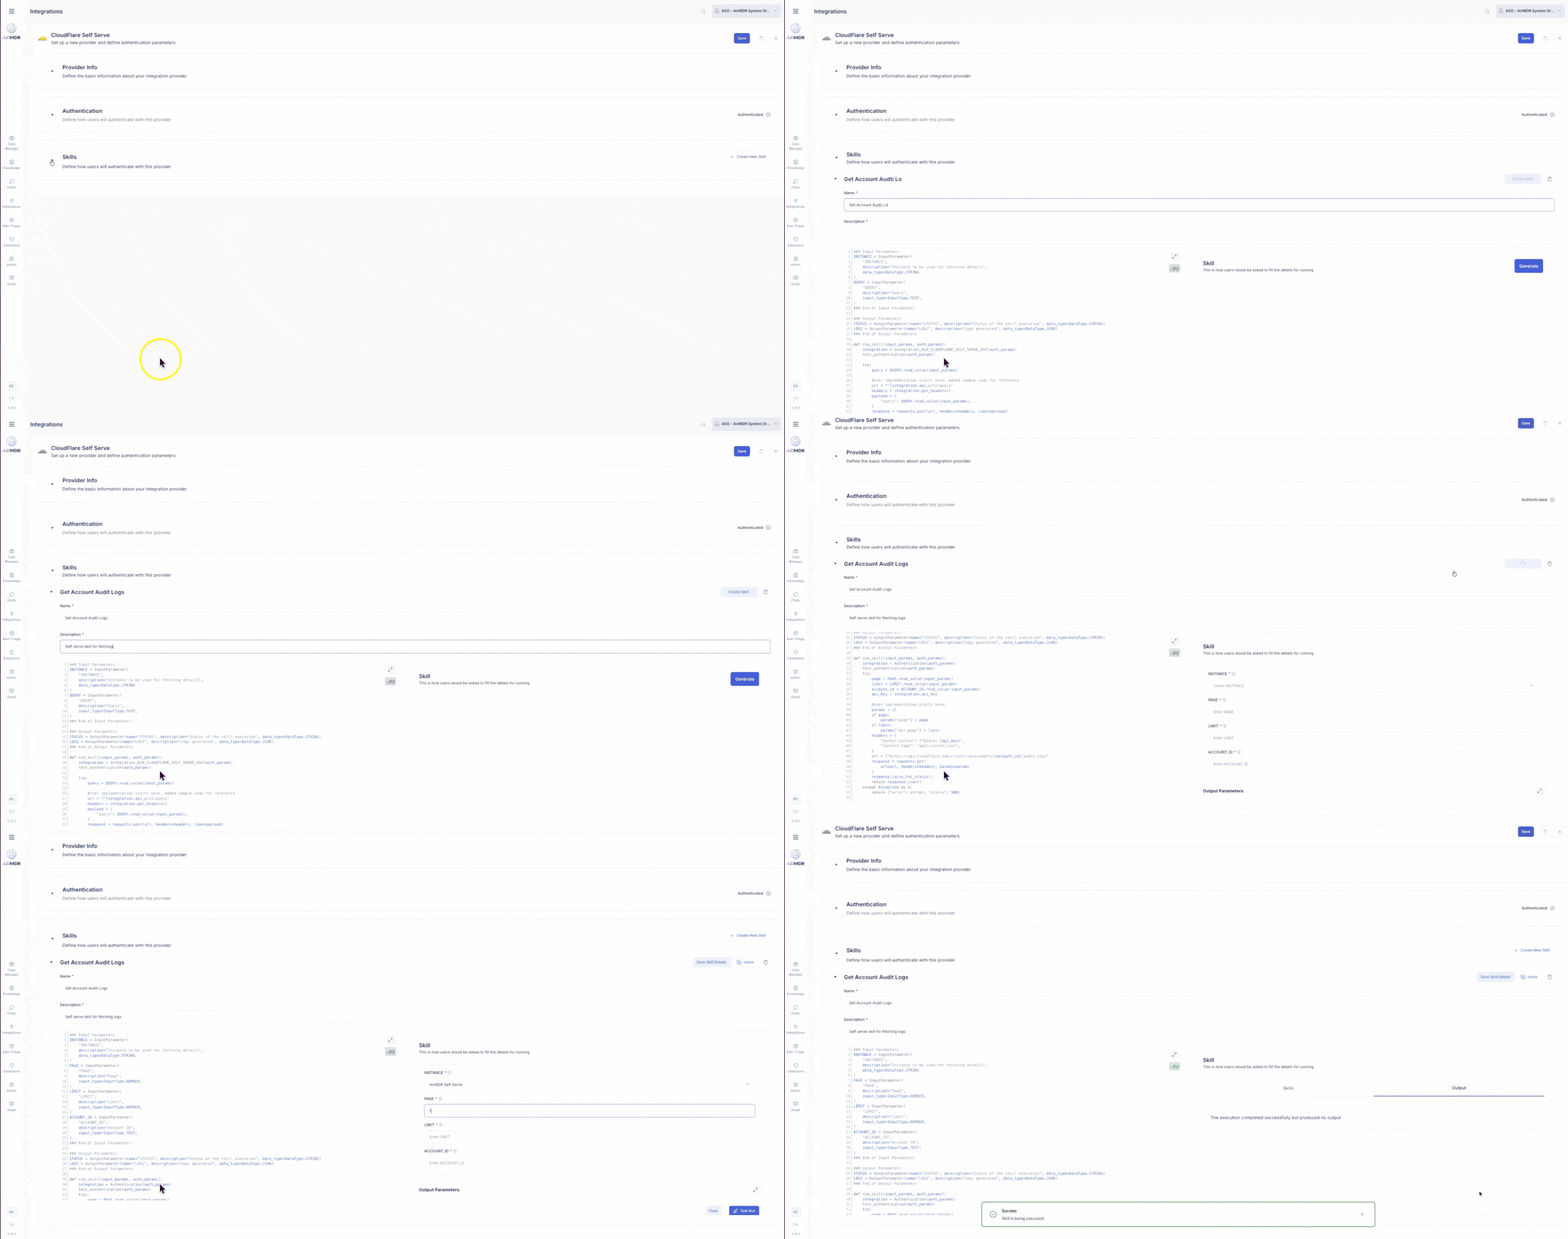
Skills represent the specific actions or data fetches your integration can perform within AirMDR.
Click **“+ Add New Skill”** or **“+ Create New Skill”**, then provide:
* **Skill Name**
* **Skill Description**
## **Creating Skills**
Skills represent the specific actions or data fetches your integration can perform within AirMDR.
Click **“+ Add New Skill”** or **“+ Create New Skill”**, then provide:
* **Skill Name**
* **Skill Description**
 ### **Skill Code Structure**
Each skill must follow the standardized AirMDR coding format.
> ⚙️ **Order of Code Sections**
1. Input Parameters
2. Output Parameters
3. `def run_skill(input_params, auth_params):`
All custom logic should reside within `run_skill`.
1. **Input Parameters Section**
```
### Input Parameters
QUERY = InputParameter(
"QUERY",
description="Enter search query",
input_type=InputType.TEXT,
)
### End of Input Parameters
```
**Guidelines**
* Start the section with:\
`### Input Parameters`
* End the section with:\
`### End of Input Parameters`
* Define each input using the `InputParameter` constructor.
* Use a **class-like format** with assignments (do not wrap in a `class` definition).\
❌ Do not use variable assignment outside this pattern\
✅ Do not wrap in `class Input:`
* **Avoid** dynamic assignments like `QUERY = ...` outside the defined structure.\
These will not be parsed correctly by the skill loader.
**Example**:
```
### Input Parameters
QUERY = InputParameter(
"QUERY",
description="Query to run against the provider",
input_type=InputType.TEXT,
)
LIMIT = InputParameter(
"LIMIT",
description="Maximum number of results",
input_type=InputType.NUMBER,
)
### End of Input Parameters
```
🔒 **Note:** The parameter names (e.g., `QUERY`, `LIMIT`) must match the internal references used in your logic.
**How to Access Input Values in Code**
You can access each input parameter inside the `run_skill()` function using the `.read_value()` method.
```
query = QUERY.read_value(input_params)
limit = LIMIT.read_value(input_params)
```
> AirMDR automatically handles type validation and conversion using the `InputType` declaration, so you don't need to manually convert strings or numbers.
**Input Types Available**
| **InputType** | **Description** |
| :-------------- | :--------------------------------------------------------------------- |
| `TEXT` | Free-form single line string |
| `TIMESTAMP` | Date-time picker for entering ISO 8601 timestamps |
| `NUMBER` | Integer or float input |
| `URL` | Field for entering a valid URL |
| `OAUTH_URL` | Authorization URL used to initiate OAuth2 flows |
| `CLIENT_ID` | OAuth2 client ID used in authentication requests |
| `CLIENT_SECRET` | OAuth2 client secret (secured and masked input) |
| `LIST` | Dropdown list with predefined selectable options |
| `BOOLEAN` | Toggle switch for True/False values (typically rendered as a checkbox) |
> 🔐 Use `SECRET` for sensitive values like API keys or tokens.
**✅ Best Practices**
* Use meaningful names like `QUERY`, `HOST`, or `USER_ID`.
* Add clear `description` fields to improve form clarity.
* Avoid redundant or unused parameters.
* Group related parameters logically for better UX.
2. **Output Parameters Section**
```
### Output Parameters
STATUS = OutputParameter(
name="STATUS",
description="Status of the skill execution",
data_type=DataType.STRING,
)
LOGS = OutputParameter(
name="LOGS",
description="Logs generated during execution",
data_type=DataType.JSON,
)
### End of Output Parameters
```
3. **Skill Function Definition**
```
def run_skill(input_params, auth_params):
"""Processes user query and returns status and logs."""
try:
query = QUERY.read_value(input_params)
logs = {"query": query}
return {"STATUS": "success", "LOGS": logs}
except Exception as e:
return {"STATUS": "error", "LOGS": {"error": str(e)}}
```
### **Generate and Deploy Skill**
1. Click **Generate** to build the skill definition.
2. Provide your input fields and test using **Test Run**.
3. Save draft if needed, or click **Deploy Integration** (top‑right corner).
Use **Save to Draft** frequently to prevent loss of progress.
## **Post‑Deployment Actions**
After deployment:
* The integration appears in your **Integrations Dashboard**.
* You can **clone**, **edit**, **delete**, or **add new skills** at any time.
* Search for integrations by **Provider Name** or **Skill Name** using the dashboard search bar.
## 🔗 **Adding a Connection for a Deployed Skill in AirMDR**
If an Authentication is defined for a Integration, then connection is necessary to access the skills.
**When is a Connection Required?**
* If the integration uses **auth\_params** like `API_URL`, `API_KEY`, `TOKEN`, etc.
* If you're deploying the same integration across **multiple organizations**
### **Skill Code Structure**
Each skill must follow the standardized AirMDR coding format.
> ⚙️ **Order of Code Sections**
1. Input Parameters
2. Output Parameters
3. `def run_skill(input_params, auth_params):`
All custom logic should reside within `run_skill`.
1. **Input Parameters Section**
```
### Input Parameters
QUERY = InputParameter(
"QUERY",
description="Enter search query",
input_type=InputType.TEXT,
)
### End of Input Parameters
```
**Guidelines**
* Start the section with:\
`### Input Parameters`
* End the section with:\
`### End of Input Parameters`
* Define each input using the `InputParameter` constructor.
* Use a **class-like format** with assignments (do not wrap in a `class` definition).\
❌ Do not use variable assignment outside this pattern\
✅ Do not wrap in `class Input:`
* **Avoid** dynamic assignments like `QUERY = ...` outside the defined structure.\
These will not be parsed correctly by the skill loader.
**Example**:
```
### Input Parameters
QUERY = InputParameter(
"QUERY",
description="Query to run against the provider",
input_type=InputType.TEXT,
)
LIMIT = InputParameter(
"LIMIT",
description="Maximum number of results",
input_type=InputType.NUMBER,
)
### End of Input Parameters
```
🔒 **Note:** The parameter names (e.g., `QUERY`, `LIMIT`) must match the internal references used in your logic.
**How to Access Input Values in Code**
You can access each input parameter inside the `run_skill()` function using the `.read_value()` method.
```
query = QUERY.read_value(input_params)
limit = LIMIT.read_value(input_params)
```
> AirMDR automatically handles type validation and conversion using the `InputType` declaration, so you don't need to manually convert strings or numbers.
**Input Types Available**
| **InputType** | **Description** |
| :-------------- | :--------------------------------------------------------------------- |
| `TEXT` | Free-form single line string |
| `TIMESTAMP` | Date-time picker for entering ISO 8601 timestamps |
| `NUMBER` | Integer or float input |
| `URL` | Field for entering a valid URL |
| `OAUTH_URL` | Authorization URL used to initiate OAuth2 flows |
| `CLIENT_ID` | OAuth2 client ID used in authentication requests |
| `CLIENT_SECRET` | OAuth2 client secret (secured and masked input) |
| `LIST` | Dropdown list with predefined selectable options |
| `BOOLEAN` | Toggle switch for True/False values (typically rendered as a checkbox) |
> 🔐 Use `SECRET` for sensitive values like API keys or tokens.
**✅ Best Practices**
* Use meaningful names like `QUERY`, `HOST`, or `USER_ID`.
* Add clear `description` fields to improve form clarity.
* Avoid redundant or unused parameters.
* Group related parameters logically for better UX.
2. **Output Parameters Section**
```
### Output Parameters
STATUS = OutputParameter(
name="STATUS",
description="Status of the skill execution",
data_type=DataType.STRING,
)
LOGS = OutputParameter(
name="LOGS",
description="Logs generated during execution",
data_type=DataType.JSON,
)
### End of Output Parameters
```
3. **Skill Function Definition**
```
def run_skill(input_params, auth_params):
"""Processes user query and returns status and logs."""
try:
query = QUERY.read_value(input_params)
logs = {"query": query}
return {"STATUS": "success", "LOGS": logs}
except Exception as e:
return {"STATUS": "error", "LOGS": {"error": str(e)}}
```
### **Generate and Deploy Skill**
1. Click **Generate** to build the skill definition.
2. Provide your input fields and test using **Test Run**.
3. Save draft if needed, or click **Deploy Integration** (top‑right corner).
Use **Save to Draft** frequently to prevent loss of progress.
## **Post‑Deployment Actions**
After deployment:
* The integration appears in your **Integrations Dashboard**.
* You can **clone**, **edit**, **delete**, or **add new skills** at any time.
* Search for integrations by **Provider Name** or **Skill Name** using the dashboard search bar.
## 🔗 **Adding a Connection for a Deployed Skill in AirMDR**
If an Authentication is defined for a Integration, then connection is necessary to access the skills.
**When is a Connection Required?**
* If the integration uses **auth\_params** like `API_URL`, `API_KEY`, `TOKEN`, etc.
* If you're deploying the same integration across **multiple organizations**
 ### Add a Connection in AirMDR
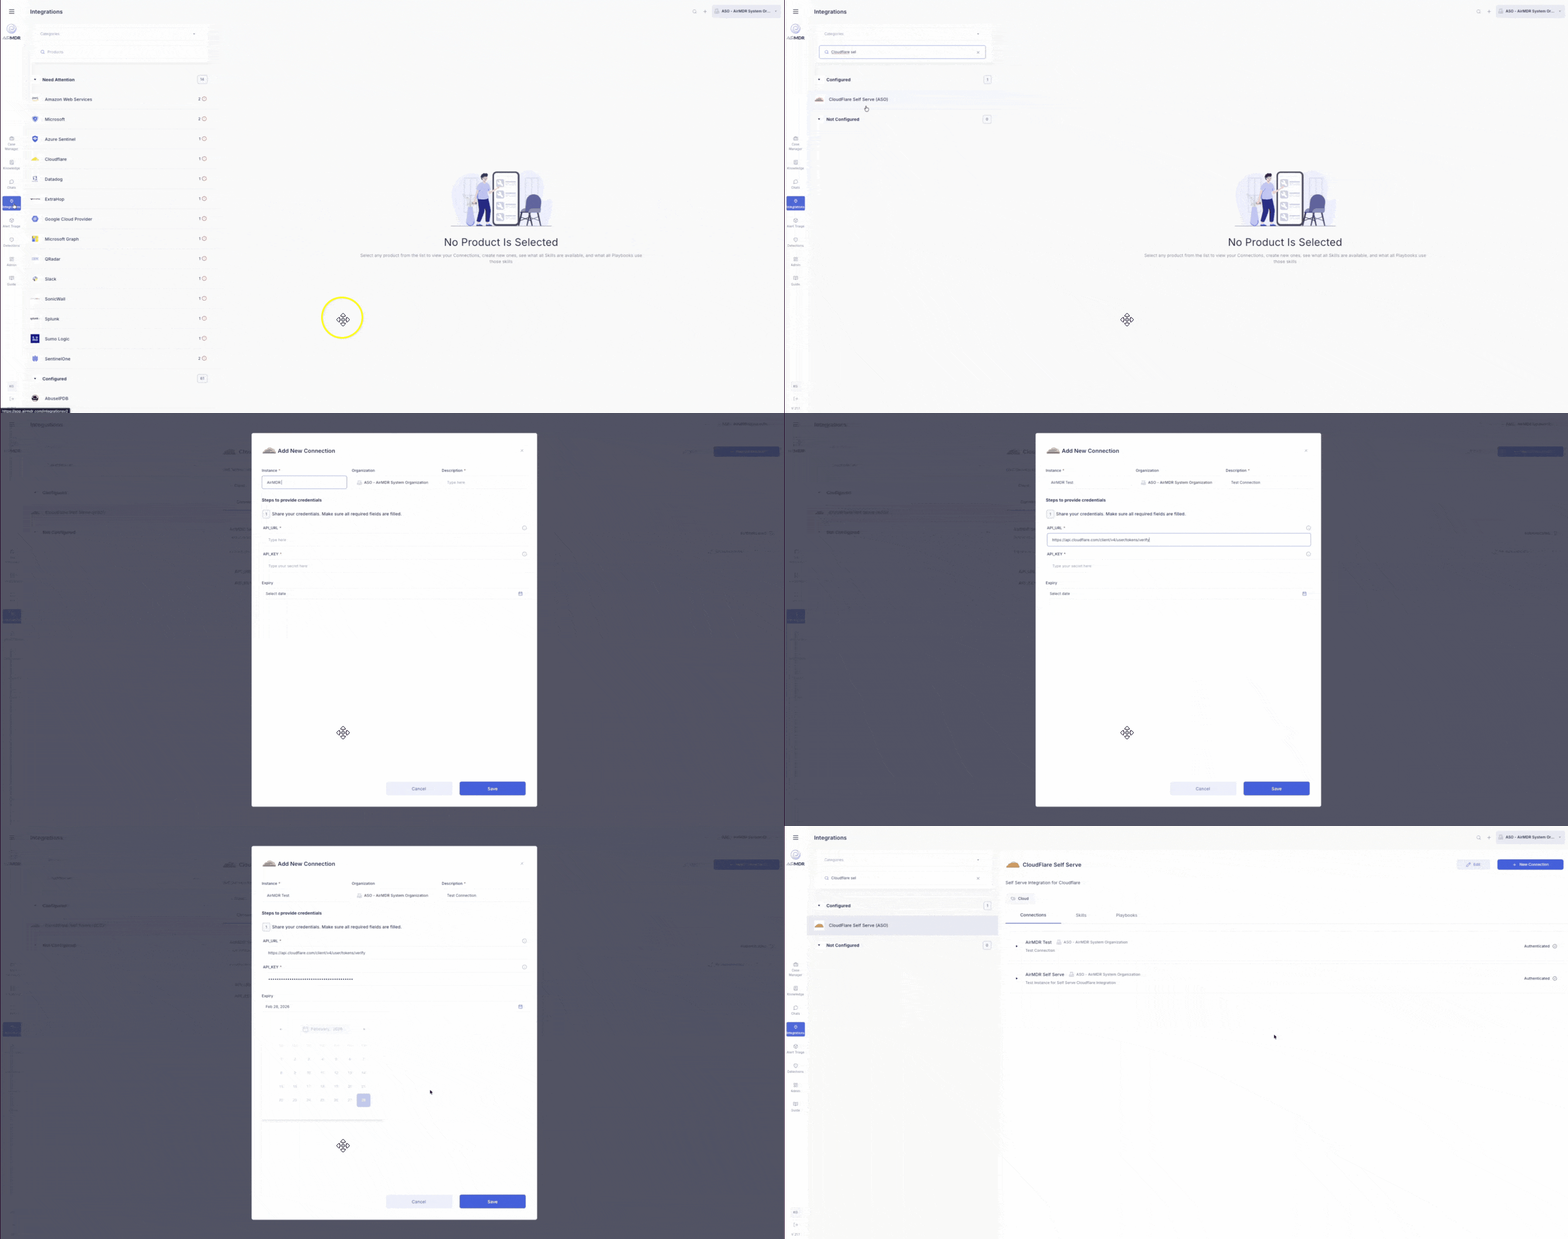
1. Login to the **AirMDR console** as a Super Admin.
2. From the **left navigation pane**, click on **Integrations**.
3. Locate your **deployed integration** by **Provider Name** or **Skill Name** using the dashboard search bar.
1. Click on the name of the deployed integration.
2. You will see the list of associated **skills** and **connections** (if any).
3. Click on the **“+ New Connection”** button (top-right of the Connections section).
1. You will now be prompted to provide required fields that were defined in your **Connection Parameters** block during integration setup.
Mandatory Fields may include:
* **Instance**
* **Description**
* **Email**
* **Token**
* **Instance Url**
2. Click **Save**.
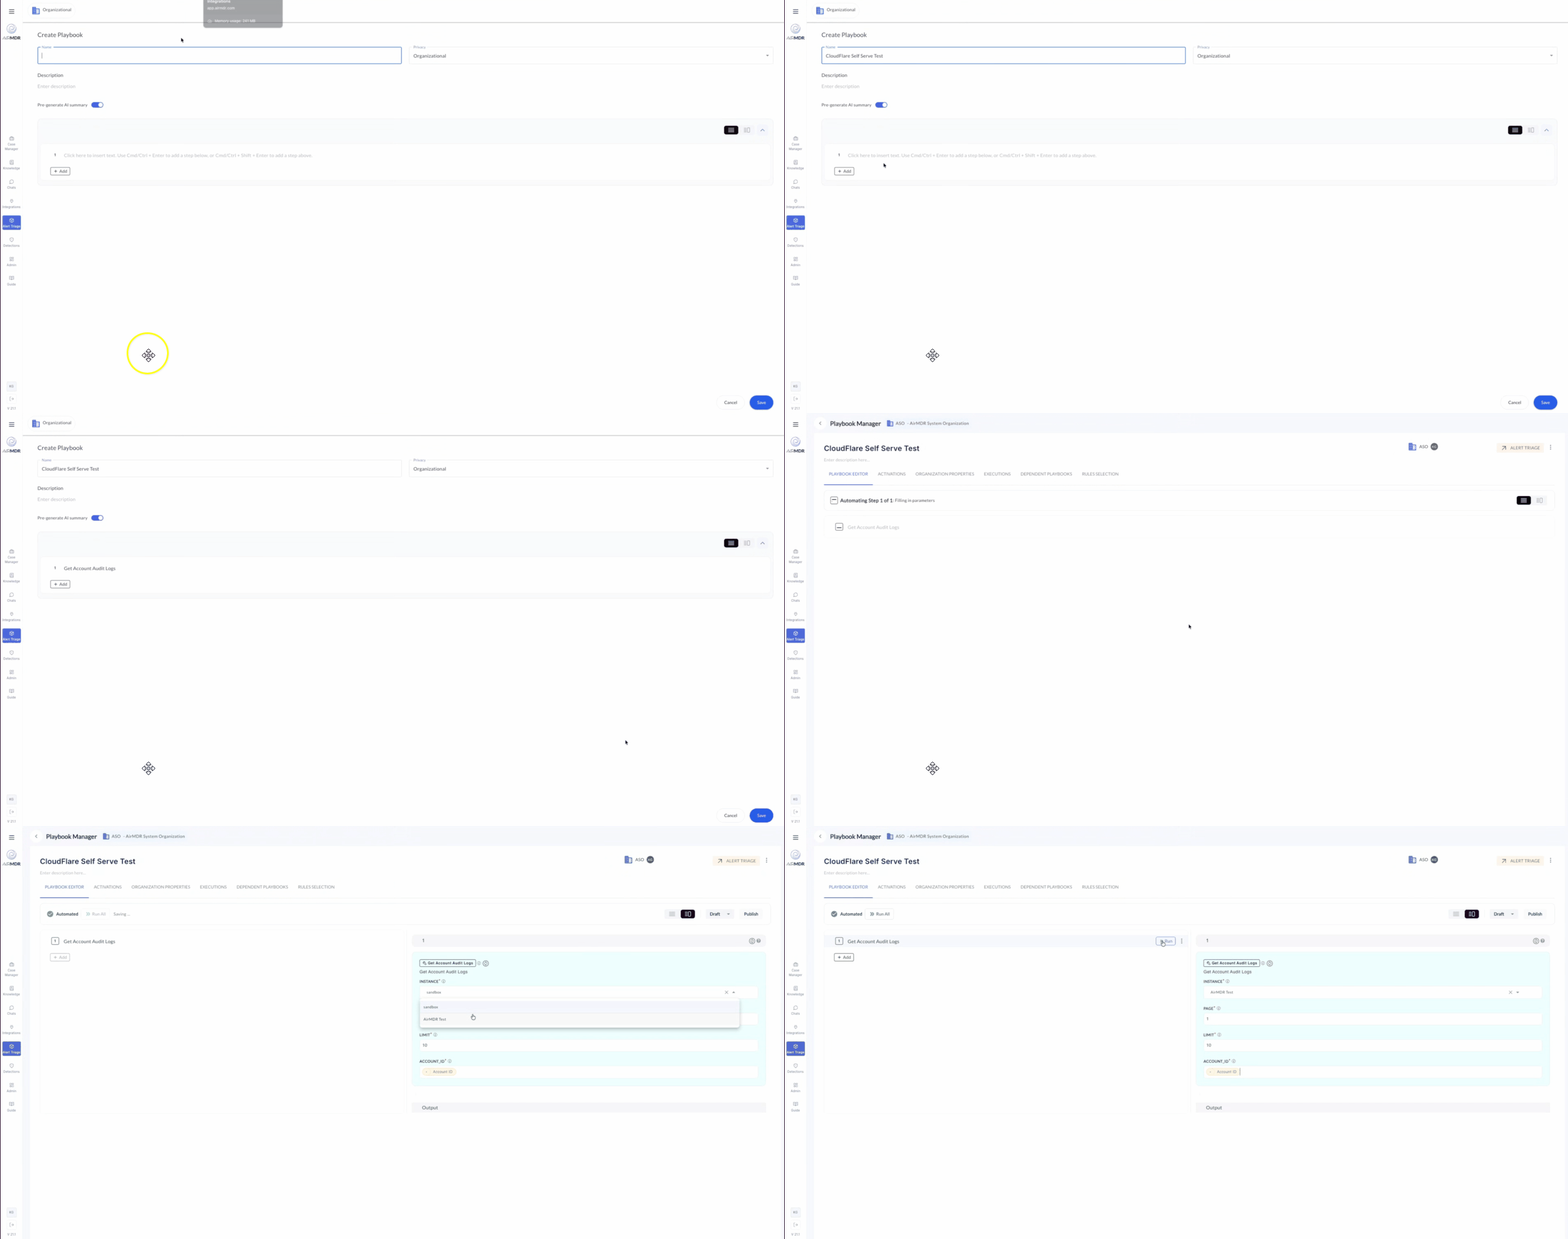
### Using the Connection in a Playbook
Now that the connection is added:
* Go to **Playbook Manager**
* Create or edit a playbook
* Add a new step and select **your deployed skill**
* In the skill configuration, choose the **connection** you just created from the dropdown.
If the skill doesn’t appear, ensure that the integration is **published**, the skill is **generated**, and a connection is **added**.
### Add a Connection in AirMDR
1. Login to the **AirMDR console** as a Super Admin.
2. From the **left navigation pane**, click on **Integrations**.
3. Locate your **deployed integration** by **Provider Name** or **Skill Name** using the dashboard search bar.
1. Click on the name of the deployed integration.
2. You will see the list of associated **skills** and **connections** (if any).
3. Click on the **“+ New Connection”** button (top-right of the Connections section).
1. You will now be prompted to provide required fields that were defined in your **Connection Parameters** block during integration setup.
Mandatory Fields may include:
* **Instance**
* **Description**
* **Email**
* **Token**
* **Instance Url**
2. Click **Save**.
### Using the Connection in a Playbook
Now that the connection is added:
* Go to **Playbook Manager**
* Create or edit a playbook
* Add a new step and select **your deployed skill**
* In the skill configuration, choose the **connection** you just created from the dropdown.
If the skill doesn’t appear, ensure that the integration is **published**, the skill is **generated**, and a connection is **added**.
 ### Best Practices
* Create **one connection per environment** (e.g., staging, production).
* Use **clear, scoped names** for each connection.
* Periodically **revalidate connections** if using expiring tokens (e.g., OAuth2).
* Maintain a **connection for each org** if using shared integrations across multiple tenants.
## **Notes & Recommendations**
* Use unique provider names to avoid duplication across organizations.
* Follow AirMDR’s Python syntax and regex structure for parameter sections.
* Always validate credentials using the **Test Authentication** option before deployment.
* For non‑standard providers, use the “Skip Authentication” option carefully — security teams should review before enabling.
* Maintain all integration code under version control (GitHub/Bitbucket) for compliance traceability.
## **Troubleshooting**
| Issue | Possible Cause | Resolution |
| :------------------------------ | :----------------------------------------------------- | :--------------------------------------------- |
| **Authentication test fails** | Incorrect API URL or Key | Re‑enter valid credentials and re‑test |
| **Skill not executing** | Missing `run_skill` function or improper input mapping | Verify skill code structure and input names |
| **Integration not visible** | Draft not deployed | Click **Deploy Integration** to make it active |
| **Incorrect parameter mapping** | Mismatched input names | Check parameter spelling and case sensitivity |
### **Support**
For further assistance, reach out to [**AirMDR Support**](mailto:support@airmdr.com)
### Best Practices
* Create **one connection per environment** (e.g., staging, production).
* Use **clear, scoped names** for each connection.
* Periodically **revalidate connections** if using expiring tokens (e.g., OAuth2).
* Maintain a **connection for each org** if using shared integrations across multiple tenants.
## **Notes & Recommendations**
* Use unique provider names to avoid duplication across organizations.
* Follow AirMDR’s Python syntax and regex structure for parameter sections.
* Always validate credentials using the **Test Authentication** option before deployment.
* For non‑standard providers, use the “Skip Authentication” option carefully — security teams should review before enabling.
* Maintain all integration code under version control (GitHub/Bitbucket) for compliance traceability.
## **Troubleshooting**
| Issue | Possible Cause | Resolution |
| :------------------------------ | :----------------------------------------------------- | :--------------------------------------------- |
| **Authentication test fails** | Incorrect API URL or Key | Re‑enter valid credentials and re‑test |
| **Skill not executing** | Missing `run_skill` function or improper input mapping | Verify skill code structure and input names |
| **Integration not visible** | Draft not deployed | Click **Deploy Integration** to make it active |
| **Incorrect parameter mapping** | Mismatched input names | Check parameter spelling and case sensitivity |
### **Support**
For further assistance, reach out to [**AirMDR Support**](mailto:support@airmdr.com)