> ## Documentation Index
> Fetch the complete documentation index at: https://docs.airmdr.com/llms.txt
> Use this file to discover all available pages before exploring further.
# SAML Integration with Azure Active Directory
> AirMDR supports SAML (Security Assertion Markup Language) integration with Azure AD to enable Single Sign-On (SSO) functionality to authenticate users for access to the AirMDR UI.
### Overview
SAML (Security Assertion Markup Language) integration with Azure AD enables Single Sign-On (SSO) functionality. This allows users to access multiple applications with just one set of credentials by securely transferring authentication and authorization information between Azure AD (the Identity Provider) and AirMDR (Service Providers).
### Pre-requisites
Prior to set-up, Super Admin must have the **Global Administrator** role in Azure AD.
### SSO Set-up & Configuration
**Configure Azure AD as the Identity Provider**
1. Sign in to [Azure Portal](https://portal.azure.com/) with Azure AD administrator account.
2. In the left-hand navigation pane, select **"Microsoft Entra ID"**.
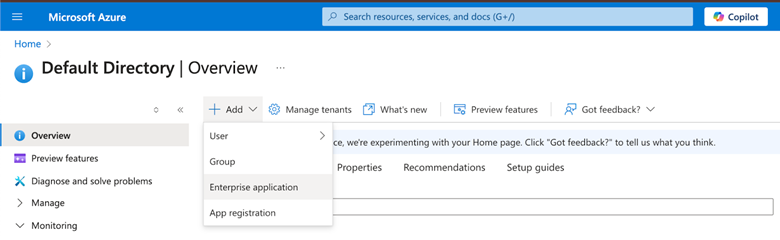
3. Click **+** **Add** dropdown list and then select **"Enterprise application"**.
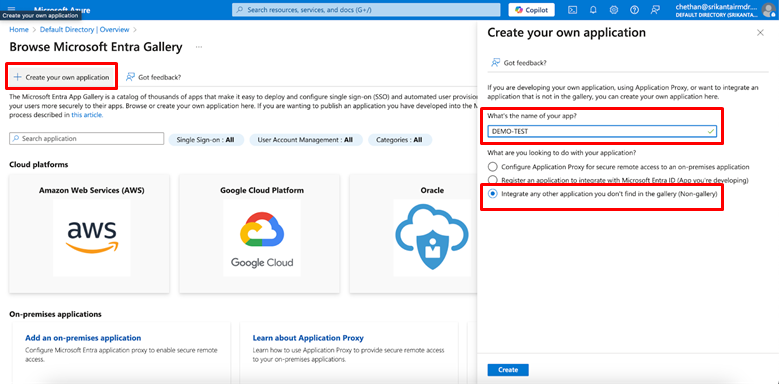
4. Choose the tab **"Create your own application”.**
5. Provide a name for your application, in the **"What's the name of your app?**" space.
6. Select **“Integrate any other application you don’t find in the gallery (Non-gallery)”**.
7. Click **"Create"**.
 **Configure Single Sign-On (SSO)**
1. Select "**Single sign-on"** from the left-hand menu on the application's overview page.
2. Choose the "**SAML"** option.
**Set Up Basic SAML Configuration**
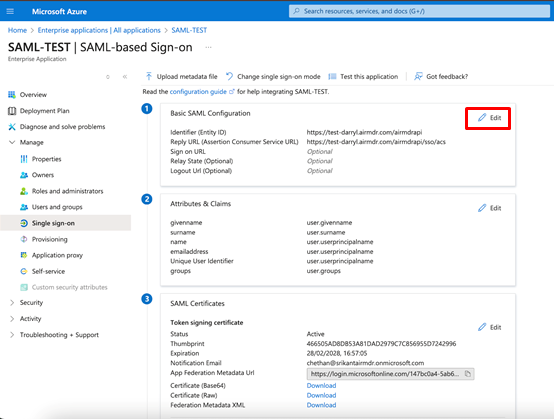
* Click the edit icon next to **“Basic SAML Configuration”**.
* Provide the required specifications as stated below
* **Identifier (Entity ID)**: This is typically a URL specific to your application.
* **Reply URL (Assertion Consumer Service URL)**: The URL where Azure AD will send the SAML token.
**Configure Single Sign-On (SSO)**
1. Select "**Single sign-on"** from the left-hand menu on the application's overview page.
2. Choose the "**SAML"** option.
**Set Up Basic SAML Configuration**
* Click the edit icon next to **“Basic SAML Configuration”**.
* Provide the required specifications as stated below
* **Identifier (Entity ID)**: This is typically a URL specific to your application.
* **Reply URL (Assertion Consumer Service URL)**: The URL where Azure AD will send the SAML token.
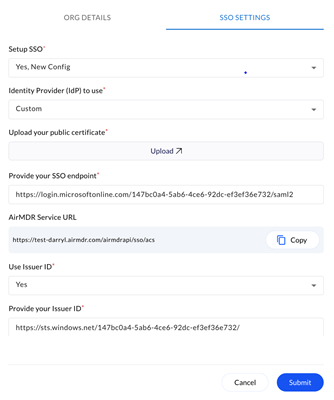 To **Copy** the Service URL:
* Login into the AirMDR UI.
* Navigate on to the bottom left, click on the **User** > **Go to Admin dashboard** > **AirMDR System Organization** > **SSO SETTINGS**
Accessible by only Admins/Super Admins
To **Copy** the Service URL:
* Login into the AirMDR UI.
* Navigate on to the bottom left, click on the **User** > **Go to Admin dashboard** > **AirMDR System Organization** > **SSO SETTINGS**
Accessible by only Admins/Super Admins
 * Click "**Save"** after entering the necessary information.
 **Configure User Attributes and Claims**
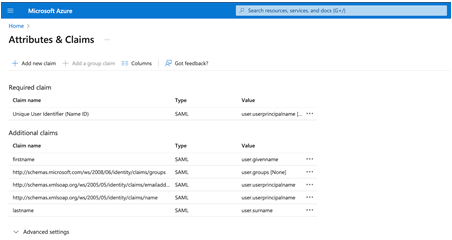
* In the **“Attributes & Claims”** section, click the edit icon.
* Ensure that the necessary user attributes (e.g., email, name) are correctly mapped to the corresponding claims required by your application.
* Remove the name space URIs for **“givenname”** and **“surname”** and update the keys to **“firstname”** and **“lastname”**.
* Update the value for emailaddress to user.userprincipalname
**Configure User Attributes and Claims**
* In the **“Attributes & Claims”** section, click the edit icon.
* Ensure that the necessary user attributes (e.g., email, name) are correctly mapped to the corresponding claims required by your application.
* Remove the name space URIs for **“givenname”** and **“surname”** and update the keys to **“firstname”** and **“lastname”**.
* Update the value for emailaddress to user.userprincipalname
 **Download the SAML Signing Certificate**
* In the **“SAML Signing Certificate”** section, download the **“Certificate (Base64)” or Federation Metadata XML**.
Certificate may be required by your application to verify the SAML token’s signature.
**Enable AirMDR access to Azure AD metadata**
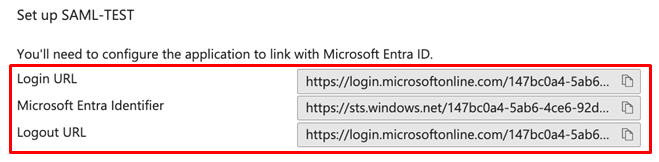
* Copy the **“Login URL and Microsoft Entra Identifier”** from the **“Set up \[Your Application Name]”** section.
**Download the SAML Signing Certificate**
* In the **“SAML Signing Certificate”** section, download the **“Certificate (Base64)” or Federation Metadata XML**.
Certificate may be required by your application to verify the SAML token’s signature.
**Enable AirMDR access to Azure AD metadata**
* Copy the **“Login URL and Microsoft Entra Identifier”** from the **“Set up \[Your Application Name]”** section.
 **Set up and configure SSO in AirMDR UI**
* Log in to the [AirMDR](https://app.airmdr.com).
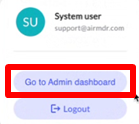
* On the bottom left, click on the **User** and select **Go to Admin dashboard**.
**Set up and configure SSO in AirMDR UI**
* Log in to the [AirMDR](https://app.airmdr.com).
* On the bottom left, click on the **User** and select **Go to Admin dashboard**.
 * Select the Organization for which SSO has to be set up.
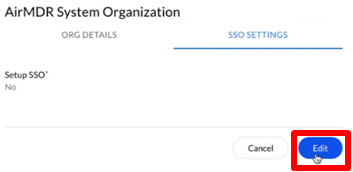
* Under the **SSO SETTINGS** tab, click **Edit**.
* Select the Organization for which SSO has to be set up.
* Under the **SSO SETTINGS** tab, click **Edit**.
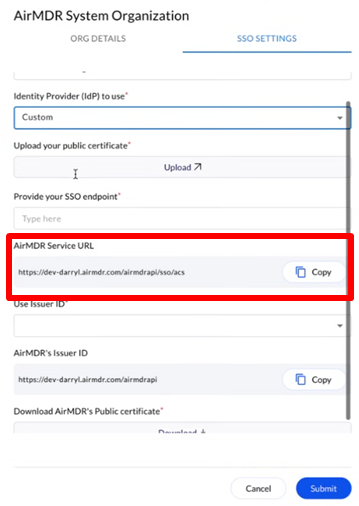
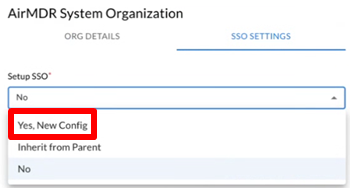
 * In the **Setup SSO** dropdown list, select **Yes, New Config**.
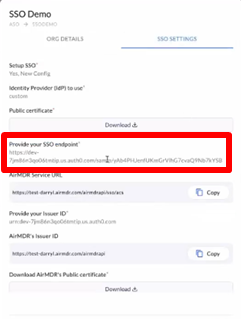
 * In the **SSO SETTINGS**, provide the SAML Protocol Configuration Parameters from Azure AD
- In the **Identity Provider (IdP) to use** dropdown list select **Custom**
- Use **Upload** option to include the **Identity Provider Certificate** from Azure AD
- In the **Provide your SSO endpoint**, enter the Identity Provider **Login URL** from Azure AD
- In the **Use Issuer ID** dropdown, select **Yes** and provide **Issuer ID** from Azure AD
- In the **Provide your Issuer ID**, enter the **Microsoft Entra Identifier**
* Click **Submit**. (SSO Authentication is successfully created for your account).
* In the **SSO SETTINGS**, provide the SAML Protocol Configuration Parameters from Azure AD
- In the **Identity Provider (IdP) to use** dropdown list select **Custom**
- Use **Upload** option to include the **Identity Provider Certificate** from Azure AD
- In the **Provide your SSO endpoint**, enter the Identity Provider **Login URL** from Azure AD
- In the **Use Issuer ID** dropdown, select **Yes** and provide **Issuer ID** from Azure AD
- In the **Provide your Issuer ID**, enter the **Microsoft Entra Identifier**
* Click **Submit**. (SSO Authentication is successfully created for your account).
 **Assign Users & Groups**
* Select **“Users and groups”** from the left-hand menu, assign users/groups who will use SSO.
* Click **“Add user/group”**, select the users or groups you want to assign to the application, and click **“Assign”**.
Configure **Conditional Access Policies** for security if needed.
### Evaluate SSO Configuration
* Navigate to the [AirMDR Login](https://app.airmdr.com) page.
* Enter the User **Email** ID assigned to the Azure SAML application, and click **Proceed to Login**.
**Assign Users & Groups**
* Select **“Users and groups”** from the left-hand menu, assign users/groups who will use SSO.
* Click **“Add user/group”**, select the users or groups you want to assign to the application, and click **“Assign”**.
Configure **Conditional Access Policies** for security if needed.
### Evaluate SSO Configuration
* Navigate to the [AirMDR Login](https://app.airmdr.com) page.
* Enter the User **Email** ID assigned to the Azure SAML application, and click **Proceed to Login**.
 * The page will be redirected to the Azure AD URL provided as the **SSO Endpoint** in the **SSO SETTINGS**.
 * Ensure that the test user can sign in successfully using Azure AD credentials.
* After successful login, the user should be redirected to [Test case](https://test-darryl.airmdr.com/casesv2) with a valid session
Hurray! You are Logged in Successfully
* Ensure that the test user can sign in successfully using Azure AD credentials.
* After successful login, the user should be redirected to [Test case](https://test-darryl.airmdr.com/casesv2) with a valid session
Hurray! You are Logged in Successfully