Pre-requisites
Microsoft 365 Tenant & Azure AD Access
- A Microsoft 365 account with Azure Active Directory (Azure AD) access
- If you don’t have one, you can sign up for a free trial at https://signup.microsoft.com and receive an your‑tenant.onmicrosoft.com domain plus a 30‑day evaluation of Microsoft 365 and Azure AD.
Azure AD App Registration Permissions
- Global Admin or App Registration Administrator role in Azure AD is required to register an app in Azure Active Directory
Setup Microsoft Graph API
Setting up the Microsoft Graph API involves a few steps, including registering an app in Azure AD and configuring permissions.1
Register an App in Azure AD
- Go to Azure Portal.
-
Search and select “Microsoft Entra ID” in the search bar.
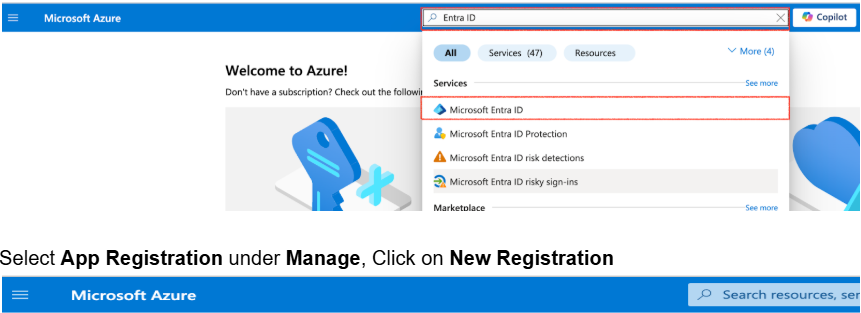
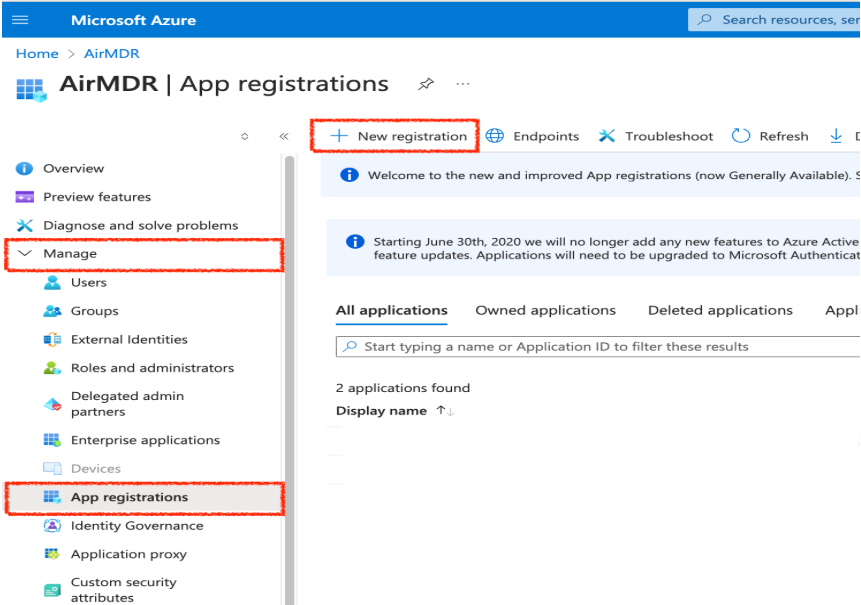
- Navigate to Manage → App registrations.
-
Click + New registration.
-
Provide:
- Name: For e.g., “graphapi-client-airmdr”
- Supported account types: Select “Accounts in any organizational directory (Any Microsoft Entra ID tenant - Multitenant)” option).
-
Click Register.
Post successful registration, the application must open automatically if not
- Search for Microsoft Entra ID.
- Select Manage → App registrations.
- Select the All Applications tab.
- Search and click on the registered app (For e.g., “graphapi-client-airmdr”).
2
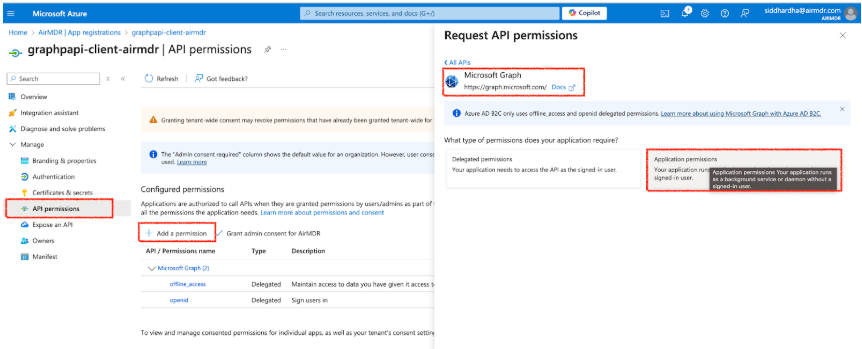
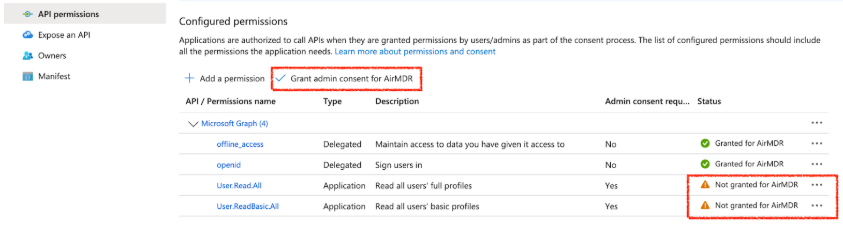
Configure API Permissions
- Go to Manage → API Permissions in the app settings.
- Click + Add a permission.
- Select Microsoft Graph.
- Choose Application permissions.
- To use the Skills in AirMDR Integration select the required permissions as stated below:
- To Disable / Enable User -
User.EnableDisableAccount.All+User.Read.All - To Fetch User Details -
User.Read.All - To Fetch Audit Logs (Sign Ins or Directory Audits) -
AuditLog.Read.All - To Reset User Password -
User-PasswordProfile.ReadWrite.All - To Fetch User Groups -
Directory.Read.All - To Revoke Sign-In Session -
User.RevokeSessions.All - To Fetch Office Calendar on userId -
Calendars.Read - To List Alerts -
SecurityEvents.Read.All+SecurityAlert.Read.All+SecurityIncident.Read.All - To Run Hunting Query -
ThreatHunting.Read.All - To List / Update Incident and Create Incident -
SecurityIncident.ReadWrite.All - To Send an Email -
Mail.Send
- To Disable / Enable User -
- Click on Add Permissions.
- In API permissions, click Grant admin consent.
- In the Grant admin consent confirmation modal, click Yes.
3
Create Client Secret (For Authentication)
- In the left navigation pane, go to Manage → Certificates & secrets.
- Select Client Secrets tab.
- Click + New client secret.
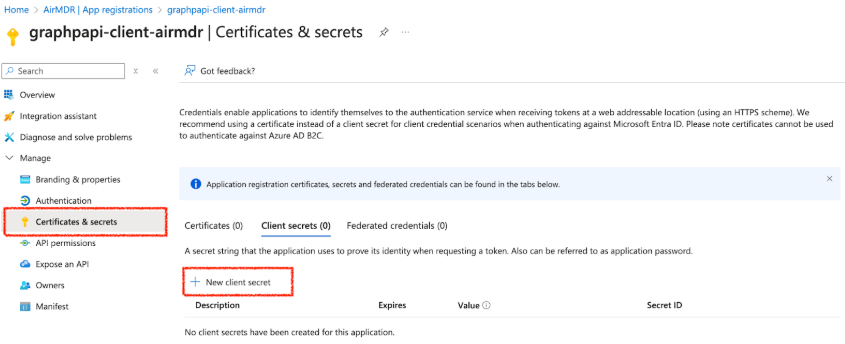
- Add a description and expiration period.
- Click Add.
4
Securely share the Client ID and Tenant ID to AirMDR
To access the Client ID, and the Tenant ID to use in Graph API authentication
- Go to Azure Portal.
- Navigate to Azure Active Directory.
- Click App registrations.
- Select your registered app.
- Under the Overview section, locate the Application (client) ID and Tenant ID (Directory ID).
- Click the Copy icon 📋 next to the Client ID, and the Tenant ID respectively.
Now, your Tenant ID and Client ID are copied and ready to use for authentication in Microsoft Graph API.Share the Tenant ID, Client ID, and Client Secret Value securely with the AirMDR operations team or self-configure them in the AirMDR Integrations Dashboard.
Skills Provided by this Integration
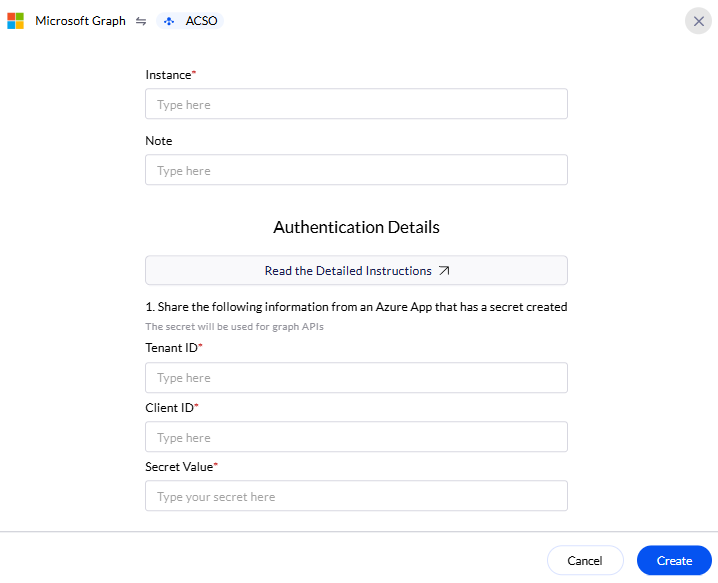
Configure Microsoft Graph in AirMDR Integrations Dashboard
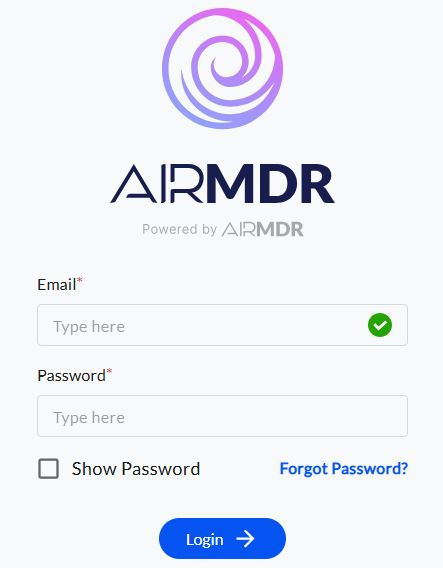
- Navigate to AirMDR, provide the credentials and click Login.
- Navigate to the AirMDR Integrations Dashboard in the left navigation pane and select Integrations.
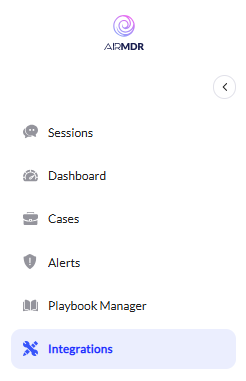
- Use the search option, enter the keyword “Microsoft Graph”, select the Connections tab, and click the + Create icon.

- Enter the generated Tenant ID, Client ID and the Client Secret in the Authentication Details field params, and click Create.